This survey will take about 1 minute.
Your answers will help us to improve our website.
Warcraft Rumble
How to Beat The Dreadnaught Westfall Campaign Guide
★ Check out our masterfully crafted builds: List of Builds
★ See our Tier Lists: Minis Tier List | Leaders Tier List
★ Learn how to play with our Tips & Tricks Guides!
★ Look for Guildmates in our Guild Board!
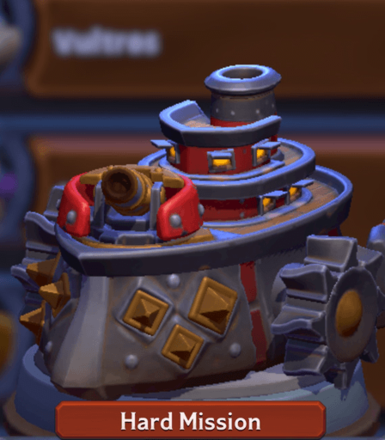
The Dreadnaught is the boss for Campaign Map 2-5 of the Westfall Zone in Warcraft Rumble. Read on to learn how to beat Heroic Dreadnaught, the enemies that spawn along it, rewards for beating it, as well as the map layout and recommended setup for The Dreadnaught!
List of Contents
The Dreadnaught Overview
The Dreadnaught Info
| The Dreadnaught Information | |
|---|---|
 The Dreadnaught The Dreadnaught |
|
| Stage | 2-5 Westfall |
| Required Onyxia Sigil | 9 |
| Recommended Deck Level | Level 3 |
| Level Description | |
|
This stage is a Hard Mission. Van Cleef got tired of his doors being used for cannon target practice. Your base will make a fine substitute. |
|
The Dreadnaught Special Ability
| Boss Tactic | Bombards lanes. Cannon changes direction slowly. Weak to Siege damage. |
|---|
The Dreadnaught Rewards
| First Clear Rewards | ||
|---|---|---|
1 |
Squad Troop, Guilds | |
Recommended Minis Setup
Go For a Siege Deck with Melee Minis
| Siege with Melee Deck Build | |||
|---|---|---|---|
|
|
|
|
|
|
|
|
|
|
This deck focuses on Siege units because the Dreadnaught is weak against Siege damage. With that, it would be good to have at least 2 strong Siege Minis, like Sneed and Earth Elemental in your deck.
Additionally, you will want to have at lleast 2 strong Melee Minis to support your siege units, such as Gnoll Brute, Prowler, or Ghoul since the Dreadnaught's cannons can punish units with low health.
How to Beat Heroic Dreadnaught
Below are the following guides to help you complete the Heroic Campaign Map of The Dreadnaught.
- The Dreadnaught Now Has Two Cannon Markers
- Send Out Minis Away From The Cannon Markers
- Overwhelm the Left Lane With Minis
The Dreadnaught Now Has Two Cannon Markers
For this Heroic version of The Dreadnaught, the boss will now have two cannon markers moving around the map. This means that The Dreadnaught can now fire its cannonballs at two separate targets in different locations.
Send Out Minis Away From The Cannon Markers
One way to avoid cannon fire is to send out Minis toward strategic locations where you could avoid the roaming markers circling the area. Make use of the blue arrows on the map to direct where your Minis can avoid the markers.
You could also wait out the cannon markers as it slowly moves away from your dispatch locations. After the markers have passed, begin sending out Minis to gain control of the battle.
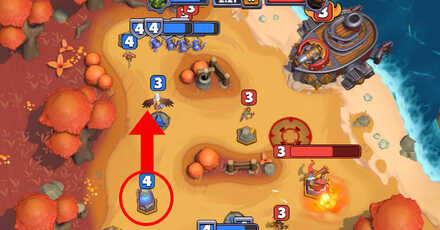
Overwhelm the Left Lane With Minis
It is recommended that you overwhelm The Dreadnaught by sending out Minis on the left lane, which can help you claim the meeting stone along the path and give you the shortest distance possible to reach the boss.
How to Beat Dreadnaught
Below are the following guides to help you complete the Campaign Map of The Dreadnaught.
- Avoid the Cannon's Marker
- Take the Guard Tower and the Meeting Stone
- Put Pressure on the Dreadnaught
Avoid the Cannon's Marker
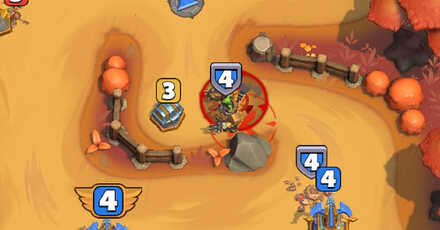
One thing you need to keep in mind is what lane the cannon marker is at. Try to avoid the marker as much as you can by placing your Minis on the lane it is not aiming at. The marker has a slow and predictable path that circles around the map, so take the time to study its pattern as you battle.
You can also redirect your units to a different lane by utilizing the blue arrows on the ground. Change the direction of your Minis by clicking on the arrows before they get to it.
Take the Guard Tower and the Meeting Stone
It is important you take the Guard Tower and Meeting Stone in the middle of the map since it will let you avoid the cannons and reach the Dreadnaught faster. Send in your Siege and Damage Minis on the right lane, and make sure the blue arrow is pointing to the right. For the left lane, you can send in a Tank, a damage dealer, and a Kobold to mine the ore veins along the way.
Note that it will be difficult controlling the Guard Tower since you will have to deal with the tower, enemies, and the cannons while your units stand still. Alternatively, you can ignore the tower and send most of your units to the left side.
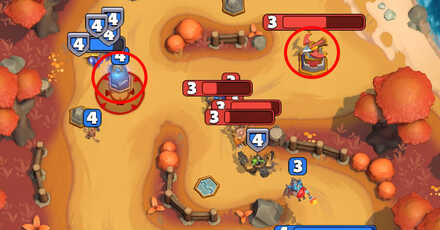
Put Pressure on the Dreadnaught
Once you have taken the Meeting Stone, start sending your units on the stone and utilize the blue arrow to avoid the cannon's marker. Your Minis will be able to put pressure on the Dreadnaught and its enemy units while you take the Guard Tower.
Also, ensure that you summon at least one Siege Mini with your units since the Dreadnaught is weak against Siege damage. The enemies will have a difficult time dealing with you once you start attacking from these points.
The Dreadnaught Map Layout
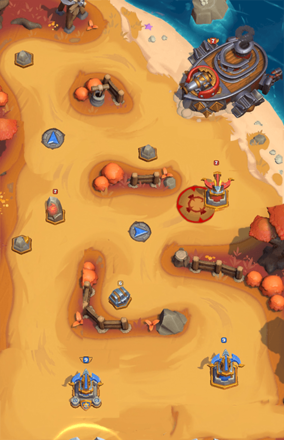
Westfall 2-5 has two exit lanes from your base, but will have 3 lanes to try and attack Dreadnaught. With only a singular Enemy Tower and one Meeting Stone, your biggest challenge is to avoid the cannon that Dreadnaught uses over the entire field.
Warcraft Rumble Related Guides

Warcraft Rumble Campaign Guide
Other Bosses in Westfall
| Region Bosses | |
|---|---|
| 2-1 | |
| 2-2 | |
| 2-3 | |
| 2-4 | |
| 2-5
(Hard) |
|
All Region Campaign Guides
| This section is currently being updated. Thank you for your patience! |
| All Regions | ||
|---|---|---|
| Elwynn Forest | Westfall | Duskwood |
| Stranglethorn Vale | The Barrens | Ashenvale |
| Darkshore | Thousand Needles | Lordaeron |
| Hinterlands | Dustwallow Marsh | Un'Goro Crater |
| Winterspring | Plaguelands | Blackrock Mountain |
Comment
Author

How to Beat The Dreadnaught Westfall Campaign Guide
Please participate in our site
improvement survey
04/2026
improvement survey
04/2026
Would you assist in
improving Game8's site?
improving Game8's site?

×
We are listening to our users' valuable opinions and discussing how to act on them.
The information collected through this survey will be used for the purpose of improving our services. In addition, the information will only be disclosed a part of a statistic in a format that will not allow identification of personal information.
Begin Survey
Not Now
×
Please rate each item regarding Game8.co's Advertisements.
Amount of Ads
Very Dissatisfied
Somewhat Dissatisfied
Fine
Somewhat Satisfied
Highly Satisfied
Placement of Ads
Timing of Ad Display
Ad Loading Speed
Safeness of Ads
Content of Ads
×
Please rate each item regarding Game8.co's Quality of Articles.
Amount of information
Very Dissatisfied
Somewhat Dissatisfied
Fine
Somewhat Satisfied
Highly Satisfied
Frequency of updates
Speed of new information
Accuracy of articles
Understandibility of articles
Readability of sentences
×
Please rate each item regarding Game8.co's Usability of the Site.
Ease of finding information
Very Dissatisfied
Somewhat Dissatisfied
Fine
Somewhat Satisfied
Highly Satisfied
Loading Speed
Use of Color
Font Size
Visibility of Images
Easy to Understand Layout
×
Please rate each item regarding Game8.co's Message Boards, Comments.
Ease of Writing
Very Dissatisfied
Somewhat Dissatisfied
Fine
Somewhat Satisfied
Highly Satisfied
Readability
Ease in Finding Information
Comment Quality
Comment Quantity
Admin Response
×
Please rate each item regarding Game8.co's Site's new design.
Please rate our site's new design
Very Dissatisfied
Somewhat Dissatisfied
Fine
Somewhat Satisfied
Highly Satisfied
Do you think that the website's design change makes the site easier to use?
Has the new design made it easier for you to find information on the site?
Has the new design improved the overall visual appeal of the site?
How would you rate your overall satisfaction with the new design of the site?
×
How likely are you to recommend Game8 to someone you know?
Very Unlikely
0
1
2
3
4
5
6
7
8
9
10
Very Likely
If you have other opinions regarding potential improvement to the website, please share them with us. We would appreciate your honest opinion.
Note: This is a free response section, so you can proceed without entering anything.
Note: Please be sure not to enter any kind of personal information into your response.
Note: Please be sure not to enter any kind of personal information into your response.
×
Thank You
×
Thank you for participating in our survey! Your answers will help us to improve the quality of our website and services.
We hope you continue to make use of Game8.
We hope you continue to make use of Game8.
Close
Rankings
- We could not find the article you were looking for.
- We could not find the message board you were looking for.
Gaming News


![Forza Horizon 6 Review [Preview] | Beautiful Roads With a Whole Lot of Oversteer](https://img.game8.co/4460981/a7254c24945c43fbdf6ad9bea52b5ce9.png/thumb)
Popular Games

Genshin Impact Walkthrough & Guides Wiki
Crimson Desert Walkthrough & Guides Wiki
Umamusume: Pretty Derby Walkthrough & Guides Wiki
Honkai: Star Rail Walkthrough & Guides Wiki
Monster Hunter Stories 3: Twisted Reflection Walkthrough & Guides Wiki
Wuthering Waves Walkthrough & Guides Wiki
The Seven Deadly Sins: Origin Walkthrough & Guides Wiki
Pokemon TCG Pocket (PTCGP) Strategies & Guides Wiki
Pokemon Pokopia Walkthrough & Guides Wiki
Zenless Zone Zero Walkthrough & Guides Wiki


Recommended Games
Monster Hunter World Walkthrough & Guides Wiki
Fire Emblem Heroes (FEH) Walkthrough & Guides Wiki
Pokemon Brilliant Diamond and Shining Pearl (BDSP) Walkthrough & Guides Wiki
Super Smash Bros. Ultimate Walkthrough & Guides Wiki
Diablo 4: Vessel of Hatred Walkthrough & Guides Wiki
Cyberpunk 2077: Ultimate Edition Walkthrough & Guides Wiki
Yu-Gi-Oh! Master Duel Walkthrough & Guides Wiki
Elden Ring Shadow of the Erdtree Walkthrough & Guides Wiki
The Legend of Zelda: Tears of the Kingdom Walkthrough & Guides Wiki
Persona 3 Reload Walkthrough & Guides Wiki


All rights reserved
©2023 Blizzard Entertainment, Inc.
The copyrights of videos of games used in our content and other intellectual property rights belong to the provider of the game.
The contents we provide on this site were created personally by members of the Game8 editorial department.
We refuse the right to reuse or repost content taken without our permission such as data or images to other sites.