★ Season 4 is live as of May 14, 2024!
┗ S4 Journey | S4 Questline | S4 Battle Pass
★ Learn more about Season 4 Itemization Changes
┗ Tempering System | Masterworks System
★ Helltide Reborn | The Pit of Artificers
★ Tormented Bosses | Echo of Andariel

This is a Season 1 Hydra Conjuration endgame build for Sorcerer in Diablo 4 (D4) that takes advantage of the synergy around Hydra and Conjuration Skills in general. This build was made to reliably push high-tier Nightmare Dungeons, as it can eliminate enemies from a safe distance. Read on to learn all the Gear, Skills, and Aspects you need and how to play the build for Season 1 (Version 1.1).
List of Contents
| Jump to a Section! | |||||
|---|---|---|---|---|---|
Check out a Tier 100 Nightmare Dungeon run of a level 85 Sorcerer using this build!
This is a range-oriented endgame Conjuration build that capitalizes on Fire Damage through the use of Hydra and several other Aspects, Skills, and Paragon Nodes. This is amplified by Malignant Hearts, notably The Barber, Tal’Rasha and Tempting Fate to maximize burst damage output.
Aside from the safety of dealing damage from afar, this build has numerous defensive attributes acquired from Affixes, Aspects, and Paragon Nodes. You will find this build to be quite capable of taking hits while delivering them to enemies as well.
You will find this to be a reliable range build that can both deliver burst damage and Damage over Time to comfortably take down enemies on the highest difficulty.
| Jump to a Section! | |||||
|---|---|---|---|---|---|
| Skill | Upgrade Path | ||
|---|---|---|---|
|
(5 Points) |
→ |
|
|
|
(1 Point) |
→ |
|
|
|
(1 Point) |
→ |
|
|
|
(1 Point) |
→ |
|
|
|
(1 Point) |
→ |
|
|
|
(1 Point) |
→ |
|
|
| Hydra Conjuration Build Passives | ||
|---|---|---|
|
(3 Points) |
(1 Point) |
(3 Points) |
|
(3 Points) |
(1 Point) |
(3 Points) |
|
(3 Points) |
(3 Points) |
(3 Points) |
|
(2 Points) |
(1 Point) |
(3 Points) |
|
(X Points) |
||
| Recommended Skill Progression | ||||
|---|---|---|---|---|
| Lv.2 | Lv.3 | Lv.4 | Lv.5 | |
| | | |||
| Lv.6 | Lv.7 | Lv.8 | Lv.9 | |
| | | |||
| Lv.10 | Lv.11 | Lv.12 | Lv.13 | |
| | | |||
| Lv.14 | Lv.15 | Lv.16 | Lv.17 | |
| | | |||
| Lv.18 | Lv.19 | Lv.20 | Lv.21 | |
| Lv.22 | Lv.23 | Lv.24 | Lv.25 | |
| Lv.26 | Lv.27 | Lv.28 | Lv.29 | |
| | | |||
| Lv.30 | Lv.31 | Lv.32 | Lv.33 | |
| | | |||
| Lv.34 | Lv.35 | Lv.36 | Lv.37 | |
| | | | ||
| Lv.38 | Lv.39 | Lv.40 | Lv.41 | |
| | ||||
| Lv.42 | Lv.43 | Lv.44 | Lv.45 | |
| | | | | |
| Lv.46 | Lv.47 | Lv.48 | Lv.49 | |
| | | | | |
| Renown Skill Points (Lv50 Onwards) | ||||
| R1 | R2 | R3 | R4 | |
| | | | | |
| R5 | R6 | R7 | R8 | |
| | | | | |
| R9 | R10 | |||
| | | |||
| Hydra Conjuration Build Enchantment Slots | |
|---|---|
|
(Level 15) |
(Level 30) |
Frost Nova Enchantment is extremely valuable to both make your enemies Frozen and Vulnerable. Combine this with Hydra's proc rate and range, and most enemies will die before ever reaching you.
Frozen Orb is your next Enchantment due to how high it can proc and due to the fact that it can make enemies Vulnerable with the Greater Frozen Orb Skill Passive. Additional sources of damage and Vulnerable are always a good thing.
| Sorcerer Leveling Enchantment Slots | |
|---|---|
|
(Level 15) |
(Level 30) |
This alternative Enchantment slot section is meant to provide a defensive approach for taking on high-tier Nightmare Dungeons. Swap out Frozen Orb enchantment. Swap out with Flame Shield as a safety net that will prevent you from being killed in a single hit.
Frost Nova will remain, as this is exceptionally valuable for both Crowd Control and Vulnerable applications.
| Jump to a Section! | |||||
|---|---|---|---|---|---|
| Weapon | Aspects and Affixes |
|---|---|
| Wand | You may have 1 additional Hydra active, but Hydra’s duration is reduced by (20-10)%. ・+X% Lucky Hit Chance (Inherent) ・+X% Vulnerable Damage ・+X% Critical Strike Damage ・+X All Stats ・+X Intelligence |
| Focus | You deal (25-35)% more damage to Immobilized, Stunned, or Frozen enemies. ・+X% Cooldown Reduction (Inherent) ・+X% Cooldown Reduction ・+X% Critical Strike Chance ・+X% All Stats ・+X Intelligence |
| Equipment | Aspects and Affixes |
|---|---|
| Helmet | Frost Nova gains an additional Charge but the Cooldown per Charge is increased by (30-40)%. ・+X Rank Hydra ・+X% Cooldown Reduction ・+X% Maximum Life ・+X All Stats |
| Chest | After using Teleport, Close enemies are Pulled to you and Stunned for (XX) seconds, but Teleport's cooldown is increased by 20%. ・+X Intelligence ・+X% Damage to Close Enemies ・+X% Damage to Stunned Enemies ・+X Rank to Glass Cannon Passive |
| Gloves | Skills deal up to (10-20)% increased damage based on your available Primary Resource when cast, receiving the maximum benefit while you have full Primary Resource. ・+X% Critical Strike Chance ・+X% Attack Speed ・+X% Lucky Hit Chance ・+X All Stats |
| Pants | You gain (0.25-0.50)% increased Armor for 4 seconds when you deal any form of damage, stacking up to (66)%. ・While Injured, Your Potion Also Grants (XX)% Maximum Life as Barrier (Inherent) ・+X% Damage Reduction from Distant Enemies ・+X% Damage Reduction from Close Enemies ・+X% Damage Reduction ・+X Maximum Life |
| Boots | Flame Shield lets you move unhindered through enemies. Enemies you move through while Flame Shield is active are Immobilized for (XX) seconds. ・Evade Briefly Grants X% Movement Speed (Inherent) ・+X Ranks Teleport ・+X Ranks Frost Nova ・+X% Movement Speed ・+X All Stats |
| Jewelry | Aspects and Affixes |
|---|---|
| Amulet | While both bonuses from the Esu’s Ferocity Key Passive are active, your Attack Speed is increased by (40-50)%. ・+X% Resistance to All (Inherent) ・+X Ranks Devouring Blaze ・+X Ranks Conjuration Skills ・+X Ranks Conjuration Mastery ・+X% Cooldown Reduction |
| Ring | You deal (11-20)% increased damage to Vulnerable enemies while you have Barrier. ・+X% Resistance (Inherent) ・+X% Resistance (Inherent) ・+X% Vulnerable Damage ・+X% Critical Strike Chance ・+X% Critical Strike Damage ・+X Maximum Life |
| Ring | Deal (15-25)% increased damage while you have a Barrier active. ・+X% Resistance (Inherent) ・+X% Resistance (Inherent) ・+X% Vulnerable Damage ・+X% Critical Strike Chance ・+X% Critical Strike Damage ・+X Maximum Life |
| Jump to a Section! | |||||
|---|---|---|---|---|---|
| Item Type | Effect |
|---|---|
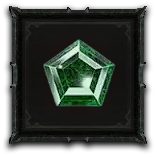 Royal Emerald (Weapon) Royal Emerald (Weapon) |
+12.0% Critical Strike Damage to Vulnerable Enemies |
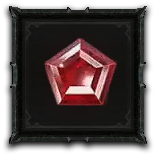 Royal Ruby (Armor) Royal Ruby (Armor) |
4.0% Maximum Life |
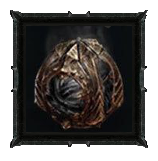 The Barber The Barber |
Type: Wrathful Critical Strikes and all subsequent damage within 2.0-4.0 seconds is absorbed by your target. Then, the absorbed damage erupts onto surrounding enemies. Stored damage is increased by 10% per second. |
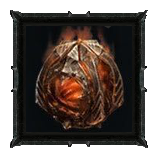 Tal’Rasha Tal’Rasha |
Type: Vicious For each unique element you deal damage with, you deal 7-12% increased damage for 3-10 seconds. |
| Tempting Fate |
Type: Vicious You gain 40-60% Critical Strike Damage but your Non-Critical Strikes deal 20-15% less damage. |
For the Gems section of the build, you would want to slot in Emerald for additional Critical Strike Damage to Vulnerable enemies. You can consistently apply Vulnerable to all types of enemies with Frost Nova, which is found in both your Enchantments and active skill bar.
Ruby, on the other hand, is of great value to Sorcerers, as they have relatively low health. The Protection Skill Passive also scales with Maximum Life to give you a tougher Barrier!
For Malignant Hearts, Tal'Rasha is almost a staple damage-boosting heart among Sorcerer builds, as you have easy access to Fire, Ice, and Lightning Elements.
Combine this with one of the best Wrathful Hearts in the game, The Barber, and you get a significant increase in burst damage. In addition, you will get a 4th stack of Tal'Rasha due to The Barber procs being considered as Shadow Damage.
Last but certainly not least, slot in Tempting Fate to add more Critical Strike Damage which complements with The Barber for more burst damage.
Creeping Death is a great Wrathful Heart to boost Damage over Time effects. And although this build also capitalizes on Burning damage, this was not placed due to the stronger nature of The Barber Malignant Heart and the way Damage over Time works in general.
The Barber Malignant, especially with lower seconds, will allow you to dispatch enemies quicker than waiting for the Damage over Time to deplete the enemies' health bars. Not only do you have faster clearing time with this, but it will affect your overall survival since enemies can still attack you until the Damage over Time effects reach the end of their health bar.
Furthermore, kills from The Barber procs synergize with the Esu's Ferocity Key Passive, which then triggers the Aspect of Ancient Flame effect. This synergy boosts Hydra's overall damage and attack speed.
The Creeping Death heart might be considered in the upcoming Patch 1.1.1 with the Combustion Key Passive buff. Make sure to check back for updates!
| Jump to a Section! | |||||
|---|---|---|---|---|---|
| No. | Board | Essential Nodes |
|---|---|---|
| 1 | Starting Board | Elementalist (Glyph) Elementalist (Rare) Elemental Balance (Rare) |
| 2 | Frigid Fate | Conjurer (Glyph) Oppressive (Rare) Chilling (Rare) Weakness (Rare) Guarded (Rare) |
| 3 | Burning Instinct | Burning Instinct (Legendary) Destruction (Glyph) Cinders (Rare) Smoldering Embers (Rare) Safeguard (Rare) Keeper of Flames (Rare) |
| 4 | Elemental Summoner | Elemental Summoner (Legendary) Control (Glyph) Swift Conjurer (Rare) Conjurer (Rare) |
| 5 | Static Surge | Exploit (Glyph) Incapacitate (Rare) |
| 6 | Searing Heat | Flamefeeder (Glyph) Flame-Touched (Rare) Ashes (Rare) |
| Hydra Conjuration Build Build Tips |
|---|
|
|
| 1 | Cast both of your Hydra to start damaging enemies from a distant |
|---|---|
| 2 | Cast your other Conjuration Skills, Lightning Spear and Ice Blades, for extra Crowd Control and damage, as well as to benefit from related skill passives |
| 3 | Use Teleport to group up and Stun the enemies from the Raiment of the Infinite Unique passive |
| 4 | If the Frost Nova Enchantment has yet to proc, cast the Frost Nova in your active skill bar to freeze enemies and make them Vulnerable |
| 5 | Use Flame Shield as needed for sustain and survival |
| 1 | Cast both of your Hydra upon entering the Boss area |
|---|---|
| 2 | Cycle through your Cooldowns to try and deplete the Boss' stagger bar |
| 3 | Focus on dodging the Boss' attacks and let Hydra deal the damage for you |
| 4 | Save your Flame Shield for surviving heavy attacks |
Practice continuously recasting Hydra, even if there are already two sets of them active, for repositioning. This directly affects which mob the Hydras target, so make sure to position them depending on which enemy you want to target first. If an Elite is going straight after you, it's better to back away and recast Hydra next to you instead of circling back around your initial cast.
Recasting Hydra often will also allow you to reach the requirements to activate the Mana Shield Skill Passive, which will give you a tremendous 21% Damage Reduction for 5 seconds. However, be careful, as using too much Mana will cause you to lose additional damage coming from the Edgemaster's Aspect.
You can also use Hydra to scout and locate enemies off screen, giving you the upper hand by engaging first.
It's easy to forget about using Lightning Spear and Ice Blades when Hydra is doing most of the damage in this build; however, the benefits of keeping them active on the field as much as possible is not to be ignored.
Lightning Spear can guarantee consistent Stun to enemies through the combination of its passives, Enhanced Lightning Spear and Invoked Lightning Spear. On the other hand, Ice Blades can greatly reduce all of your skill cooldowns through Enhanced Ice Blades and Summoned Ice Blades.
In addition, keeping all your Conjuration Skills active on the field will give you the 4 stacks of the Conjuration Mastery Skill Passive. This bonus will give you a notable 12% multiplicative bonus on the damage that you deal.
One of the beauties of this build is its ease of use. All of your Conjuration Skills will automatically seek out and attack enemies nearby. This negates the need to target enemies and will allow you to focus more on dodging attacks, which will significantly raise your overall survivability.

| All Classes | |||||
|---|---|---|---|---|---|
| List of Builds | ||
|---|---|---|
 Arc Lash Charged Bolts Arc Lash Charged Bolts
(PVE) |
 Ball Lightning Ball Lightning
(PVE) |
 Blizzard Blizzard
(PVE) |
 Chain Lightning Chain Lightning
(PVE) |
 Fireball Fireball
(PVE) |
 Fireball Meteor Fireball Meteor
(PVE) |
 Sorcerer Leveling Sorcerer Leveling
(Leveling) |
||

Season 1 Hydra Conjuration Endgame Build

Genshin Impact Walkthrough & Guides Wiki

Honkai: Star Rail Walkthrough & Guides Wiki

Pokemon Scarlet and Violet (SV) Walkthrough & Guides Wiki

FF7 Rebirth Walkthrough & Guides Wiki

Stellar Blade Walkthrough & Guides Wiki

Monster Hunter Rise: Sunbreak Walkthrough & Guides Wiki

Persona 3 Reload Walkthrough & Guides Wiki

Palworld Walkthrough & Guides Wiki

Pokemon UNITE Walkthrough & Guides Wiki

Call of Duty Modern Warfare 3 (MW3) Walkthrough & Guides Wiki

Elden Ring Walkthrough & Guides Wiki

Super Smash Bros. Ultimate Walkthrough & Guides Wiki

Pokemon Legends: Arceus Walkthrough & Guides Wiki

FF7 Remake Walkthrough & Guides Wiki

New Pokemon Snap Walkthrough & Guides Wiki

Hyrule Warriors: Age of Calamity Walkthrough & Guides Wiki

The Legend of Zelda: Breath of the Wild Walkthrough & Guides Wiki
©2022 BLIZZARD ENTERTAINMENT, INC. ALL RIGHTS RESERVED.
All trademarks referenced herein are the properties of their respective owners.
The copyrights of videos of games used in our content and other intellectual property rights belong to the provider of the game.
The contents we provide on this site were created personally by members of the Game8 editorial department.
We refuse the right to reuse or repost content taken without our permission such as data or images to other sites.