★ Season 3 is live as of January 23, 2024!
┗ S3 Journey | S3 Questline | S3 Battle Pass
★ Season 3 Class Tier List | Best Season 3 Blessings
★ Learn more about Seneschal Companions
┗ Governing Stones | Tuning Stones
★ Vaults | Nightmare Vaults | Arcane Tremors

This is a Season 2 Double Swing endgame build for Barbarian in Diablo 4 (D4) that centers around the deadly synergy between Double Swing and Dust Devils to have a reliably swift build that can excel in both single target and AoE. Read on for the complete list of Vampiric Powers, Skills, and Aspects you need and how to play the build for Season 2 and Abattoir of Zir.
List of Contents
| List of Pros |
|---|
This build particularly excels when fighting huge hordes of enemies, which is perfect for the new pinnacle content, the Abattoir of Zir. You'll find yourself hacking and slicing through groups of enemies with the build's fast attack speed and Fury generation.
The synergy between the build's high attack speed and the Undying Vampiric Power makes the build have remarkably high sustainability. You can generate enormous amounts of Health while dealing damage, allowing you to continuously be on the offensive.
This is an extremely fun build, as you can swiftly decimate enemies due to the damage that it can dish out in a short period of time. If you want a build with fast and high clearing potential, then this is something you definitely must try out!
| List of Cons |
|---|
One of the downsides of this build is the Fury generation issue when fighting against bosses. Whenever you have a hard time clearing out enemies, your Fury generation lessens due to the Seething Glyph not activating.
This is noticeable during boss fights, and the only way to combat it is to use Lunging Strike.
The Dust Devil mechanic has pretty good automatic pathing, but it can be unpredictable in certain terrains and when fighting Elites with the Suppressor affix. You have no option to specifically control these Dust Devils, which makes it a bit unrealiable overall.
| Jump to a Section! | |||||
|---|---|---|---|---|---|
| Build Overview and Summary | |||||
|---|---|---|---|---|---|
 Double Swing Double Swing | Tier: Focus: PVE Playstyle: Solo and Party | ||||
| Active Skills | |||||
| Passive Skills | |||||
| Build Overview and Summary | |||||
|---|---|---|---|---|---|
| Double Swing | Tier: Focus: PVE Playstyle: Solo and Party | ||||
| Aspects and Uniques | |||||
| Build Overview and Summary | |||||
|---|---|---|---|---|---|
| Double Swing | Tier: Focus: PVE Playstyle: Solo and Party | ||||
| Stat Priorities | Recommended Gems | ||||
| ・Critical Strike Damage ・Strength ・Lucky Hit Chance ・Fury Regeneration ・Maximum Life ・Damage while Berserking ・Attack Speed Bonus ・Maximum Resource | |||||
This build capitalizes on Double Swing and its interaction with Dust Devils to have a swift, close-range build that can excel in both single target and AoE. This build boasts an extremely high Attack Speed that can unleash multiple casts of Double Swing in a short period of time.
All other Skills, Aspects, Uniques, Paragon Nodes, and Vampiric powers focus on improving the build's damage and survivability. This build can undoubtedly clear the toughest Nightmare Dungeons and take on Uber Bosses.
| Jump to a Section! | |||||
|---|---|---|---|---|---|
| Skill | Upgrade Path | ||
|---|---|---|---|
|
(1 Point) |
→ |
|
|
|
(5 Points) |
→ |
|
|
|
(1 Point) |
→ |
|
|
|
(1 Point) |
→ | - | |
|
(1 Point) |
→ |
|
|
|
(1 Point) |
→ |
|
|
| Double Swing Passives | ||||
|---|---|---|---|---|
|
(3 Points) |
(3 Points) |
(3 Points) |
||
|
(3 Points) |
(3 Points) |
(3 Points) |
||
|
(3 Points) |
(3 Points) |
(3 Points) |
||
|
(1 Point) |
(3 Points) |
(2 Points) |
||
|
(3 Points) |
(3 Points) |
(1 Point) |
||
| Weapon Expertise | |
|---|---|
| Two-Handed Axe Expertise | 15% increased damage to Vulnerable Enemies |
The Two-Handed Axe Expertise is the best damage-boosting expertise for this build since you can constantly apply Vulnerable to enemies through the Exploit Glyph and Prey on the Weak Vampiric Power.
Arsenal System and Techniques Guide
| Jump to a Section! | |||||
|---|---|---|---|---|---|
| Vampiric Power Cost |
Effect Explanation |
|---|---|
 Metamorphosis Metamorphosis
|
When you Evade you turn into a cloud of bats, becoming Unstoppable for 4 seconds. Enemies along your path take 160% Physical damage and are inflicted with Vampiric Curse.
This power will make you Unstoppable whenever you dash, which is great for escaping enemy Crowd Control and activate Tibault's Will for additional damage and Fury. In addition, this also goes well with Prey on the Weak to make enemies Vulnerable by applying Vampiric Curse. |
 Undying Undying
|
Casting Skills heals you for 3% Life. Double this bonus while below 50% Life.
This power is great when paired with builds with high attack speed, as you can continuously recover HP at a fast rate. This will make your sustainability extremely high and encourage you to be on the offensive. |
 Prey on the Weak Prey on the Weak
|
You deal 16% increased damage to Vulnerable enemies. Enemies are Vulnerable while affected by a Vampiric Curse from your other Vampiric Powers.
This will make enemies Vulnerable whenever you apply Vampiric Curse to them through Metamorphosis, which is a good source of Vulnerable aside from your Exploit Glyph. Not to mention, this will allow you to deal significantly more damage to Vulnerable enemies. |
 Ravenous Ravenous
|
Lucky Hit: Up to a 20% chance to increase your Attack Speed by 40% of your Total Movement Speed for 6 seconds.
This will allow you to spam Double Swing at an extremely fast rate, increasing your overall damage per second. |
 Sanguine Brace Sanguine Brace
|
When you kill an enemy, Fortify for 6% of your Base Life. While you have more Fortify than half of your Maximum Life, you gain 8% Critical Strike Chance.
This will give you added survivability through Fortify and a consistent additional Critical Strike chance. |
| Total Pacts Required |
List of Vampiric Powers and Pacts Explained
| Jump to a Section! | |||||
|---|---|---|---|---|---|
| Weapon | Aspects and Affixes |
|---|---|
| Two-Handed Mace | Casting Double Swing twice within 1.5 seconds creates a Dust Devil that deals XX damage to enemies behind the target. ・+X% Overpower Damage (Inherent) ・+X% Damage While Berserking ・+X% Critical Strike Damage ・+X All Stats ・+X Strength |
| Two-Handed Sword | Increases your Critical Strike Damage by (60-100%). The other properties of this weapon can roll higher than normal. ・+X% Critical Strike Damage (Inherent) ・+X% Damage ・+X Maximum Life ・+X All Stats ・Ignores Durability Loss |
| One-Handed Sword | Skills using this weapon deal (0.2-0.4)% increased damage per point of Fury you have, but you lose 2 Fury every second. ・+X% Critical Strike Damage (Inherent) ・+X% Damage with Dual-Wielded Weapons ・+X% Damage to Close Enemies ・+X Maximum Fury ・+X Lucky Hit: Up to a 5% Chance to Restore Primary Resource |
| One-Handed Sword | Lucky Hit: Up to a (15-25)% chance to deal Shadow damage to surrounding enemies and reduce their damage done by 20% for 5 seconds. ・+X% Critical Strike Damage (Inherent) ・+X% Core Skill Damage ・+X% Damage ・+X Lucky Hit: Chance to Heal ・+X% Maximum Life |
| Equipment | Aspects and Affixes |
|---|---|
| Helmet | Gain (10.0-20.0)% Damage Reduction. In addition, gain +4 Ranks to all Skills. ・+X Maximum Life ・+X% Cooldown Reduction ・+X% Resource Generation ・+X All Stats |
| Chest | You gain (0.25-0.50)% increased Armor for 4 seconds when you deal any form of damage, stacking up to (66)%. ・+X Maximum Life ・+X% Damage Reduction ・+X% Total Armor ・+X% Damage Reduction While Fortified |
| Gloves | After generating 100 Fury your next Core Skill creates a Dust Devil that deals (XX) damage to enemies behind the target. ・+X Ranks of Double Swing ・+X% Lucky Hit Chance ・+X% Attack Speed ・+X% Critical Strike Chance |
| Pants |
Tibault's Will
You deal 20-40% increased damage while Unstoppable and for 4 seconds after. When you become Unstoppable, gain 50 of your Primary Resource. ・While Injured, Your Potion Also Restores 20% Resource (Inherent) ・+X% Damage Reduction from Close Enemies ・+X Potion Capacity ・+X% Damage ・+X% Maximum Resource |
| Boots | While Unstoppable, and for 4 seconds after, you gain (10=25)% increased Movement Speed and can move freely through enemies. ・+X Max Evade Charge (Inherent) ・+X% Movement Speed ・+X% Fury Cost Reduction ・+X% Damage Reduction While Injured ・+X All Stats |
| Jewelry | Aspects and Affixes |
|---|---|
| Amulet |
Banished Lord's Talisman
After you spend 300 of your Primary Resource, your next Core Skill is guaranteed to Overpower. Your Critical Strikes that Overpower deal 80-120% increased damage. ・+X% Resist All (Inherent) ・+X% Critical Strike Chance ・+X% Overpower Damage ・+X% Resource Generation ・+X Ranks of All Core Skills |
| Ring | Your Shout Skills generate (XX) Fury per second while active. ・+X% Resist All (Inherent) ・+X% Element Resistance (Inherent) ・+X% Resource Generation ・+X% Damage While Berserking ・+X Critical Strike Chance ・+X Maximum Life |
| Ring | Whenever you cast a Shout Skill, its Cooldown is reduced by (XX) seconds per Nearby enemy, up to a maximum of 6 seconds. ・+X% Resist All (Inherent) ・+X% Element Resistance (Inherent) ・+X% Resource Generation ・+X% Damage While Berserking ・+X Maximum Fury ・+X Maximum Life |
| Jump to a Section! | |||||
|---|---|---|---|---|---|
| Gem Type | Effect Explanation |
|---|---|
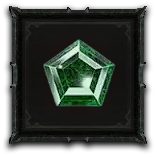 Royal Emerald Royal Emerald
(Weapon) |
+12.0% Critical Strike Damage to Vulnerable Enemies
This build has guaranteed Critical Strike procs and Vulnerable application, which allows this gem to provide a consistent damage boost. |
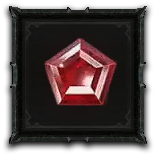 Royal Ruby Royal Ruby
(Armor) |
4.0% Maximum Life
More Maximum Life will give you better survivability. |
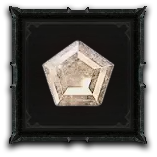 Royal Diamond Royal Diamond
(Jewelry) |
5.0% Resistance to All Elements
Resistances are now extremely important to withstand elemental attacks from enemies. |
If you have certain resistance affixes in your Chest and Boots, you can replace the Diamond gems slotted in your Jewelry and go for more specific resistances coming from Amethyst, Emerald, Ruby, Topaz, or Sapphire gems.
| Jump to a Section! | |||||
|---|---|---|---|---|---|
| No. | Board | Essential Nodes |
|---|---|---|
| 1 | Starting Board | Ire (Glyph) Tenacity (Rare) Raw Power (Rare) Iron Strength (Rare) |
| 2 | Blood Rage | Blood Rage (Legendary) Twister (Glyph) Enraged (Rare) Grit (Rare) Revel (Rare) |
| 3 | Flawless Technique | Flawless Technique (Legendary) Exploit (Glyph) Brash (Rare) Heavy Blows (Rare) |
| 4 | Carnage | Carnage (Legendary) Tears of Blood (Glyph) Fierce (Rare) Brash (Rare) Berserker (Rare) |
| 5 | Warbringer | Marshal (Glyph) Conditioned (Rare) Raw Power (Rare) Core Reserve (Rare) |
| 6 | Bone Breaker | Seething (Glyph) Vigor (Rare) |
| Double Swing Build Paragon Board Setup | ||
| Full Paragon Board Display (External Link) | ||

The Starting Board offers multiple defensive and offensive nodes. For this build, it's best to focus on acquiring all defensive nodes available in order to increase tankiness right off the bat.

The Blood Rage is one of the most crucial boards you can take due to the insane damage multiplier you can get by acquiring the board's Legendary node. On top of that, this board is perfect for the Twister Glyph due to the number of available Strength nodes.

For the third board, it's great to take on the Flawless Technique to get remarkable additional critical strike damage. This board will also house the Exploit Glyph, which will allow you to apply Vulnerable to enemies.

The Carnage board is one of the best boards to place the new Tears of Blood Glyph due to the presence of exceptional Rare Nodes surrounding the Glyph Slot. This board is a great source of additional Damage while Berserking, which is needed to further increase the damage multiplier coming from the Blood Rage Legendary Node.

The Warbringer board is one of the best ones to house a Strength-scaling Glyph due to the availability of nodes and closeness to a Board Attachment Gate. In addition, this board will give you access to nodes that will increase your maximum Fury, which is great to increase the damage multiplier coming from the Ramaladni's Magnum Opus Unique.

Last but not least, take the Bone Breaker board in order to be able to equip the Seething Glyph. The close placement of Strength nodes within the Glyph's radius will allow you to activate the Glyph without spending too many Paragon points.
| Double Swing Build Tips |
|---|
|
|
| 1 | Dash to gain Fury through the synergy of Metamorphosis and Tibault's Will. |
|---|---|
| 2 | Cast War Cry to gain a significant damage bonus and Berserking. |
| 3 | Spam Double Swing to deal damage. |
| 4 | Use Rallying Cry or Challenging Shout as needed for Fury generation and survival. |
| 1 | Gain Fury by dashing to activate the unique effect of Tibault's Will through Metamorphosis. |
|---|---|
| 2 | Activate War Cry, Challenging Shout, and Rallying Cry simultaneously for buffs and Fury generation through the Aspect of Echoing Fury. |
| 3 | Spam Double Swing for damage. |
| 4 | Use Wrath of the Berserker for damage increase and Fury generation once your shouts have expired. |
| 5 | Continue casting Double Swing until the boss is defeated. Ideally, the boss should die within one stagger rotation; however, if the boss survives, continue spamming Double Swing and cycling through your skills to manage your Fury. |
In this build, you'll gaining most of your resource by using your Shouts to activate the Aspect of Echoing Fury. Always remember to cycle between them with Fury management in mind.
If your Shouts are on cooldown, you can use Lunging Strik to recover Fury. You can also activate Wrath of the Berserker to give you a significant Fury generation bonus when needed. Make sure to time the casting of these skills to maximize their effects.

| Season 3 Leveling Builds | |||||
|---|---|---|---|---|---|
| Barbarian HoTA | Sorcerer Chain Lightning | ||||
| Rogue Twisting Blades | Necromancer Blood Surge | Druid Poison Creeper | |||
| All Classes | |||||
|---|---|---|---|---|---|
| List of Builds | ||
|---|---|---|
 Barb Leveling Barb Leveling
(Leveling) |
 Double Swing Double Swing
(PVE) |
 HotA HotA
(PVE) |
 Rend Bleed Rend Bleed
(PVE) |
 Thorns Barbarian Thorns Barbarian
(PVE) |
 Upheaval Upheaval
(PVE) |
 Walking Arsenal Walking Arsenal
(PVE) |
 Whirlwind Whirlwind
(PVE) |
|
Double Swing Barbarian Abattoir of Zir Build (Season 2)

Honkai: Star Rail Walkthrough & Guides Wiki

Genshin Impact Walkthrough & Guides Wiki

FF7 Rebirth Walkthrough & Guides Wiki

Pokemon Scarlet and Violet (SV) Walkthrough & Guides Wiki

Palworld Walkthrough & Guides Wiki

Dragon's Dogma 2 (DD2) Walkthrough & Guides Wiki

Persona 3 Reload Walkthrough & Guides Wiki

Monster Hunter Rise: Sunbreak Walkthrough & Guides Wiki

Pokemon UNITE Walkthrough & Guides Wiki

Fire Emblem Heroes (FEH) Walkthrough & Guides Wiki

Elden Ring Walkthrough & Guides Wiki

Pokemon Legends: Arceus Walkthrough & Guides Wiki

FF7 Remake Walkthrough & Guides Wiki

New Pokemon Snap Walkthrough & Guides Wiki

Hyrule Warriors: Age of Calamity Walkthrough & Guides Wiki

Super Smash Bros. Ultimate Walkthrough & Guides Wiki

The Legend of Zelda: Breath of the Wild Walkthrough & Guides Wiki
©2022 BLIZZARD ENTERTAINMENT, INC. ALL RIGHTS RESERVED.
All trademarks referenced herein are the properties of their respective owners.
The copyrights of videos of games used in our content and other intellectual property rights belong to the provider of the game.
The contents we provide on this site were created personally by members of the Game8 editorial department.
We refuse the right to reuse or repost content taken without our permission such as data or images to other sites.