This survey will take about 1 minute.
Your answers will help us to improve our website.
Honkai: Star Rail
How to Clear Difficulty 5 in Swarm Disaster
★ Exclusive: Check out the State of Meta in 4.0!
♦ Latest: 4.1 Livestream Redeem Codes
♦ Phase 2: Sparkxie, Sparkle, Cerydra, Rappa
♦ Upcoming: Ashveil, Silver Wolf Lv.999, Evanescia
♦ Events: Cosmicon, Roll On!, Ding! Arcadia Fun-Time Clock-In Essentials

Check out how to clear Difficulty 5, also known as the Torturous Difficulty in Honkai: Star Rail's Swarm Disaster. We have the best Paths, teams, Blessings, and how to beat it in this Simulated Universe guide!
| Swarm Disaster Guides | |
|---|---|
 How to Clear Difficulty 5 How to Clear Difficulty 5 |
 Communing Trail Communing Trail |
 Exploration Guide Exploration Guide |
 How to Unlock All Chapters How to Unlock All Chapters |
List of Contents
Best Path for Difficulty 5
Abundance Path for Difficulty 5
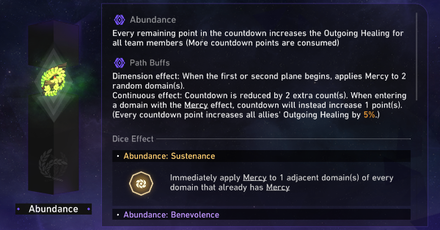
The Path of Abundance is the best Path for Difficulty 5 as enemies hit hard in this difficulty, so constant healing outside of a character's turn is essential. It's also the safest Path to use as you can easily avoid Planar Disarray, preventing the Final Boss from powering up in the process.
Remembrance Path for Difficulty 5
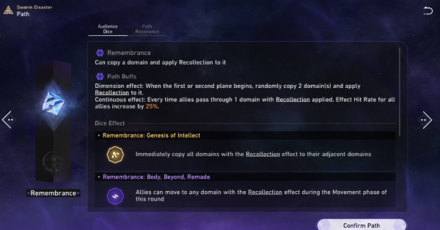
The Path of Remembrance is an alternative Path you can take as The Final Boss doesn't have any resistance to Freeze. Remembrance can help prevent DMG by negating the enemies' chance to take a turn.
Propagation Path for Difficulty 5
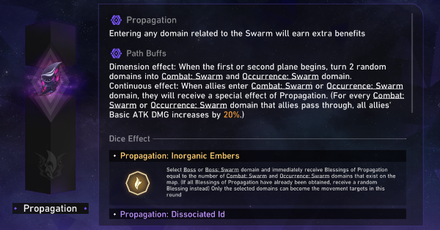
The Path of Propagation is the best Path for characters such as Imbibitor Lunae, Blade, and Qingque. You can easily collect a lot of Propagation Blessings to unlock the Path Resonance and all three Resonance Formations.
While the drawback of using this Path is its lack of defensive utility, its high damage numbers are more than enough to defeat the Final Boss and its summons.
How to Unlock Path of Propagation Guide
Best Teams for Difficulty 5
Best Team for General Use
| DPS | Support | Utility | Healer |
|---|---|---|---|
 Imbibitor Lunae Imbibitor Lunae
|
 Bronya Bronya
|
 Fu Xuan Fu Xuan
|
 Luocha Luocha
|
Clearing Difficulty 5 requires a team with the right balance of offense and defense. The Main DPS should be capable of dishing out a lot of DMG for both single-target and AoE situations. If the DPS uses Basic ATKs as their specialty, we recommend using the Propagation Path over Abundance.
You would want to have both a Preservation and an Abundance character in the party as most enemies in Difficulty 5 are capable of one-shotting your characters.
| Alternative | Explanation |
|---|---|
 Seele Seele | DPS Replacement Seele is the best Quantum character to use for Difficulty 5. While she isn't capable of dealing AoE DMG to enemies, her use of Resurgence will be useful in taking out smaller enemies. |
 Blade Blade | DPS Replacement Blade is one of the best AoE DMG dealers in-game. His high HP will help him survive longer in combat. If you are using Blade, you can replace a Shielder with another Support character to be able to frequently use his Follow-up Attacks. |
 Qingque Qingque | DPS Replacement Qingque is the best F2P character for Difficulty 5, especially when highly invested. Propagation Blessings will improve her DMG and remedy her high SP usage. |
 Tingyun Tingyun | Support Replacement Tingyun can increase the DPS' DMG and restore their energy to use their Ultimates much sooner. Tingyun's Relic Stats should have HP or DEF over ATK for better survivability. |
 Yukong Yukong | Support Replacement A F2P Support alternative. Yukong's ability to increase CRIT and deal a good amount of single-target DMG as an Imaginary character makes her a solid pick against the final boss. |
 Gepard Gepard | Shielder Replacement Has the strongest shield in-game. Gepard's Skill also has the chance to Freeze enemies. |
 Trailblazer (Fire) Trailblazer (Fire) | Shielder Replacement A F2P Shielder alternative. While their shield isn't as strong as Gepard's, they can taunt enemies and easily tank almost any attack. |
 Bailu Bailu | Healer Replacement A 5-Star healer alternative. Bailu can heal a ton of HP and her character revival mechanic will come in handy in the latter Planes. |
Best Team for Remembrance
| DPS | Support | Shielder | Healer |
|---|---|---|---|
 Herta Herta
|
 Pela Pela
|
 March 7th March 7th
|
Luocha
|
Combined with a lot of Remembrance Blessings, this team can immobilize enemies very frequently. It helps that the Final Boss doesn't have any resistance to Freeze.
The downside of using this team is that it can't deal a lot of damage compared to your usual Hypercarry team. You can use another team in the early Planes and use this team against the Final Boss.
| Alternative | Explanation |
|---|---|
 Yanqing Yanqing | DPS Replacement Yanqing can be used as to replace Herta. While Yanqing is not capable of dealing AoE DMG, his personal DMG to single targets makes up for it. |
| Gepard | Shielder Replacement Gepard is a great alternative to March if you want to sacrifice AoE Freezing in favor of more protection. |
| Bailu | Healer Replacement A 5-Star healer alternative. Bailu can heal a ton of HP and her character revival mechanic will come in handy in the latter Planes. |
Best Blessings in Difficulty 5
List of Best Blessings
| Path | Blessings |
|---|---|
 Abundance Abundance |
• Any Dewdrop Blessing • Being of Abundance, Becoming One Mind • Clear Lucite Body • Every Other Abundance Blessing |
 Destruction Destruction |
• Regression Inequality of Annihilation • Orbital Redshift • Reflection • Polarization Receptor |
 Preservation Preservation |
• Divine Construct - Macrosegregation • Interstellar Construct - Sanctuary • Interstellar Construct - Quadrangular Pyramid • Construct - Firmness • Construct - Compensation • Construct - Assemble |
 Remembrance Remembrance |
• Any Dissociation Blessing* • Perfect Experience - Reticence • Perfect Experience - Innocence • Perfect Experience - Fuli • Experience - Lost Memory • Experience - Unspeakable Shame |
Abundance Blessings
| Blessing Title | Effects |
|---|---|
| Being of Abundance, Becoming One Mind ★★★ |
Effect: When the character Provides healing, allies other than the healed target will also help gain HP equal to 30% of the Outgoing Healing. Enhanced Effect: When a character provides healing, allies other than the healed target will also restore HP equal to 30% of the amount healed. Increases the ATK of all allies by 15% of the amount healed, stacking up to no more than 80% of each ally's respective Base ATK and lasts until the end of the next turn. |
| Prosperity, Longevity ★★★ |
Effect: Charges Dewdrop when a character's HP is restored, The Charge value is equal to 100% of the amount of healing received. Enhanced Effect: Charges Dewdrop when a character's HP is restored, The Charge value is equal to 100% of the amount of healing received, and increases the DMG of Dewdrop by 40%. |
| Mudra of Blessing ★★★ |
Effect: Charges Dewdrop at the beginning of a character's turn. The Charge value is equal to 60% of their current HP. Enhanced Effect: Charges Dewdrop at the beginning of a character's turn. The Charge value is equal to 70% of their Max HP. |
| Mortals of the Buddha-Field ★★ |
Effect: When the character's HP is full, increases the Charging Efficiency for Dewdrop by 80%. Enhanced Effect: When the character's HP is full, increases the Charging Efficiency for Dewdrop by 120%. |
| Clear Lucite Body ★★ |
Effect: When a character's HP is full, reduces their DMG taken by 36%. Enhanced Effect: When a character's HP is full, reduces their DMG taken by 36%, and increases their Effect RES by 27%. |
Abundance Blessings must be prioritized as you will need a lot of them to activate the Path Resonance and Resonance Formations. Being of Abundance, Becoming One Mind is a must-have Blessing thanks to its ability to spread healing to other party members.
Clear Lucite Body can help reduce DMG taken when a character's HP is full. Lastly, every Blessing that involves the Dewdrop mechanic is mandatory to have since its additional DMG makes up for the lack of offensive Blessings in your collection.
Destruction Blessings
| Blessing Title | Effects | |
|---|---|---|
| Regression Inequality of Annihilation ★★★ |
Effect: When the player characters are hit, DMG taken by characters is equally distributed among all allies. Enhanced Effect: Receives 15% less DMG. When the player characters are hit, DMG taken by characters is equally distributed among all allies. |
|
| Orbital Redshift ★ |
Effect: Increases Max HP by 16%. Enhanced Effect: Increases Max HP by 24%. | |
| Reflection ★ |
Effect: When struck with a killing blow, instead of becoming downed, characters immediately restore HP by 1% of their Max HP. The allied team can only trigger this effect 1 time(s) per battle. Enhanced Effect: When struck with a killing blow, instead of becoming downed, characters immediately restore HP by 30% of their Max HP. The allied team can only trigger this effect 1 time(s) per battle. |
|
| Polarization Receptor ★ |
Effect: For every 1% of HP lost by a character, their DEF increases by 0.40%. Enhanced Effect: For every 1% of HP lost by a character, their DEF increases by 0.60%. |
Destruction Blessings are great to have for their survivability through defensive stat buffs and DMG reduction. The Regression Inequality of Annihilation in particular can greatly increase the party's overall survivability and prevent one-shot attacks.
Orbital Redshift can increase the party's max HP and Reflection can prevent a party member from getting knocked down. Polarization Receptor can be great to have if you find yourself always low on HP.
Preservation Blessings
| Blessing Title | Effects |
|---|---|
| Divine Construct - Macrosegregation ★★★ |
Effect: At the start of the battle, characters gain a special Shield that can absorb DMG equal to 1% of their Max HP. Whenever another Shield is gained, this special Shield will also strengthen in equal value. For every 2 turn(s), this will be removed, and then this special Shield can be regained. Enhanced Effect: At the start of the battle, characters gain a special Shield that can absorb DMG equal to 10% of their Max HP. Whenever another Shield is gained, this special Shield will also strengthen by 130%. For every 2 turn(s), this will be removed, and then this special Shield can be regained. |
| Interstellar Construct - Sanctuary ★★ |
Effect: At the end of the turn, there is 80% fixed chance for characters to gain a Shield equal to 12% of their Max HP, lasting 1 turn(s). Enhanced Effect: At the end of the turn, characters gain a Shield that can absorb DMG equal to 15% of their Max HP, lasting 1 turn(s). |
| Interstellar Construct - Quadrangular Pyramid ★★ |
Effect: Increases the max DMG that can be absorbed by Shields created by characters by 30%. Enhanced Effect: When characters gain a Shield, increases the max DMG that can be absorbed by the Shield by 35%. |
| Construct - Firmness ★ |
Effect: Shielded characters take 16% less DMG. Enhanced Effect: Shielded characters take 24% less DMG. |
| Construct - Compensation ★ |
Effect: After applying Weakness Break on an enemy, characters gain a Shield that can absorb DMG equal to 14% of their Max HP, lasting for 2 turn(s). Enhanced Effect: After applying Weakness Break on an enemy, characters gain a Shield that can absorb DMG equal to 18% of their Max HP, lasting for 3 turn(s). |
| Construct - Assemble ★ |
Effect: Characters gain a 6% DEF increase for each Preservation Blessing, stacking up to a max of 6 time(s). Enhanced Effect: Characters gain an 8% DEF increase for each Preservation Blessing, stacking up to a max of 9 time(s). |
Preservation Blessings are also great to have for stat bonuses and DMG reduction when equipped with a shield. Divine Construct - Macrosegregation, Interstellar Construct - Sanctuary, and Construct - Compensation will help you get shields through various means.
Interstellar Construct - Quadrangular Pyramid and Construct - Firmness can increase shield durability. Construct - Assemble can increase everyone's DEF for every Preservation Blessing owned.
List of Preservation Blessings
Remembrance Blessings
| Blessing Title | Effects |
|---|---|
| Perfect Experience - Reticence ★★★ |
Effect: After an enemy is attacked 6 time(s), they have a 120% base chance to become Frozen for 1 turn(s). Enhanced Effect: After an enemy is attacked 5 time(s), they have a 150% base chance to become Frozen for 1 turn(s). |
| Perfect Experience - Innocence ★★★ |
Effect: After a character Breaks an enemy's weakness, there is a 100% base chance to apply Dissociation on the enemy for 1 turn(s). Enhanced Effect: After the character inflicts Weakness Break on an enemy, there is a 100% base chance to apply Dissociation on the enemy for 1 turn(s). This effect ignores enemies' chance to resist Frozen. |
| Perfect Experience - Fuli ★★★ |
Effect: When attacking Frozen Enemies, there is a 100% base chance to apply Dissociation for 1 turn(s). Enhanced Effect: When attacking Frozen Enemies, there is a 100% base chance to apply Dissociation for 1 turn(s). DMG dealt by Dissociation when it is removed is increased by 20%. |
| Experience - Lost Memory ★ |
Effect: When attacks reduce an enemy's HP to a point that is lower than 50% for the first time in this battle, there's a 70% base chance to Freeze the enemy for 1 turn(s). Enhanced Effect: When attacks reduce an enemy's HP to a point that is lower than 50% for the first time in this battle, there's a 70% base chance to Freeze the enemy for 1 turn(s). |
| Experience - Unspeakable Shame ★ |
Effect: For every Blessing of Remembrance the team has, enemies' chance to resist Frozen decreases by 6%, stacking up to 6 time(s). Enhanced Effect: For every Blessing of Remembrance the team has, enemies' chance to resist Frozen decreases by 8%, stacking up to 9 time(s). |
Remembrance Blessings are useful for immobilizing every enemy which includes the Final Boss. Focus on getting these Blessings if you've chosen the Path of Remembrance at the start of the run. Dissociation Blessings are extremely helpful for dealing a ton of DMG once the Frozen status is removed.
Perfect Experience - Reticence and Perfect Experience - Innocence can Freeze enemies simply by attacking and Weakness Break respectively. Perfect Experience - Fuli can apply Dissociation to Frozen enemies. Experience - Lost Memory and Experience - Unspeakable Shame can increase the chances of enemies getting Frozen.
How to Beat Difficulty 5
Complete Pathstrider Challenges
If your characters are easily knocked out during Difficulty 5, you could opt to complete Pathstrider Challenges to improve your stats. While not a significant increase, it does slightly improve your chances for Survival.
Communing Trail and Pathstrider Guide
Enter Domains with Mercy

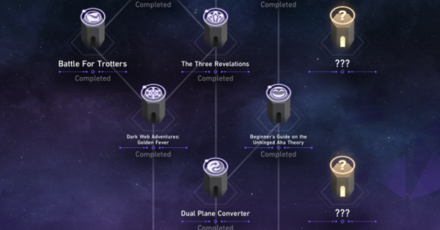
If you chose the Path of Abundance, take your time and go into the domains affected by Mercy to prevent Planar Disarray. This is you so can gather up a bunch of Blessings for the party before the final boss.
Skip to the End with Propagation
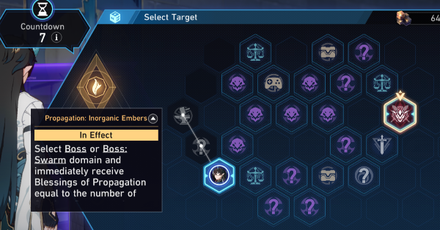
If you chose the Path of Propagation, there's an Audience Die effect called Inorganic Embers that allows you to skip toward the Boss domain and collect Propagation Blessings based on the number of Swarm domains in the Plane.
Combined with the Dissociated Id effect, you can gather enough Propagation Blessings to unlock Path Resonance and all three Resonance Formations.
Prioritize Weakness Break

In the final domain, prioritize Weakness Break over defeating The Swarm - True Sting as they can charge up and deal a massive amount of DMG to the entire party.
If you have the right Remembrance Blessings, it should be easy to trigger Perfect Experience - Innocence and apply Dissociation via Weakness Break.
The Swarm - True Sting (Complete) Guide
Honkai: Star Rail Related Guides

Simulated Universe Stage Guides
| Simulated Universe Guides | |||
|---|---|---|---|
Paths and Blessing Guides
| All Simulated Universe Paths | ||
|---|---|---|
 Propagation Propagation |
Preservation |
Abundance |
 Nihility Nihility |
 The Hunt The Hunt |
Remembrance |
| Destruction |
 Elation Elation |
 Erudition Erudition |
Swarm Disaster Guides
| Simulated Universe: The Swarm Disaster Guides | |
|---|---|
| The Swarm Disaster Guide | How to Unlock All Chapters |
| Communing Trail and Pathstrider Guide | Exploration Guide |
| How to Clear Difficulty 5 | |
Gold and Gears Guides
| Simulated Universe: Gold and Gears Guides | |
|---|---|
| Gold and Gears Guide | How to Unlock All Trailblaze and Aeon Secrets |
| Neural Network Guide | Dice Customization and All Dice Faces |
| How to Beat Difficulty 5 | |
Divergent Universe Guides
Unknowable Domain Guides
| Simulated Universe: Unknowable Domain | |
|---|---|
| Unknowable Domain Guide | How to Beat Someone's Mausoleum |
Other Simulated Universe Guides
| Simulated Universe Guides | |
|---|---|
| List of All Paths | Simulated Universe Events |
| List of All Curios | Resonance Interplay Guide |
| Herta Store Event Light Cones | |
Comment
Author

How to Clear Difficulty 5 in Swarm Disaster
Please participate in our site
improvement survey
03/2026
improvement survey
03/2026
Would you assist in
improving Game8's site?
improving Game8's site?

×
We are listening to our users' valuable opinions and discussing how to act on them.
The information collected through this survey will be used for the purpose of improving our services. In addition, the information will only be disclosed a part of a statistic in a format that will not allow identification of personal information.
Begin Survey
Not Now
×
Please rate each item regarding Game8.co's Advertisements.
Amount of Ads
Very Dissatisfied
Somewhat Dissatisfied
Fine
Somewhat Satisfied
Highly Satisfied
Placement of Ads
Timing of Ad Display
Ad Loading Speed
Safeness of Ads
Content of Ads
×
Please rate each item regarding Game8.co's Quality of Articles.
Amount of information
Very Dissatisfied
Somewhat Dissatisfied
Fine
Somewhat Satisfied
Highly Satisfied
Frequency of updates
Speed of new information
Accuracy of articles
Understandibility of articles
Readability of sentences
×
Please rate each item regarding Game8.co's Usability of the Site.
Ease of finding information
Very Dissatisfied
Somewhat Dissatisfied
Fine
Somewhat Satisfied
Highly Satisfied
Loading Speed
Use of Color
Font Size
Visibility of Images
Easy to Understand Layout
×
Please rate each item regarding Game8.co's Message Boards, Comments.
Ease of Writing
Very Dissatisfied
Somewhat Dissatisfied
Fine
Somewhat Satisfied
Highly Satisfied
Readability
Ease in Finding Information
Comment Quality
Comment Quantity
Admin Response
×
Please rate each item regarding Game8.co's Site's new design.
Please rate our site's new design
Very Dissatisfied
Somewhat Dissatisfied
Fine
Somewhat Satisfied
Highly Satisfied
Do you think that the website's design change makes the site easier to use?
Has the new design made it easier for you to find information on the site?
Has the new design improved the overall visual appeal of the site?
How would you rate your overall satisfaction with the new design of the site?
×
How likely are you to recommend Game8 to someone you know?
Very Unlikely
0
1
2
3
4
5
6
7
8
9
10
Very Likely
If you have other opinions regarding potential improvement to the website, please share them with us. We would appreciate your honest opinion.
Note: This is a free response section, so you can proceed without entering anything.
Note: Please be sure not to enter any kind of personal information into your response.
Note: Please be sure not to enter any kind of personal information into your response.
×
Thank You
×
Thank you for participating in our survey! Your answers will help us to improve the quality of our website and services.
We hope you continue to make use of Game8.
We hope you continue to make use of Game8.
Close
Premium Articles

Rankings
Gaming News


![Everwind Review [Early Access] | The Shaky First Step to A Very Long Journey](https://img.game8.co/4440226/ab079b1153298a042633dd1ef51e878e.png/thumb)

![Monster Hunter Stories 3 Review [First Impressions] | Simply Rejuvenating](https://img.game8.co/4438641/2a31b7702bd70e78ec8efd24661dacda.jpeg/thumb)
Popular Games

Genshin Impact Walkthrough & Guides Wiki
Honkai: Star Rail Walkthrough & Guides Wiki
Umamusume: Pretty Derby Walkthrough & Guides Wiki
Pokemon Pokopia Walkthrough & Guides Wiki
Resident Evil Requiem (RE9) Walkthrough & Guides Wiki
Monster Hunter Wilds Walkthrough & Guides Wiki
Wuthering Waves Walkthrough & Guides Wiki
Arknights: Endfield Walkthrough & Guides Wiki
Pokemon FireRed and LeafGreen (FRLG) Walkthrough & Guides Wiki
Pokemon TCG Pocket (PTCGP) Strategies & Guides Wiki


Recommended Games
Diablo 4: Vessel of Hatred Walkthrough & Guides Wiki
Fire Emblem Heroes (FEH) Walkthrough & Guides Wiki
Yu-Gi-Oh! Master Duel Walkthrough & Guides Wiki
Super Smash Bros. Ultimate Walkthrough & Guides Wiki
Pokemon Brilliant Diamond and Shining Pearl (BDSP) Walkthrough & Guides Wiki
Elden Ring Shadow of the Erdtree Walkthrough & Guides Wiki
Monster Hunter World Walkthrough & Guides Wiki
The Legend of Zelda: Tears of the Kingdom Walkthrough & Guides Wiki
Persona 3 Reload Walkthrough & Guides Wiki
Cyberpunk 2077: Ultimate Edition Walkthrough & Guides Wiki


All rights reserved
Copyright © 2024 HoYoverse, COGNOSPHERE. All Rights Reserved.
The copyrights of videos of games used in our content and other intellectual property rights belong to the provider of the game.
The contents we provide on this site were created personally by members of the Game8 editorial department.
We refuse the right to reuse or repost content taken without our permission such as data or images to other sites.