All Puzzle Pieces Location Guide
Puzzle Pieces are collectibles that Astro can collect from worlds, and are used to unlock Crash Site stations in Astro Bot. Read on for all Puzzle Pieces, as well as the Puzzle Pieces available in each stage!
List of Contents
Gorilla Nebula Puzzle Piece Locations
Sky Garden Puzzle Pieces
| # | Puzzle Piece Locations |
|---|---|
| 1 | 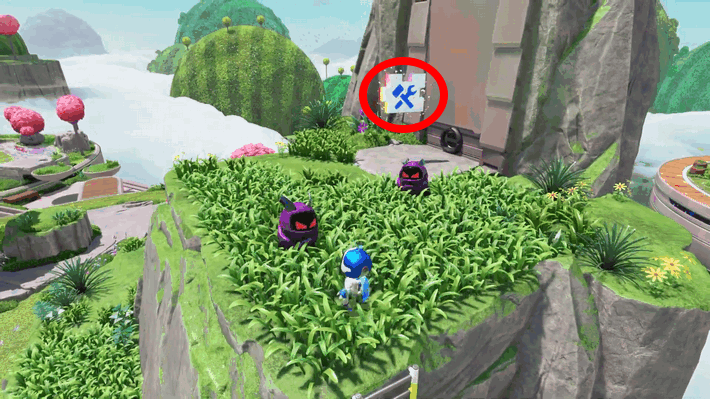 Can be found by the exposed wires leading to the Tooled-Up Mechanic VIP Bot. |
| 2 | 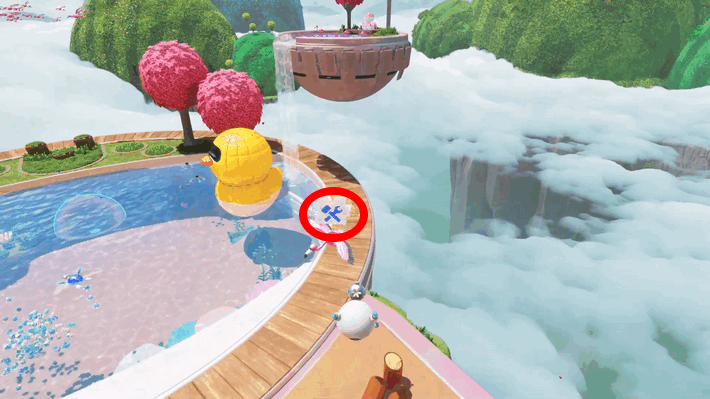 Carried by a flying Flamingo bot above the Octopus. Can be reached by using the Inflate Skill. |
| 3 | 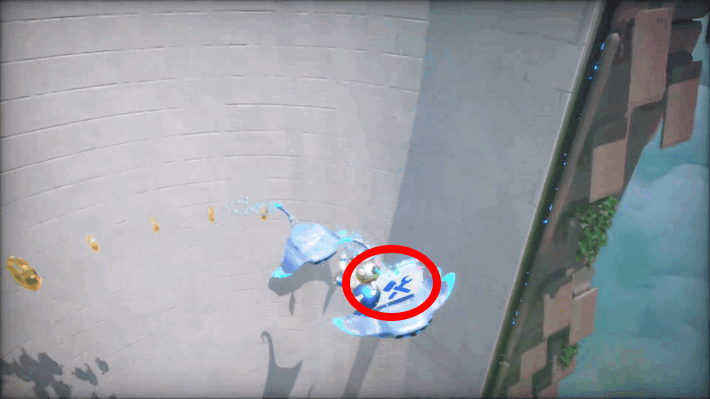 Carried by a Manta Ray bot inside the vertical tank of Checkpoint 5. |
Az-Tech Trail Puzzle Pieces
| # | Puzzle Piece Locations |
|---|---|
| 1 | 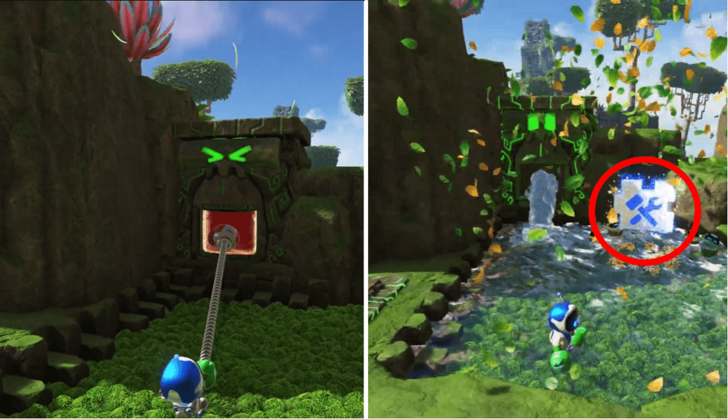 Appears after interacting with a red-marked stone wall in the pond area. |
| 2 | 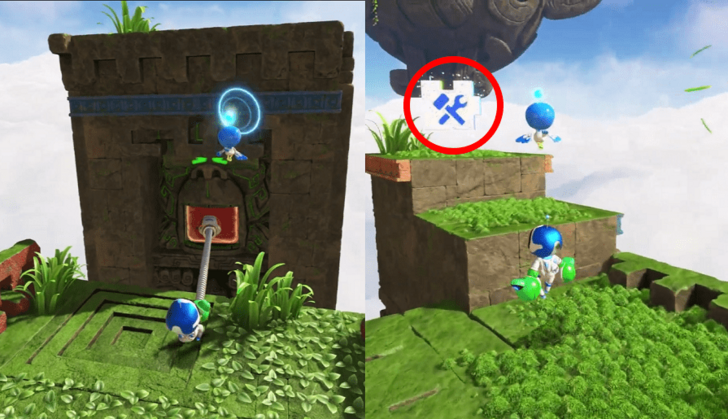 Above a platform that appears after interacting with a red-marked stone wall. |
| 3 | 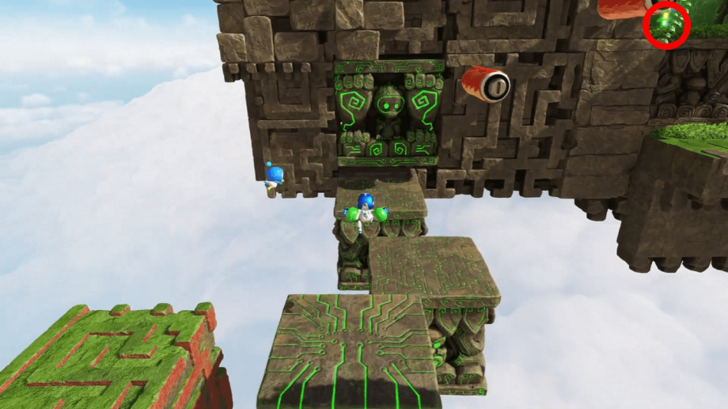 Found inside the wall near the floating platforms. |
Creamy Canyon Puzzle Pieces
| # | Puzzle Piece Locations |
|---|---|
| 1 | 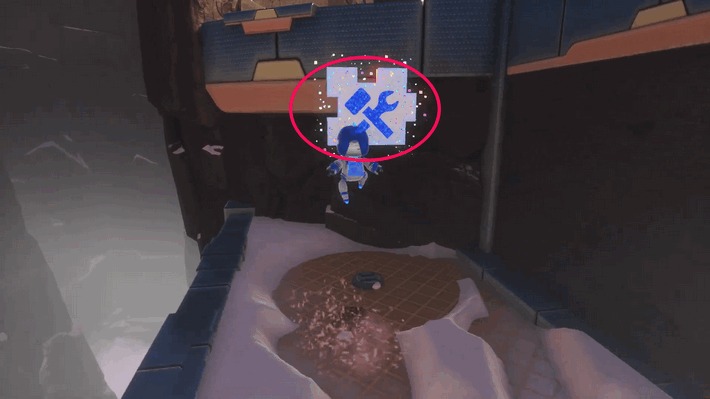 Revealed by pulling the exposed wires under the 2nd Checkpoint. |
| 2 | 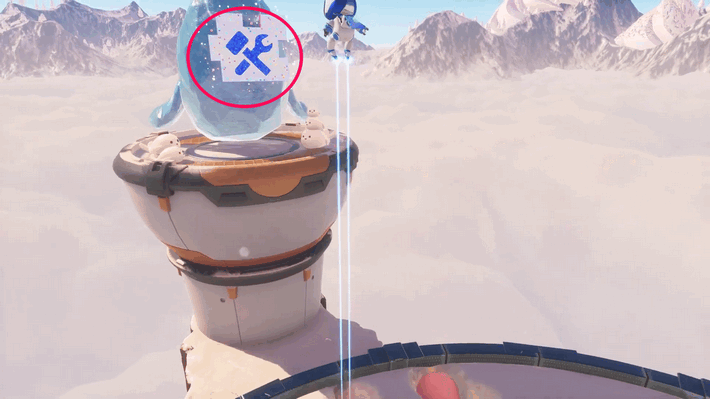 In front of the Sea Lion Ice sculpture that leads to the Funky Fungi portal. |
| 3 | 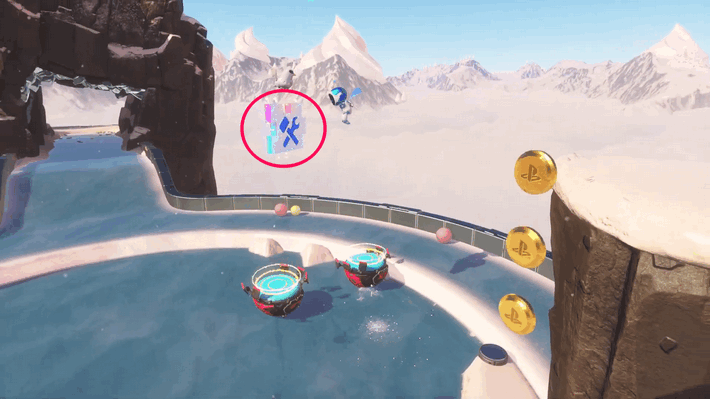 Carried by a bird bot above the Skating Rink area. |
Construction Derby Puzzle Pieces
| # | Puzzle Piece Locations |
|---|---|
| 1 |  Glide between construction beams at the beginning of the stage. |
| 2 | 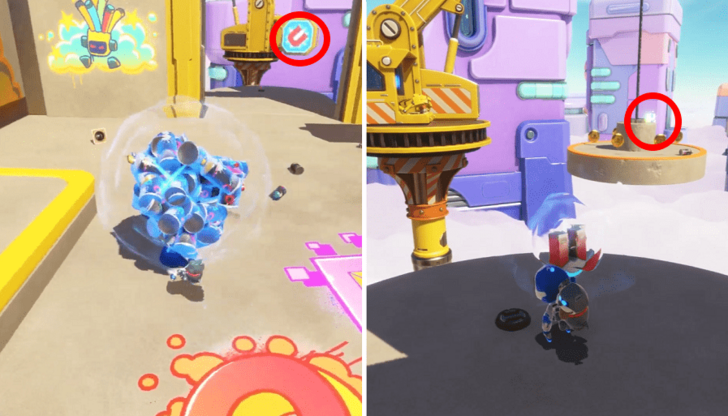 Appears on a hanging platform after hitting the magnet sign. |
| 3 | 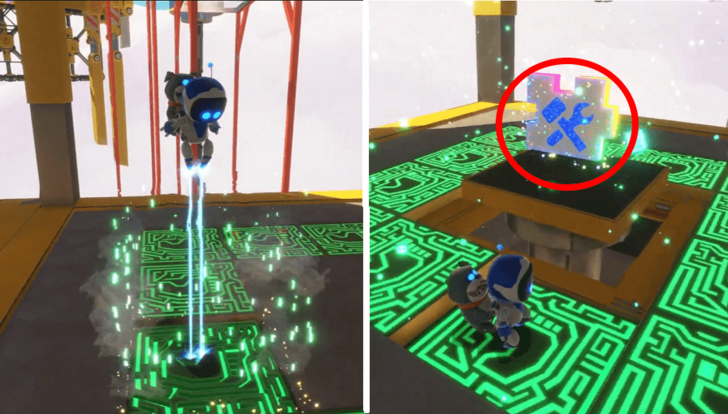 Appears after shooting beams towards the green floor marks. |
Apes on the Loose Puzzle Pieces
| # | Puzzle Piece Locations |
|---|---|
| 1 | 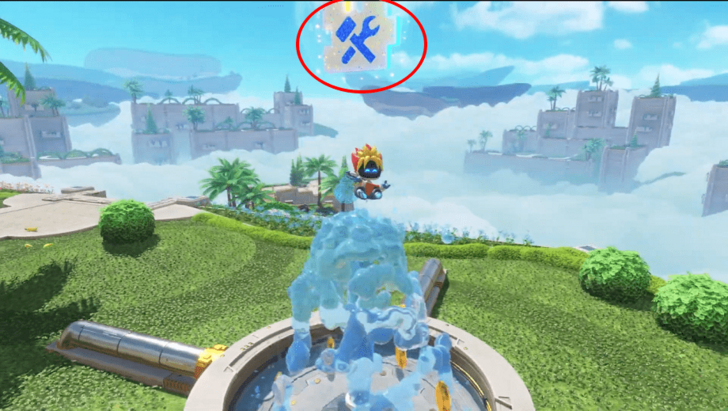 Hovering above the fountain. |
| 2 | 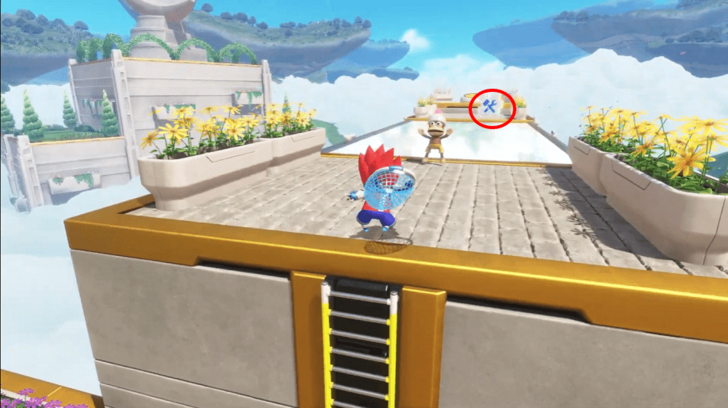 Found on the glass bridge near the triangle tower. |
| 3 |  In the middle of the triangular tower. |
Tentacle System Puzzle Piece Locations
Go-Go Archipelago! Puzzle Pieces
| # | Puzzle Piece Locations |
|---|---|
| 1 | 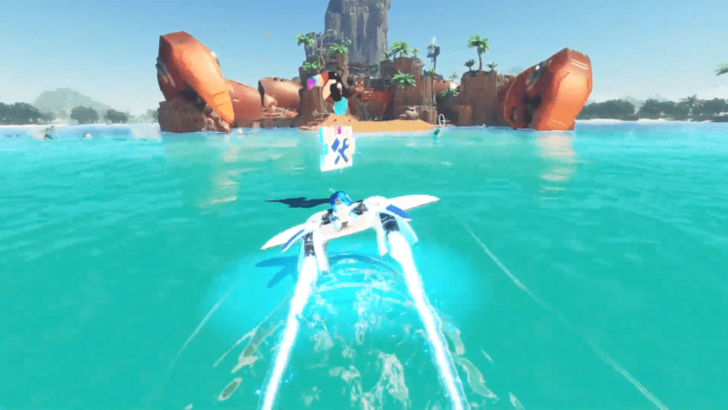 Fly towards it in the beginning of the stage. |
Downsize Surprise Puzzle Pieces
| 2 | 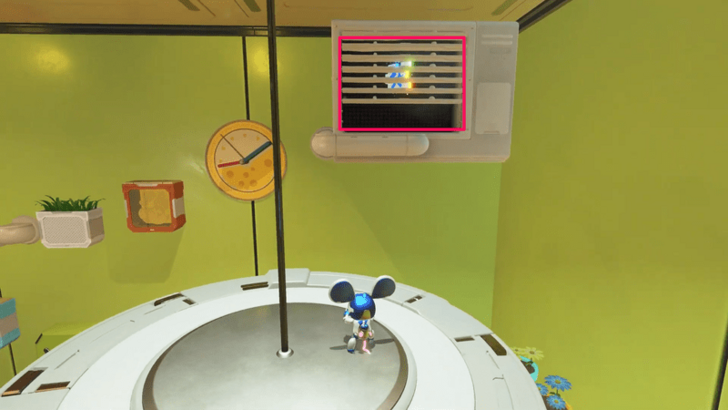 After entering the room using the clothesline and water pipes, look to your right to spot a puzzle piece hidden inside the air conditioner. To access it, transform into your mouse form and locate the nearby pot where you can perform a charged spin attack and float. From this point, jump towards the platforms to reach the air confitioner. |
|---|---|
| 3 | 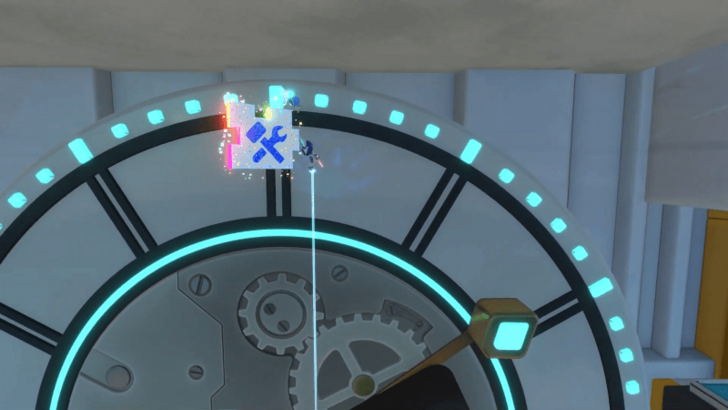 Towards the end of the stage, you'll need to ride on the clock hands. Wait for the second clock hand (the one ticking to represent the seconds), then ride it to reach the final puzzle piece located at the top of the clock. |
Wormy Passage Puzzle Pieces
| # | Puzzle Piece Locations |
|---|---|
| 1 | 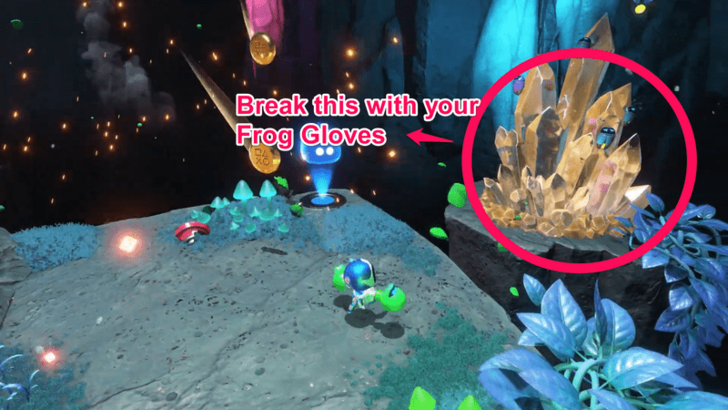 After entering the main door to the stage, find the nearest checkpoint. You will find a lone pillar with a huge crystal block, destroy it with your Frog Gloves. |
| 2 | 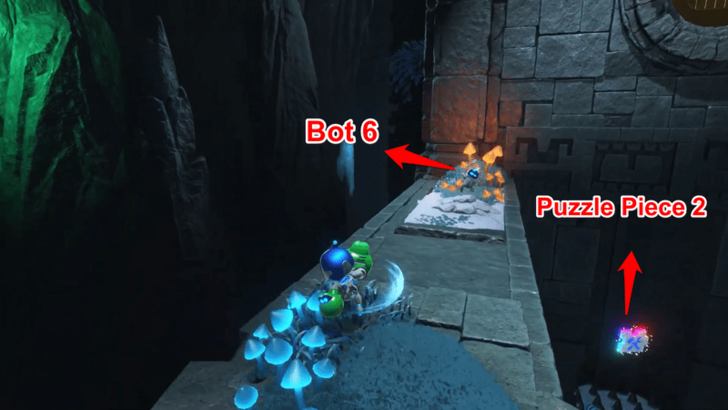 From the location of Bot 6, head down to find the puzzle piece below |
| 3 | 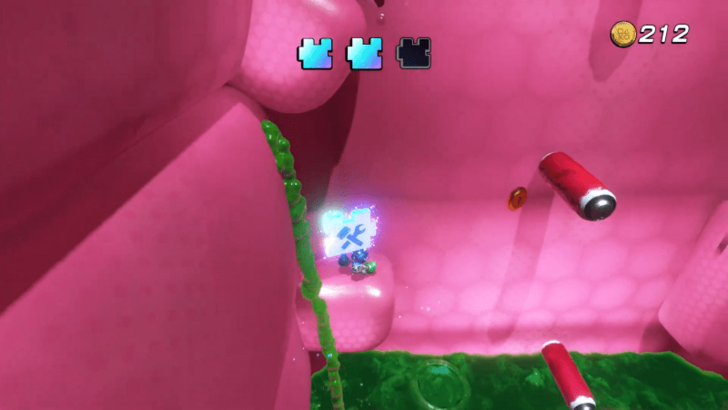 After being swallowed near the end of the stage, you will have to do some platforming to get out of the monster. You will pass by this puzzle piece on your way up. |
Trunk of Funk Puzzle Pieces
| # | Puzzle Piece Locations |
|---|---|
| 1 | 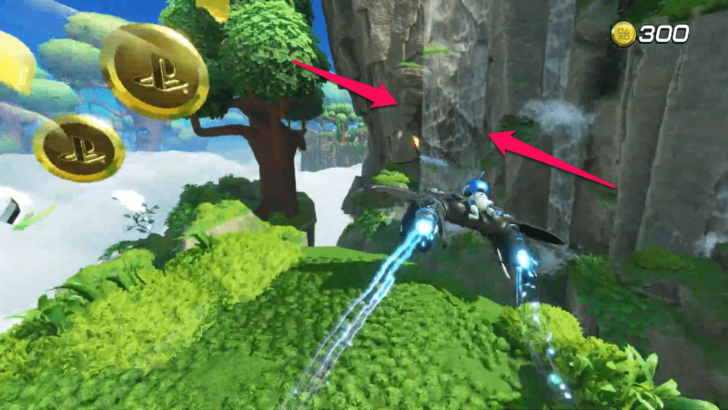 From the beginning, hover your spaceship over the cave covered by the waterfall. If you miss this, it is recommended to restart the level since it is still early on. |
| 2 | 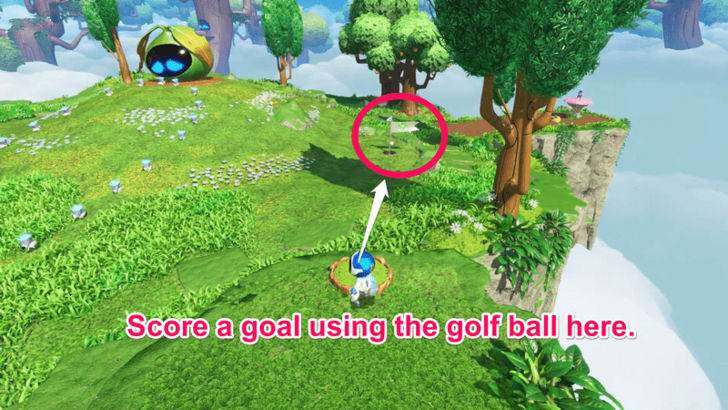 From the area with the big sapling bot, find a small spot where a gopher bot appears with a golf ball. Aim it at the hole to score a goal. The puzzle piece will appear once you score. |
| 3 | 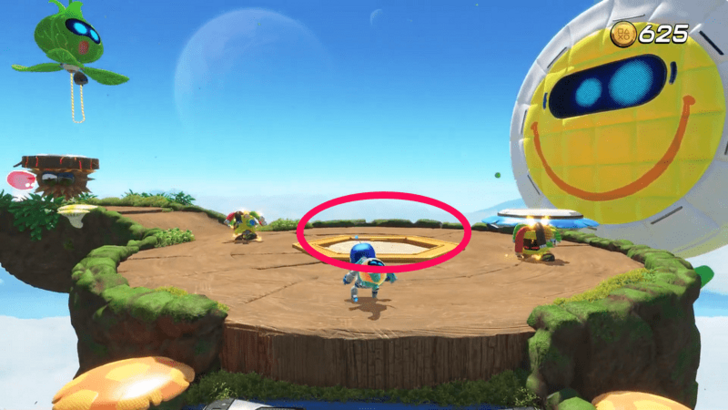 After exiting the honeycomb area, locate the platform with the large floating smiley face. In the center of this platform, a flower enemy bot will appear. Defeat the bot, and a hole will be revealed. Perform a charged attack on the hole to uncover the third sticker underneath. |
Bot of War Puzzle Pieces
| # | Puzzle Piece Locations |
|---|---|
| 1 | 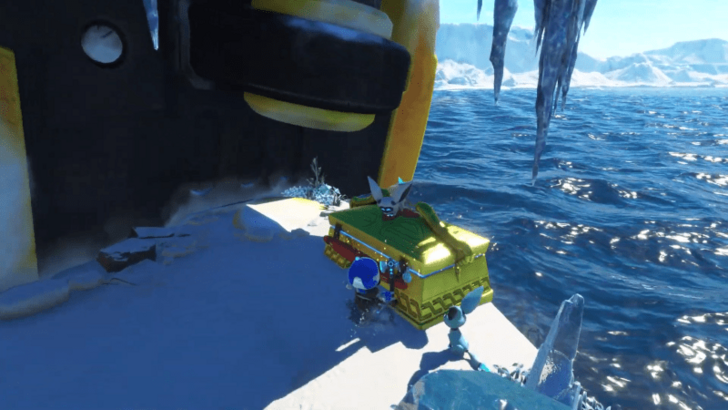 On the way to the second checkpoint, you will encounter a golden chest, open it to reveal the first puzzle piece. |
| 2 | 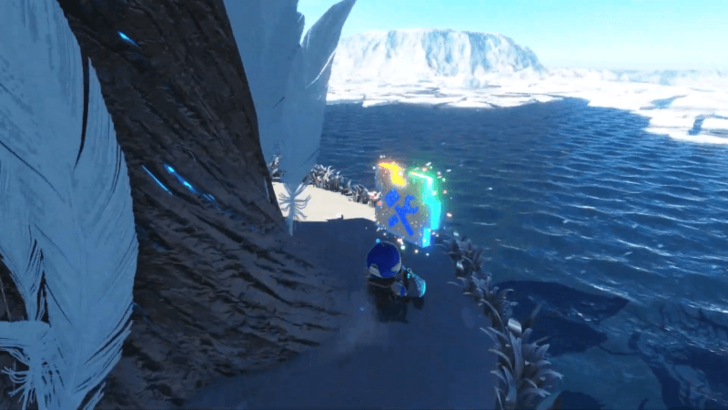 Found at the back of the tree from where you found the fifth bot together with a green bird. |
| 3 | 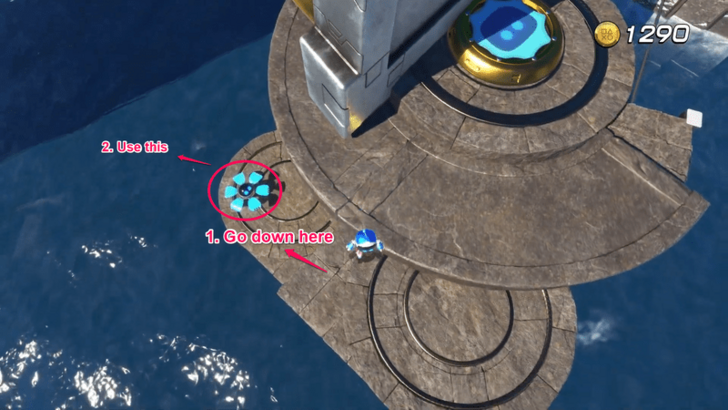 From the area where you found the final green bird, head down and use a charged spin on the mechanism below to reveal a path containing the third puzzle piece. |
Serpent Starway Puzzle Piece Locations
Slo-Mo Casino Puzzle Pieces
| # | Puzzle Piece Locations |
|---|---|
| 1 |  On one of the hanging platforms on the right side of the seesaw. |
| 2 | 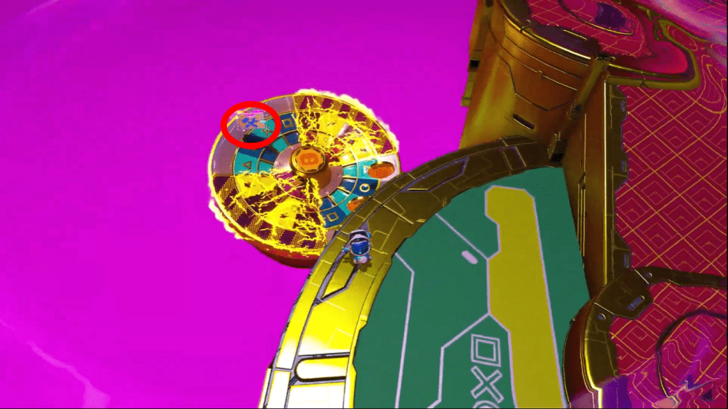 On the fast-spinning roulette found below the platform with the chameleon enemy. |
| 3 | 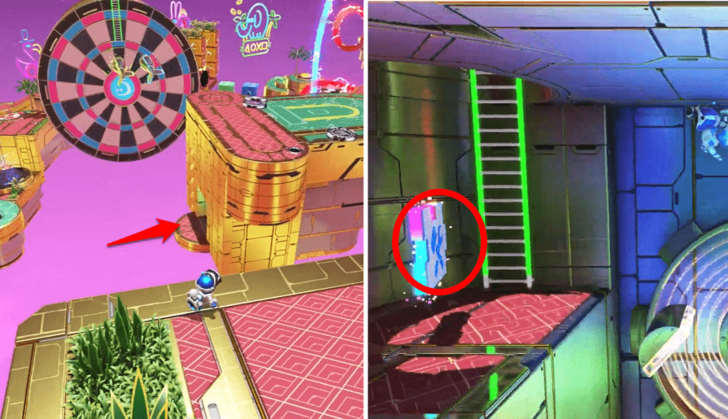 Found near the end of the stage at the bottom of one of the platforms. Ride darts or simple jump down and collect the puzzle piece once inside the area. |
Bathhouse Battle Puzzle Pieces
| # | Puzzle Piece Locations |
|---|---|
| 1 | 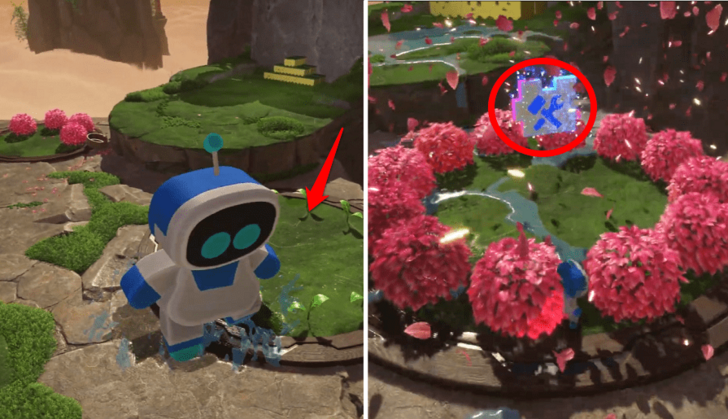 Appears in the middle when you use your ability to water all the sprouts in this area. |
| 2 | 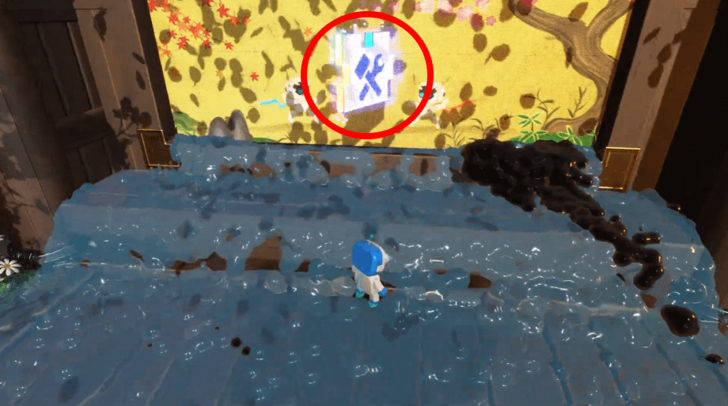 Appears after washing away all the tar on the painting. |
| 3 | 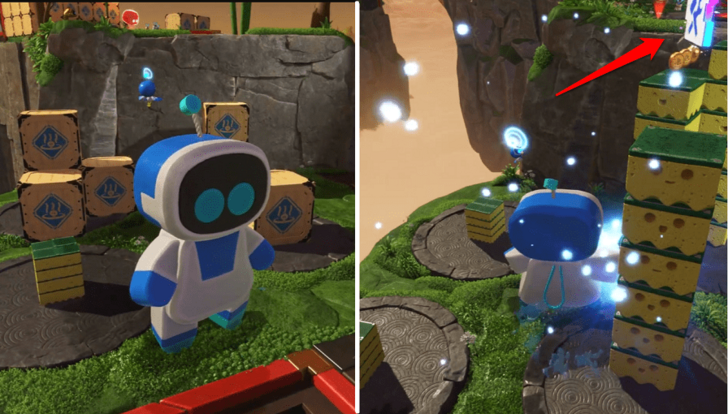 Floating above the crates. Destroy the crates and water the sponges with you ability to reach this puzzle piece. |
Free Big Brother! Puzzle Pieces
| # | Puzzle Piece Locations |
|---|---|
| 1 |  Inside the cave on the right side at the start of the stage. |
| 2 | 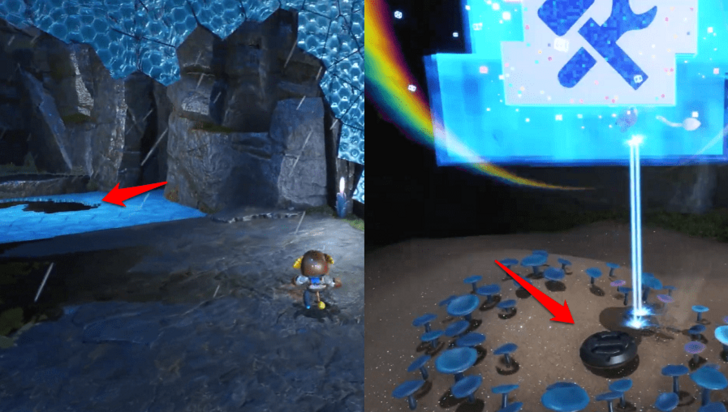 Appears after pulling the wire on the floor found under the glass floor. |
| 3 |  Appears on top of a hut after removing the chains from Big Brother and making him free. |
Trapped In Time Puzzle Pieces
| # | Puzzle Piece Locations |
|---|---|
| 1 | 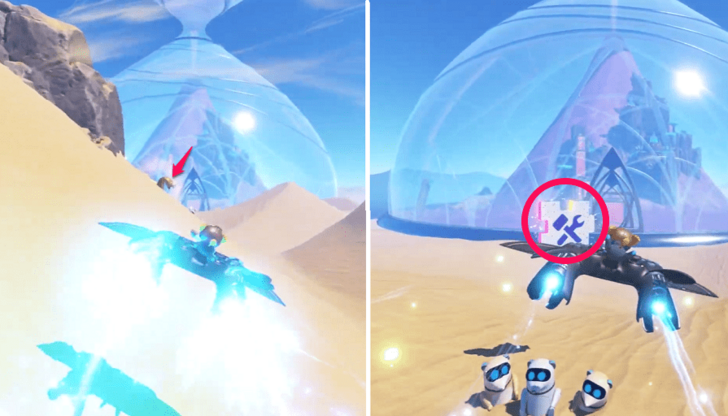 Appears after hitting the enemy while gliding with your Dual Speeder. |
| 2 | 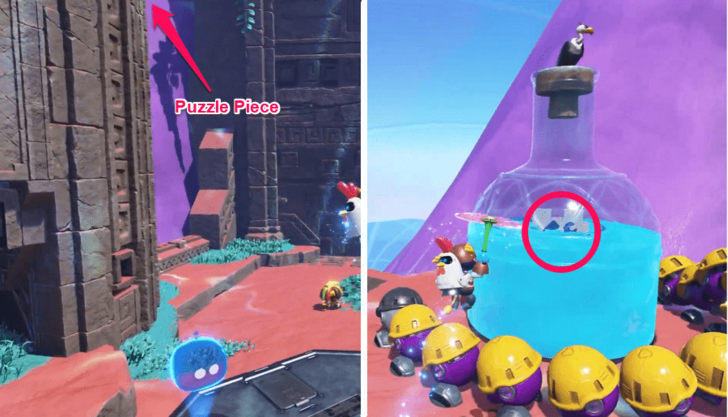 Inside a bottle guarded by enemies above the tower. |
| 3 |  To get to this Puzzle Piece, use your laser jump to break the glass floor found above it. |
Dude Raiding Puzzle Pieces
| # | Puzzle Piece Locations |
|---|---|
| 1 | 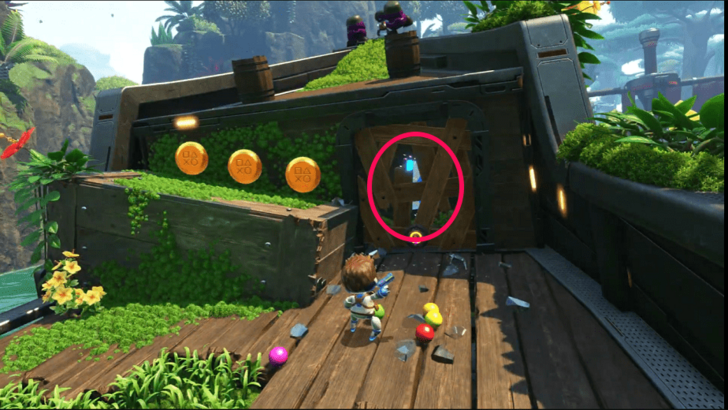 Behind wooden planks inside the ship. |
| 2 | 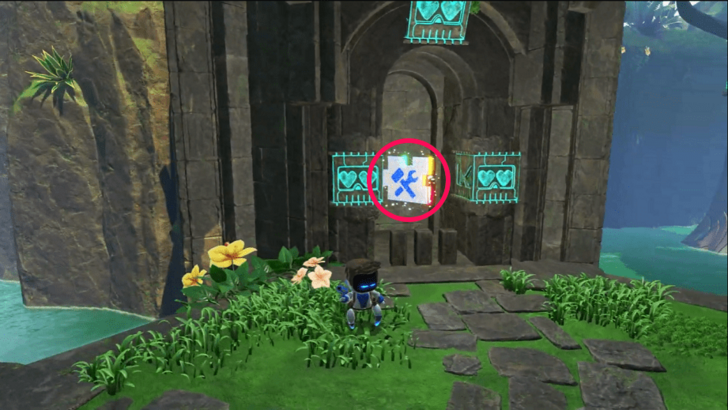 Inside a puzzle door that can be opened by turning switching all the cubes to a heart-face. |
| 3 | 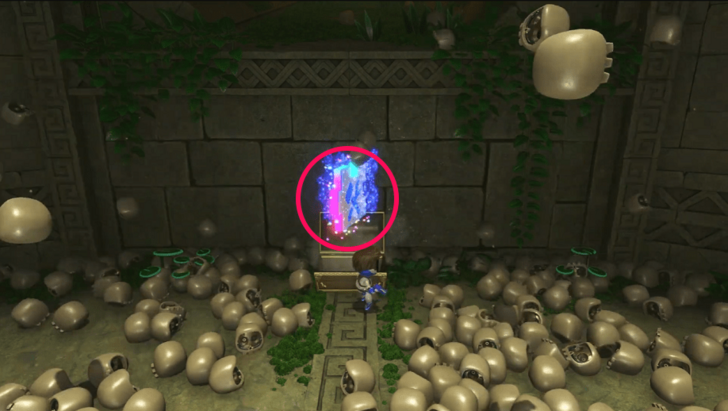 Inside a treasure chest buried in the area with skulls at the start of the dungeon/temple area. |
Camo Cosmos Puzzle Piece Locations
Hieroglitch Pyramid Puzzle Pieces
| # | Puzzle Piece Locations |
|---|---|
| 1 | 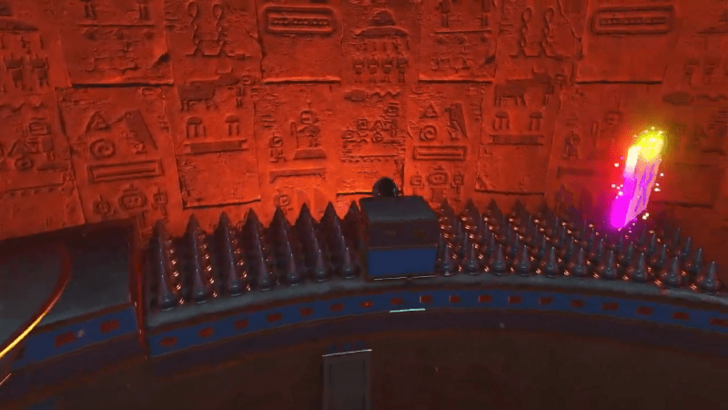 After turning into a metal ball for the first time, go to the far right of the area to get this puzzle piece. |
Bubbling Under Puzzle Pieces
| # | Puzzle Piece Locations |
|---|---|
| 1 |  From the same area where you found Bot 3, Puzzle Piece 1 is hidden inside a bubble just underwater, surrounded by 3 continuously moving sea urchins. |
| 2 | 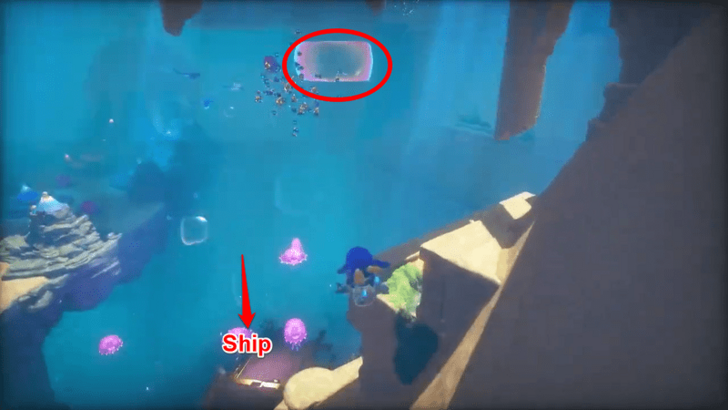 From the same underwater area as the first puzzle piece, find a bubble in a dome with an enemy inside holding a rotating blackjack. This area is just above where the ship is. Defeat the enemy and perform a charged attack to reveal the puzzle piece underneath. |
| 3 |  Just nearby the ship will be an area with three electric anemones formed in a fidget spinner. Hit all three and the puzzle piece will appear. |
Balloon Breeze Puzzle Pieces
| # | Puzzle Piece Locations |
|---|---|
| 1 |  In the beginning of the stage, immediately knock out the ladybug and use it as a trampoline to get onto the pillar to the left, the puzzle piece will be found here. |
| 3 |  Found on the ninth checkpoint, the one found on the blue airplane balloon. You can find this puzzle piece midair at the top of the balloon. |
Spooky Time Puzzle Pieces
| # | Puzzle Piece Locations |
|---|---|
| 1 | 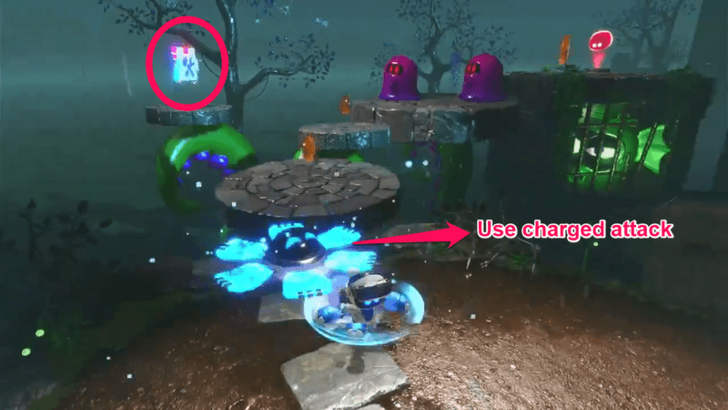 From the third checkpoint, use a charged attack on the flower to reveal hidden platforms, with one containing the puzzle piece. Stop the time after the platform appears to get it. |
| 2 |  From the location of the fourth bot, head above the area by stepping on the spider nearby. It will act as a mini trampoline to launch you above. From here, you will find a platform with lots of coins and one big coin. This big coin is actually an enemy, defeat this and a wire will appear afterwards. Pull the wire to get the puzzle piece. |
| 3 |  Near the final location, where the flag is located, you will have to go through tornado of rocks and knives. Use your ability to slow down time and use the debris as a platform to navigate to the other side. The puzzle piece will be located in one of the rocks floating about. |
Going Loco Puzzle Pieces
| # | Puzzle Piece Locations |
|---|---|
| 1 |  After passing through the small crevice by multiplying yourself into smaller bits, the puzzle piece is located on the right side. |
| 2 | 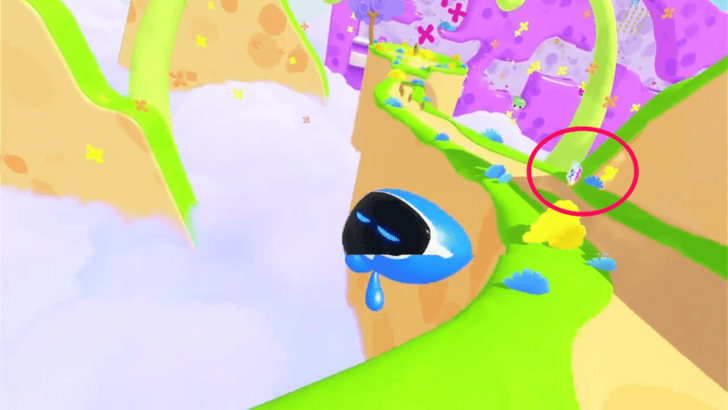 Found on the main path after breaking the wall to reveal a path, you won't miss this. |
| 3 |  From the location of Bot 4, head back to the center of the area and find three adjacent pine trees covered in snow. Hit each one of them to reveal the puzzle piece. |
Feather Cluster Puzzle Piece Locations
Djinny of the Lamp Puzzle Pieces
| # | Puzzle Piece Locations |
|---|---|
| 1 | 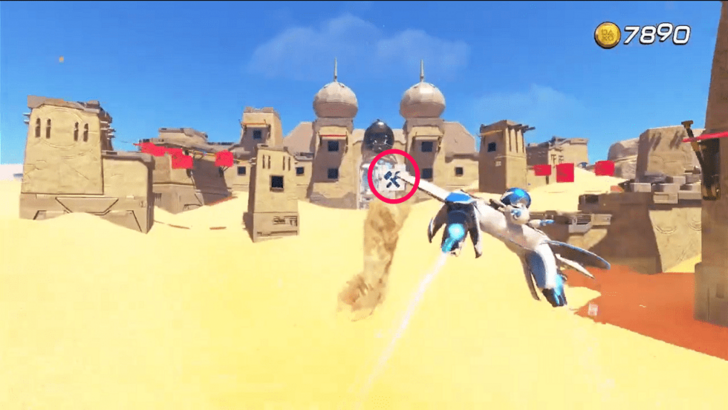 On top of a moving tornado found upon entering the planet with the Dual Speeder. |
| 2 | 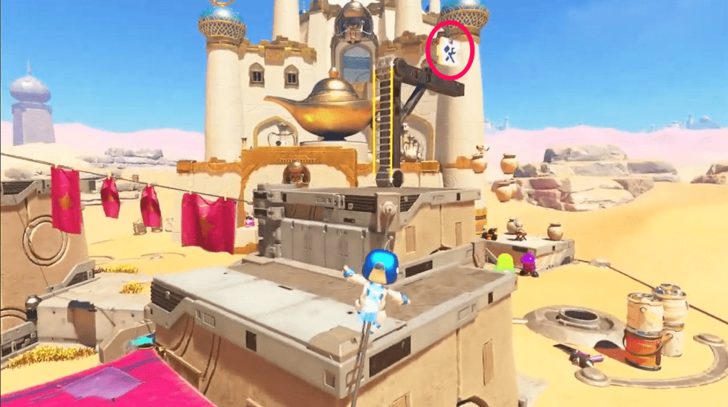 On top of platform above a ladder found above one of the houses. |
| 3 | 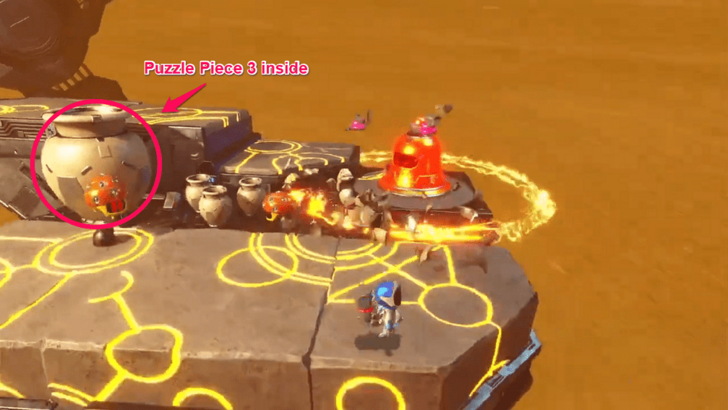 Hidden inside a large vase near the golden bell enemy. |
Luna Sola Puzzle Pieces
| # | Puzzle Piece Locations |
|---|---|
| 1 | 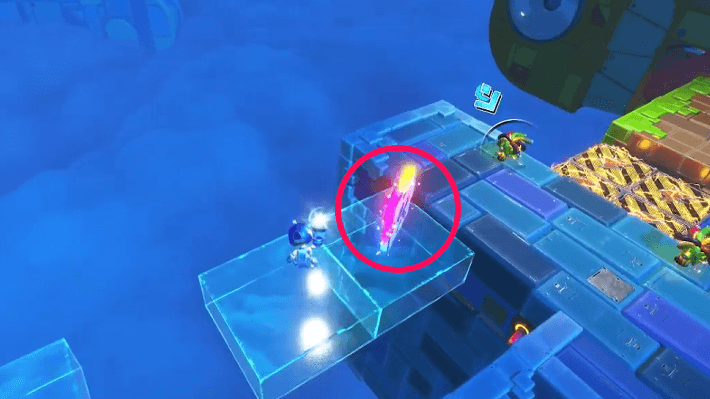 After activating the second night switch, jump up to the checkpoint and turn around. Pull out a light bulb, and follow the invisible platforms to the first puzzle piece. |
| 2 | 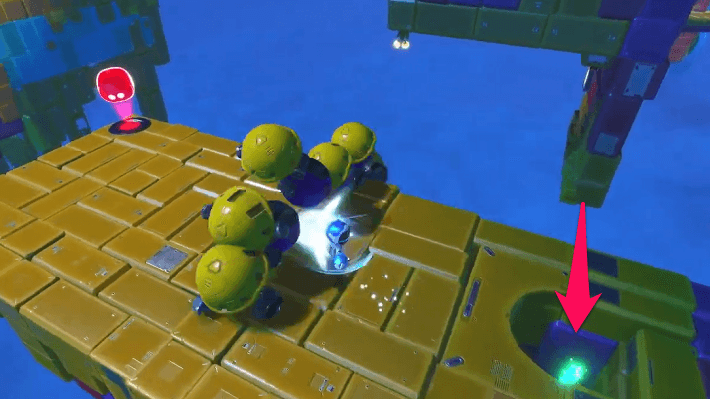 Switch to night in the area with the line of enemies going through a hole. At the top of the platform, there is a hole on the floor containing the second puzzle piece. |
| 3 | 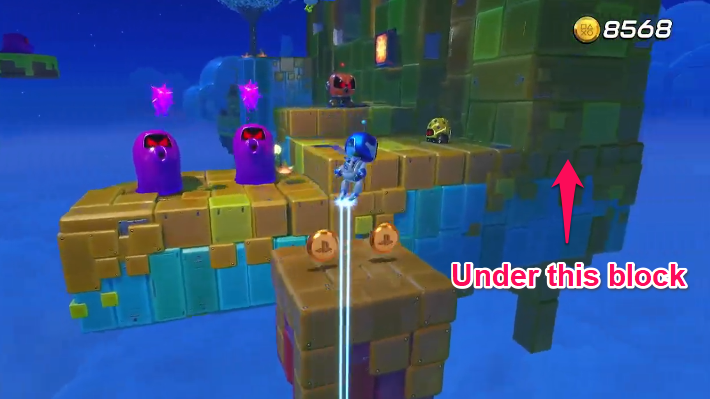 In the area with the two purple enemies, one yellow enemy, and one orange enemy, switch from night to day then back to night. Pull the wire that appears on the side to reveal a puzzle piece. |
Frozen Meal Puzzle Pieces
| # | Puzzle Piece Locations |
|---|---|
| 1 | 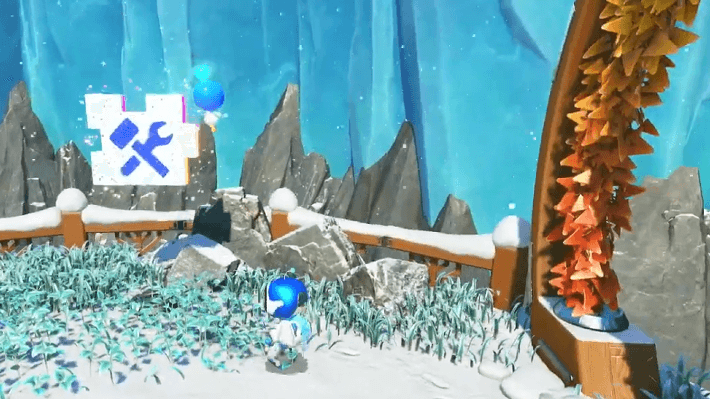 Upon landing in Frozen Meal, go back uphill to the first arch. Hit the snowman to reveal a cluster of wires that you can pull to reveal the first puzzle piece. |
| 2 | 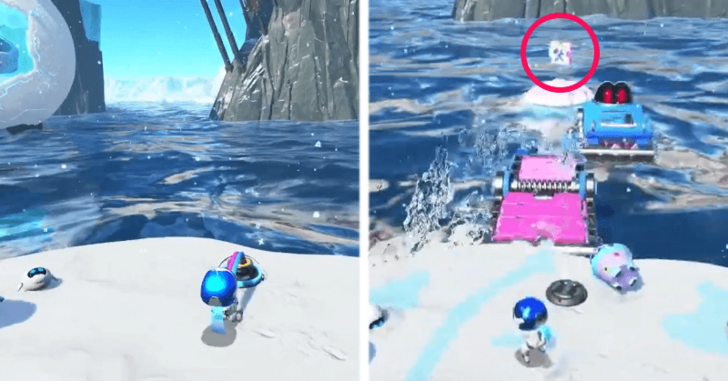 On the right side of the ice rink where the exit used to be before the giant snowman swallowed it, there is a small snowman hiding some wires. Hit the snowman, then pull the wires to reveal a moving platform with the puzzle piece. |
| 3 | 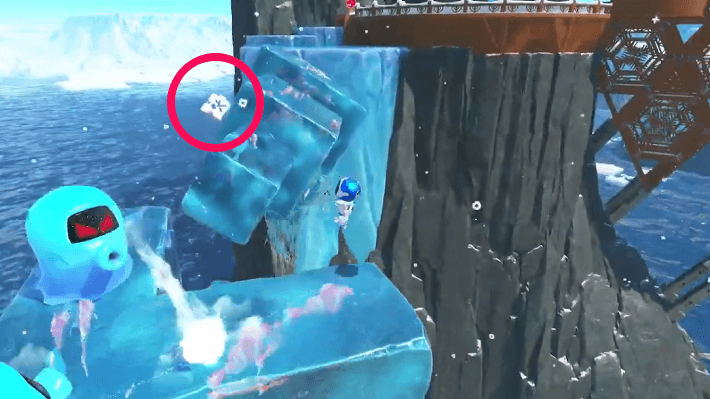 Found on a rotating ice block. |
Orbital Blitz Puzzle Pieces
| # | Puzzle Piece Locations |
|---|---|
| 1 | 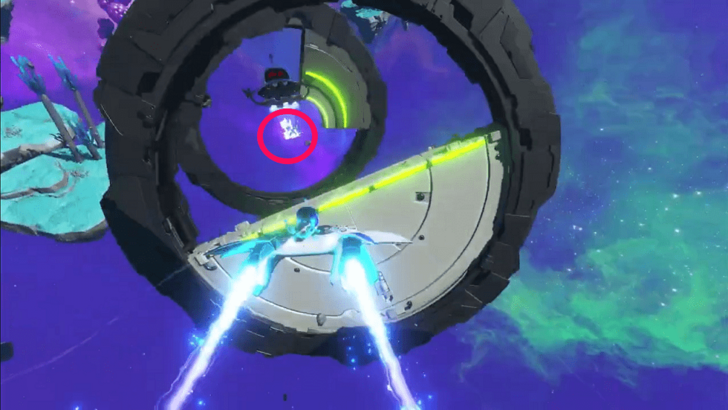 Abducted by a UFO once you enter the planet. Use the boosters of the Dual Speeder to chase and get the Puzzle Piece. |
| 2 | 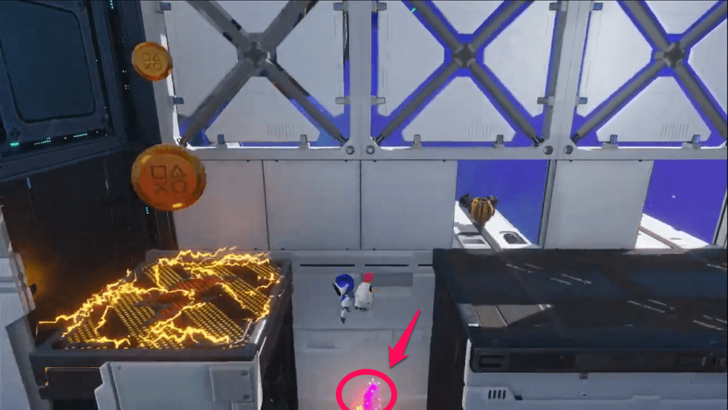 Below a pit found between a mechanical saw and electric platform. |
| 3 | 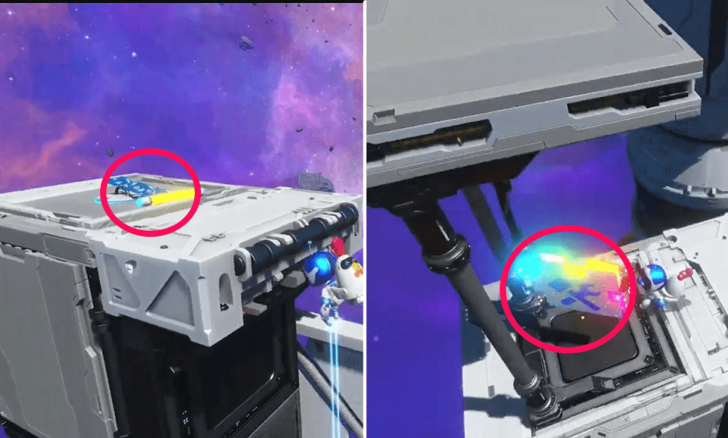 Appears after pulling the bar attached to the platform. |
Cannon Brawl Puzzle Pieces
| # | Puzzle Piece Locations |
|---|---|
| 1 | 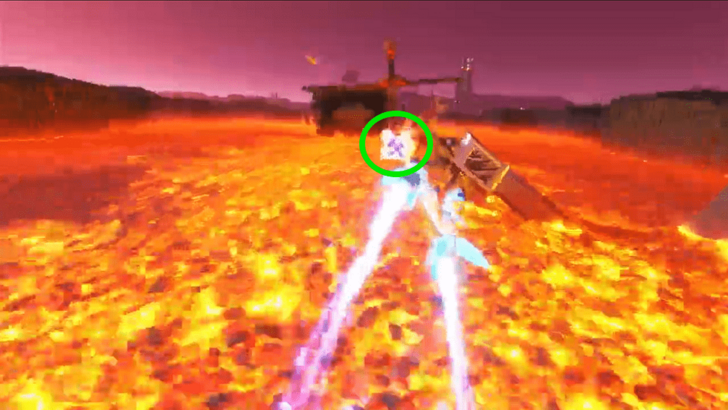 Near some debris upon entering the planet with the Dual Speeder. |
| 2 | 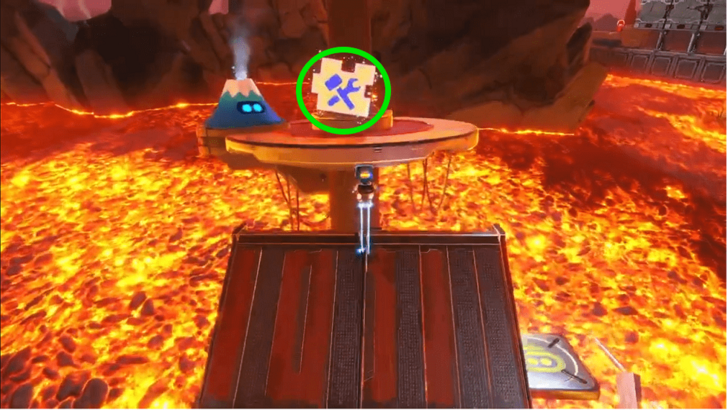 Found on top of the sinking platform. |
| 3 | 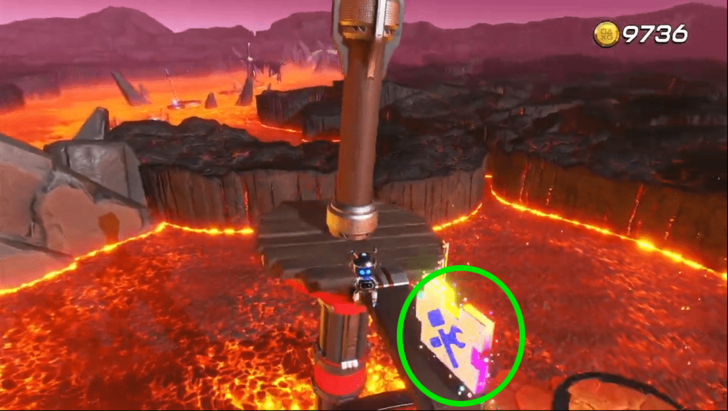 On a plank found above the area with Bot 6. |
Machine Learning Puzzle Pieces
| # | Puzzle Piece Locations |
|---|---|
| 1 | 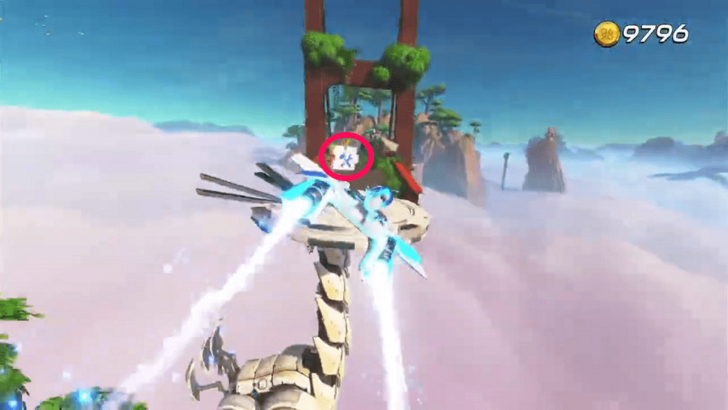 Appears above one of the machines as soon as you enter the planet with the Dual Speeder. |
| 2 | 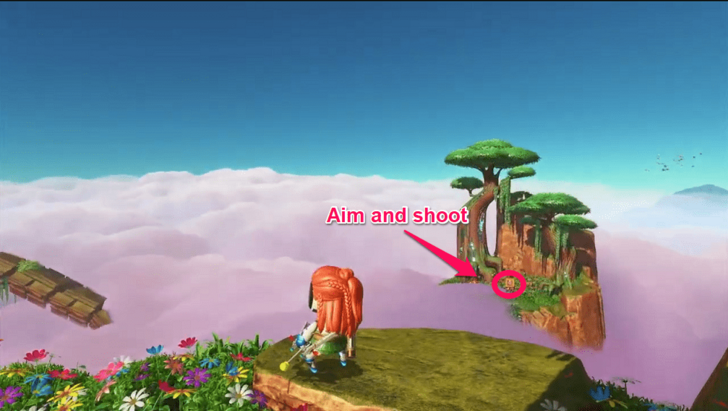 Inside a crate on far island found to the left of the purple wire area. Aim and shoot at the crate to get the Puzzle Piece. |
| 3 | 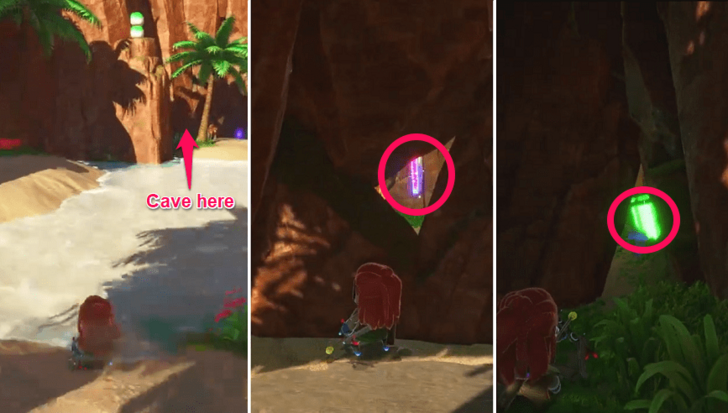 Inside a cave with behind a rock wall with openings. Shoot at the green explosive on the lower right opening to enter the cave. |
Lost Galaxy Puzzle Piece Locations
Fan Club Puzzle Pieces
| # | Puzzle Piece Locations |
|---|---|
| 1 | 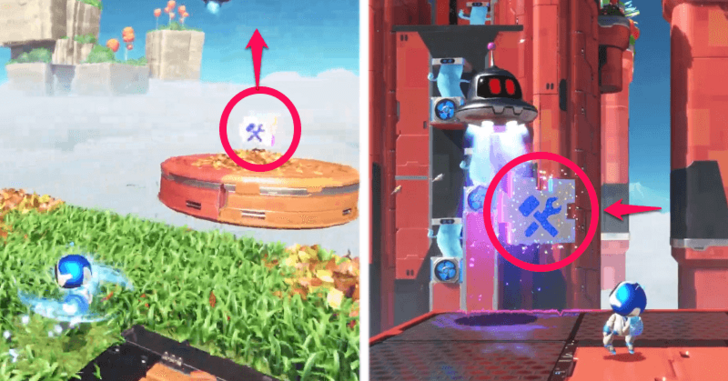 Found to the right of the grassy platform. Upon being taken by a UFO, pull up the hidden fan from where the puzzle piece used to be, and use it to bring you to the upper platform to take the piece back. |
| 2 | 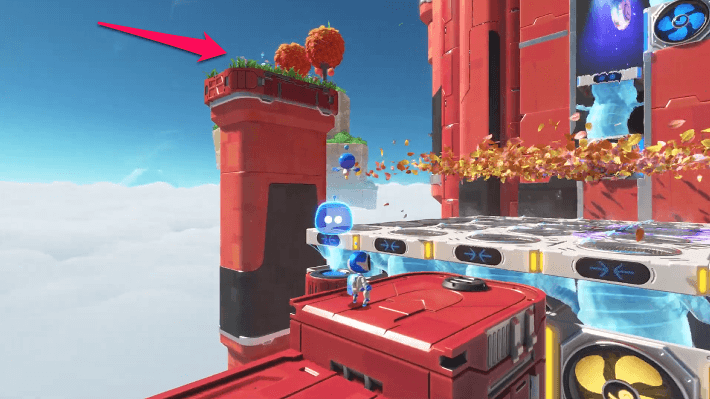 Found on a platfrom to the left of the large fan area beneath the UFO that kidnapped a Bot. Use the fans to reach this area, and pull the wires to reveal the puzzle piece. |
Funky Fungi Puzzle Pieces
| # | Puzzle Piece Locations |
|---|---|
| 1 | 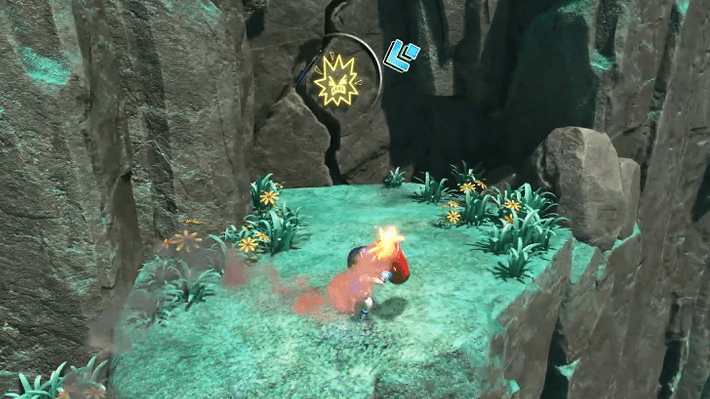 Use a dynamite to blow up the wall hiding the puzzle piece. |
| 2 | 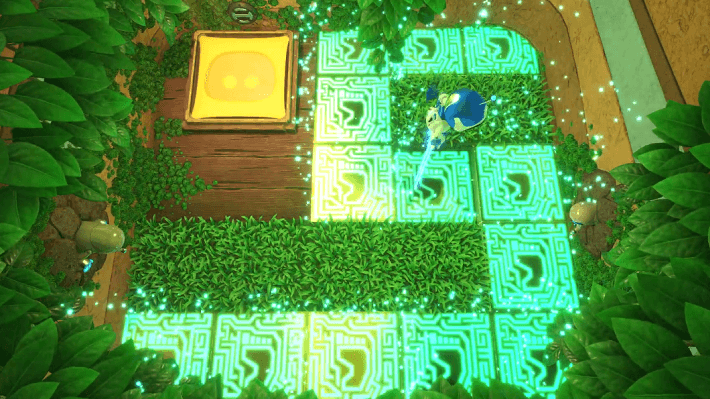 In the underground hidden area, feel out the tiles, then laser off the correct one to uncover the puzzle piece. |
Light Bulb Limbo Puzzle Pieces
| # | Puzzle Piece Locations |
|---|---|
| 1 | 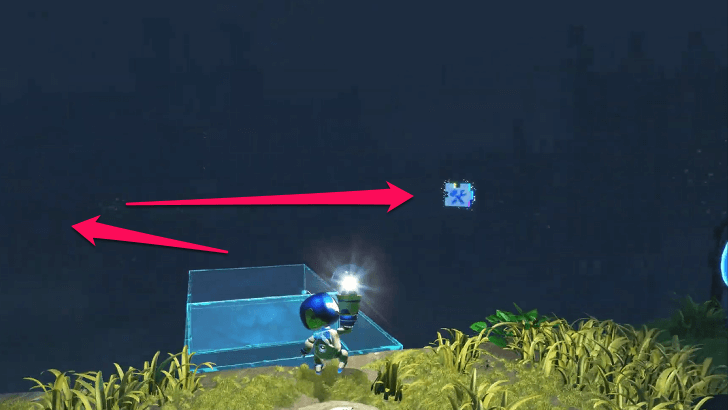 After the third checkpoint, use the light to navigate through the invisible platforms in order to reach the first puzzle piece. |
| 2 | 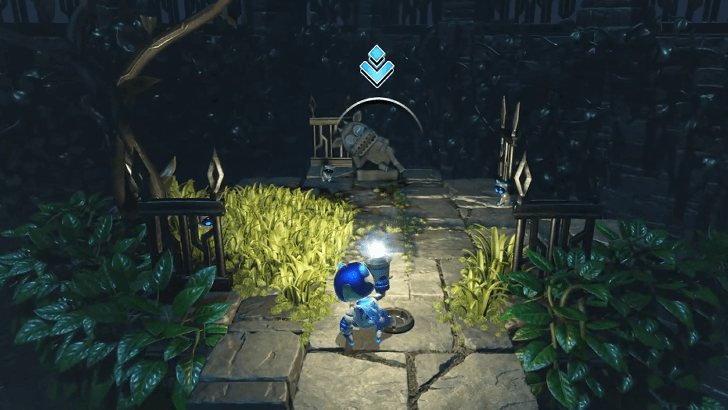 Throw a light bulb onto the statue on a platform to the right of the headstone. |
Boxel Bust-Up Puzzle Pieces
| # | Puzzle Piece Locations |
|---|---|
| 1 | 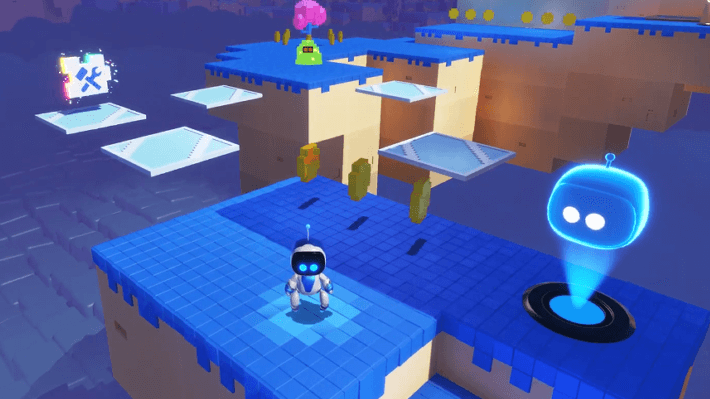 On a moving platform after the second checkpoint. |
| 2 | 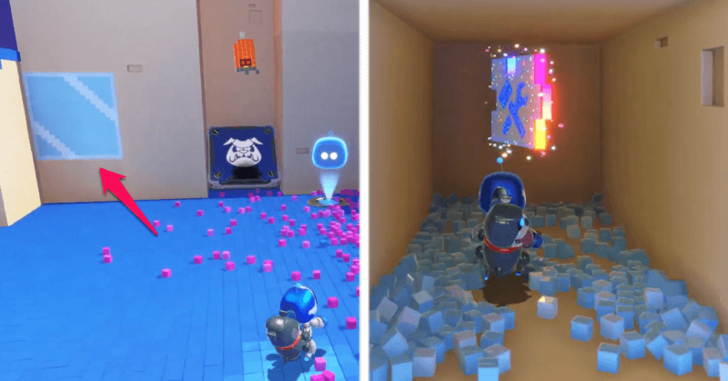 On the platform with the ability chest, break the glass-looking blocks on the wall. Then, pull the wires to reveal the puzzle piece. |
Furnace Fever Puzzle Pieces
| # | Puzzle Piece Locations |
|---|---|
| 1 | 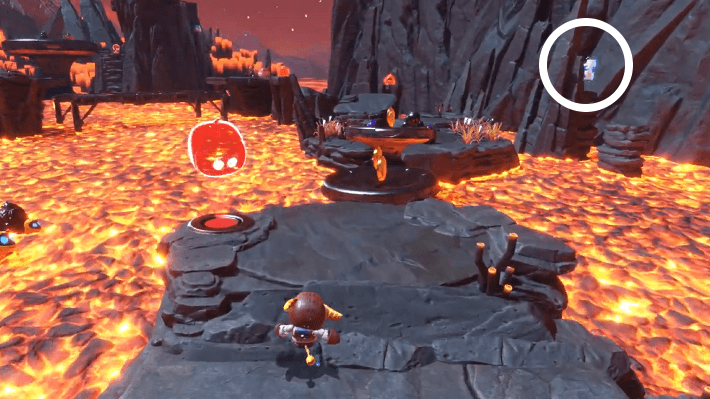 Found by a rock spire after the second checkpoint. |
| 2 | 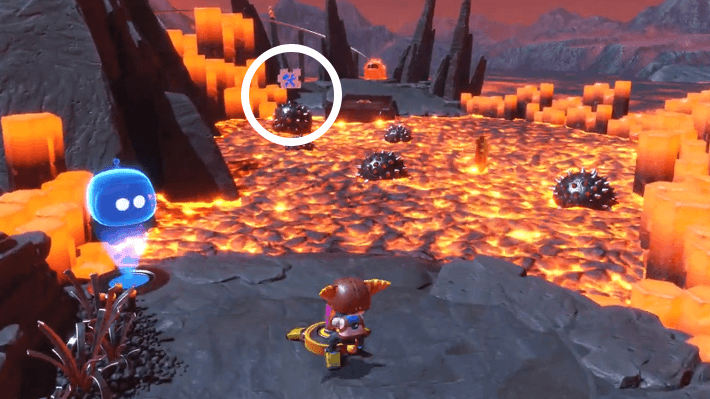 On top of a spiky ball rolling around in the lava floor area. Pull out the rubber duck to get through this area, and try to jump over the spiky ball to get the puzzle piece. |
Ghouls & Bots Puzzle Pieces
| # | Puzzle Piece Locations |
|---|---|
| 1 | 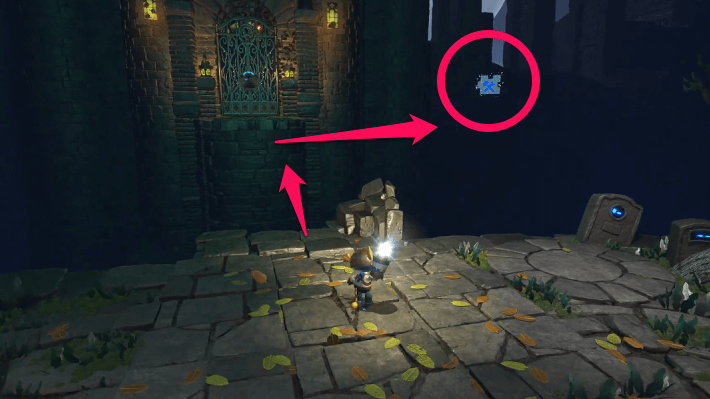 After reaching the high circular platform, catch the light bulb, and use it to navigate through the invisible platforms to reach the puzzle piece. |
| 2 | 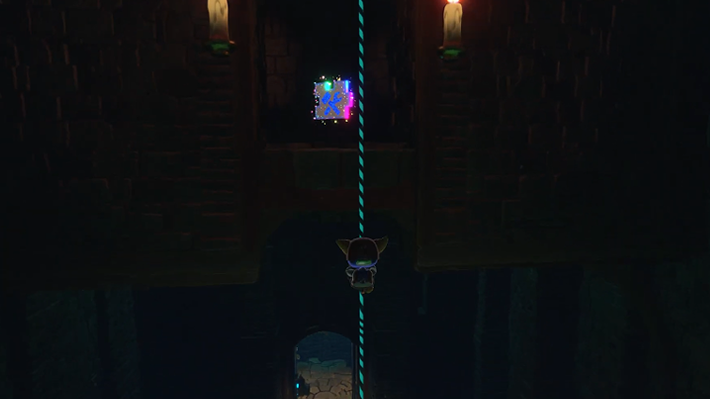 Climb to the very top of the chandelier, then look back. The puzzle piece should be on a platform opposite the path forward. |
Rocket Pull Power! Puzzle Pieces
| # | Puzzle Piece Locations |
|---|---|
| 1 | 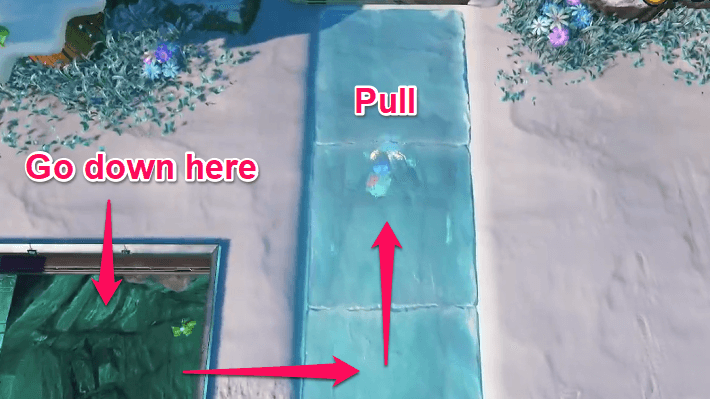 On the platform of the second checkpoint, pull the handle of the grate with your ability, and go down the hole. Go right then up to another handle, and pull that as well. This should reveal the first puzzle piece. |
| 2 | 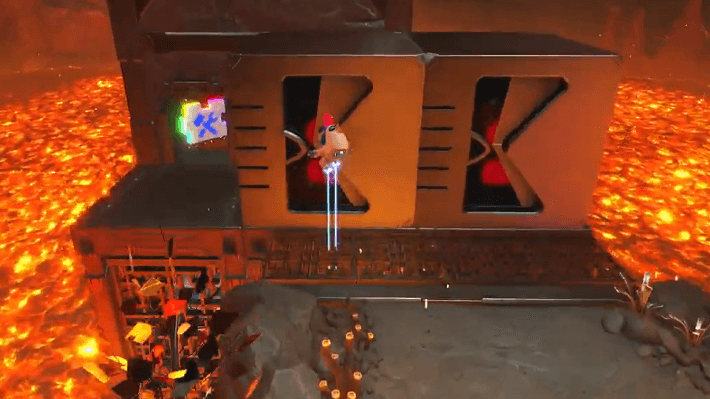 In a nook in the wall guarded by the large block enemies. Either time your jump properly or defeat the block enemies by pulling their handles in order to get the puzzle piece. |
Danger Dojo Puzzle Pieces
| # | Puzzle Piece Locations |
|---|---|
| 1 | 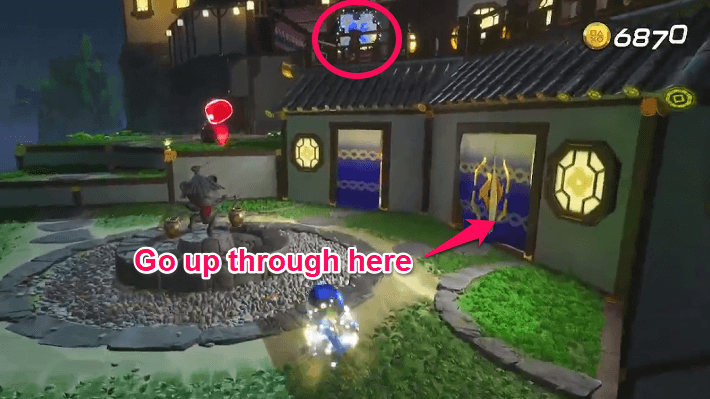 On the second floor of the house found after the bamboo stalks. Enter the room on the right at the first floor to bounce up onto the second floor. |
| 2 | 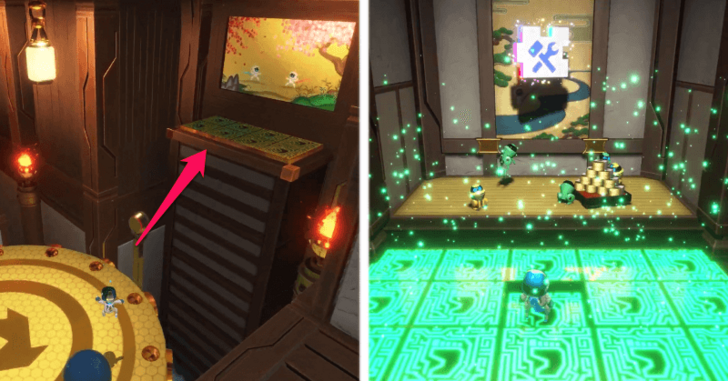 On the large trampoline after the shuriken wall, bounce towards the left platform that has glowing panels on the floor. Use your laser on the panels with the strongest vibrations to get further into the hidden room and find the puzzle piece! |
High-Suction Hero Puzzle Pieces
| # | Puzzle Piece Locations |
|---|---|
| 1 | 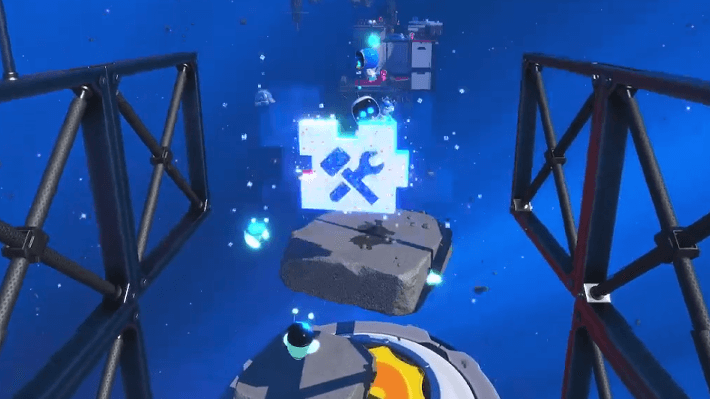 After defeating the large plant monster and using your ability on the geyser to get up onto the tall platform, use the remaining cement to make platforms to reach the puzzle piece high on top of the platform. |
| 2 | 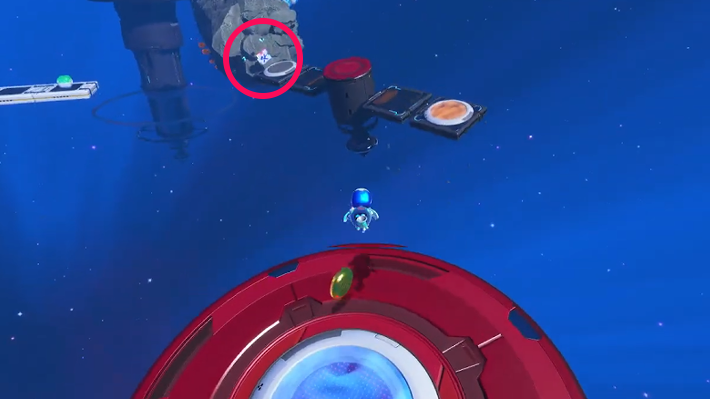 Found on an asteroid on the right side in the area where you can choose your preferred liquid. |
Turtles in Trash Puzzle Pieces
| # | Puzzle Piece Locations |
|---|---|
| 1 | 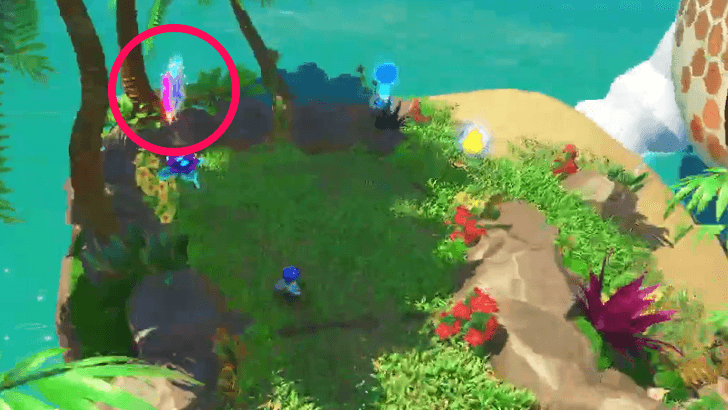 After washing off all the oil on the turtle's back, the puzzle piece appears on top of a flower on the right side of the turtle. |
| 2 | 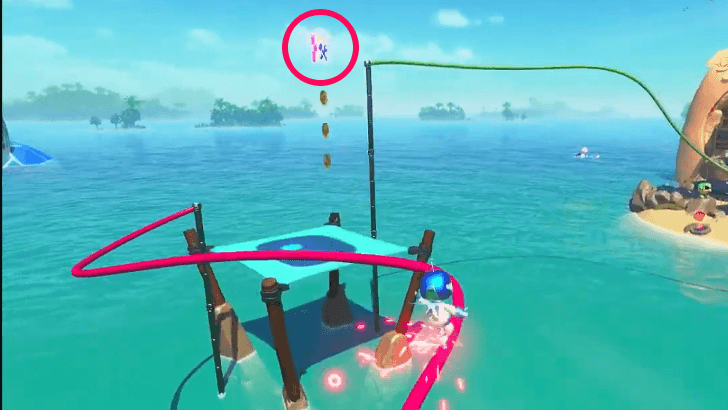 Can be found over the large blue trampoline between the red and green rails. |
Final Encore Puzzle Pieces
| # | Puzzle Piece Locations |
|---|---|
| 1 |  After reaching the platform above the red and blue gift boxes, follow the edge of this platform, and use your ability to push back the red block on the side. Pull the wires to reveal the puzzle piece. |
| 2 |  After reaching the platform above the piano, use your ability to activate the accordion platforms to make your way onto the square platform on the right. |
Crash Site Puzzle Piece Locations
Regular Puzzle Pieces
| # | Required Bots | Location |
|---|---|---|
| 1 | 2 | 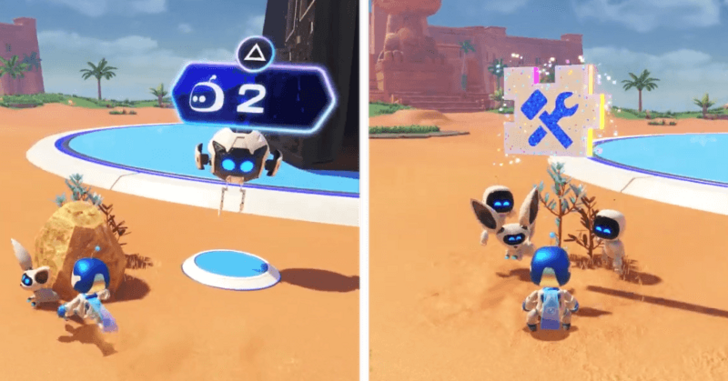 Found under the rock with a trapped lemur right in front of your spaceship. Make sure to join the two other bots to lift the rock! |
| 2 | 10 | 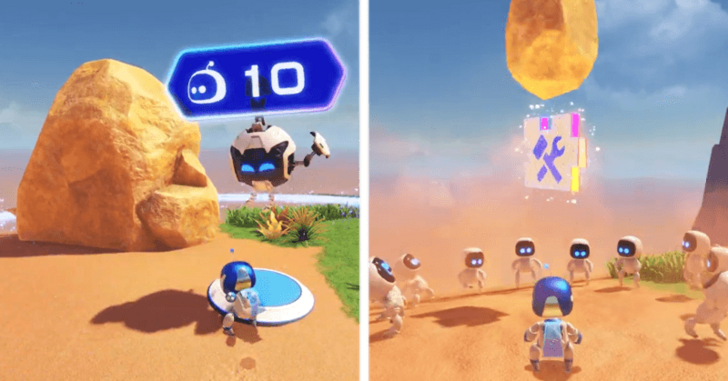 Found under a large boulder to the left of the spaceship, behind Safari Park. |
| 3 | 10 | 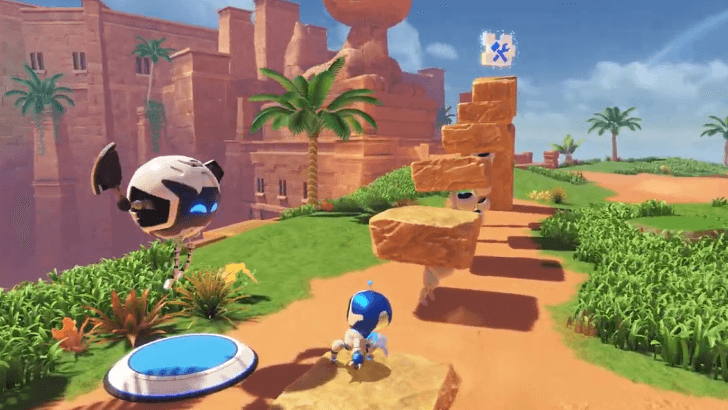 On top of a stone pillar on the west side of the Crash Site's main area. |
| 4 | 10 | 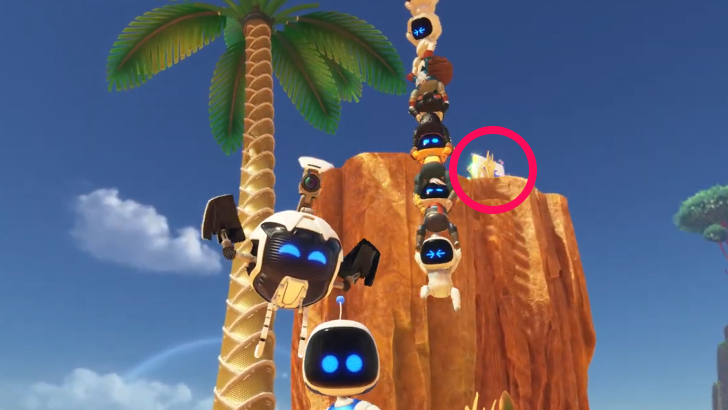 Found on a cliff on the north side of the main area. Once your Bots are summoned, jump onto the Bot rope, and climb up to reach this puzzle piece. |
| 5 | 10 | 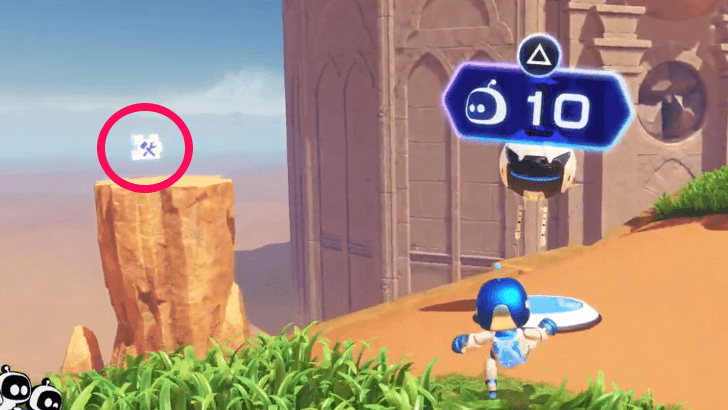 On top of a rock formation separate from the mainland on the east side of the Crash Site's main area. |
| 6 | 100 | 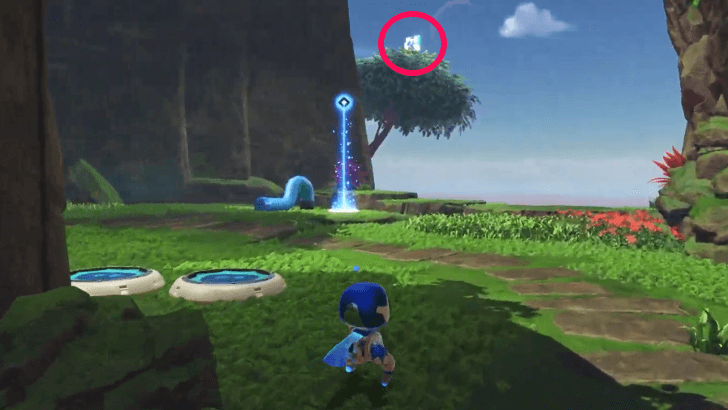 Found on top of a tree branch in the northeast jungle area. |
| 7 | 40 | 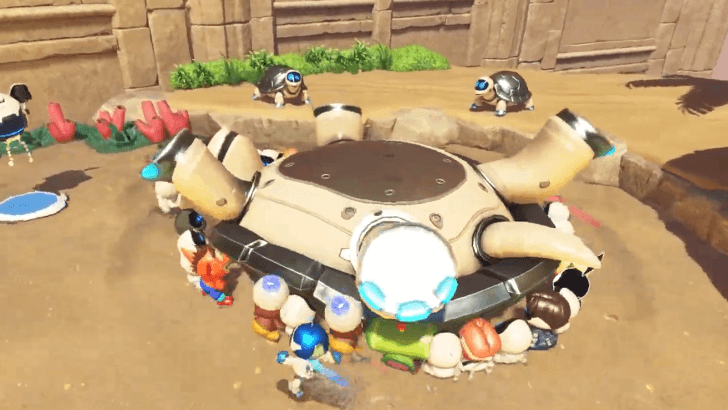 Flip the large turtle in the southeast beach area. |
| 8 | 80 |  In the southwest snowy area, destroy the large block of ice trapping four bots and a pink shark. Use the trampoline to get to the platform with the puzzle piece. This can also be accessed from the ledge requiring 100 Bots to reach, but only if you don't break the large ice block. |
| 9 | 100 | 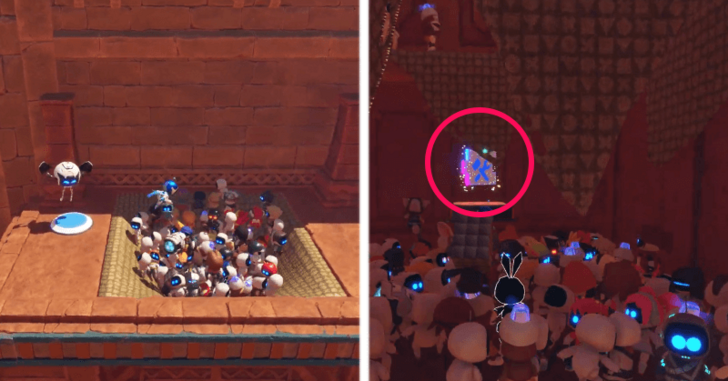 Go up the ramp requiring 120 Bots, then go to the end of the second floor. Summon Bots to stand on the cloth floor requiring 100 Bots. Once the floor breaks, you can get the puzzle piece at the back of this hidden area. |
Crash Site Guide: All Bots, Puzzle Pieces, and Facilities
Gatcha Lab Puzzle Pieces
| Gatcha Item | Location |
|---|---|
| Squawky | 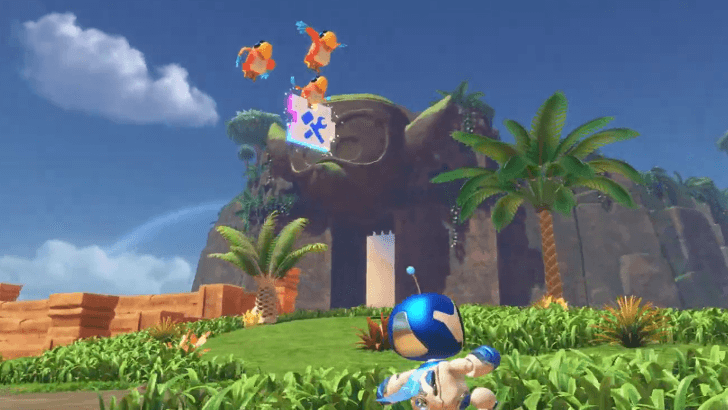 Flying around the main area. |
| Heavy Roller | Obtained by playing bowling behind the Changing Room. You need to hit the bowling ball and knock down all the pins in a strike for the puzzle piece to appear. |
What Are Puzzle Pieces?
Stage Collectibles
Puzzle Pieces are Collectibles that can be found in most stages, similar to Hidden Bots.
Unlocks Crash Site Stations
Puzzle Pieces are mainly used to unlock Stations within the Crash Site.
Each Crash Site Station requires a certain number of Puzzle Pieces, so it is best to unlock after collecting a bunch from different levels.
Astro Bot Related Guides

All Collectible Guides
| Collectible Guides | |
|---|---|
| Special VIP Bots | Astro's Playroom VIP Bots |
| All Hidden Bots Location Guide | All Puzzle Pieces Location Guide |
| All Astro Bot Outfits | All Dual Speeder Skins |
| Gatcha Lab Guide | All Photo Spot Locations |
| Special Egg Bots | - |
Comment
Author
All Puzzle Pieces Location Guide
Rankings
- We could not find the article you were looking for.
- We could not find the message board you were looking for.
Gaming News
Popular Games

Genshin Impact Walkthrough & Guides Wiki

Umamusume: Pretty Derby Walkthrough & Guides Wiki

Pokemon Pokopia Walkthrough & Guides Wiki

Honkai: Star Rail Walkthrough & Guides Wiki

Monster Hunter Stories 3: Twisted Reflection Walkthrough & Guides Wiki

Arknights: Endfield Walkthrough & Guides Wiki

Wuthering Waves Walkthrough & Guides Wiki

Zenless Zone Zero Walkthrough & Guides Wiki

Pokemon TCG Pocket (PTCGP) Strategies & Guides Wiki

Monster Hunter Wilds Walkthrough & Guides Wiki
Recommended Games

Fire Emblem Heroes (FEH) Walkthrough & Guides Wiki

Diablo 4: Vessel of Hatred Walkthrough & Guides Wiki

Cyberpunk 2077: Ultimate Edition Walkthrough & Guides Wiki

Yu-Gi-Oh! Master Duel Walkthrough & Guides Wiki

Super Smash Bros. Ultimate Walkthrough & Guides Wiki

Pokemon Brilliant Diamond and Shining Pearl (BDSP) Walkthrough & Guides Wiki

Elden Ring Shadow of the Erdtree Walkthrough & Guides Wiki

Monster Hunter World Walkthrough & Guides Wiki

The Legend of Zelda: Tears of the Kingdom Walkthrough & Guides Wiki

Persona 3 Reload Walkthrough & Guides Wiki
All rights reserved
©2024 Sony Interactive Entertainment Inc. Developed by Team Asobi. Astro Bot is a trademark of Sony Interactive Entertainment LLC.
The copyrights of videos of games used in our content and other intellectual property rights belong to the provider of the game.
The contents we provide on this site were created personally by members of the Game8 editorial department.
We refuse the right to reuse or repost content taken without our permission such as data or images to other sites.




![Monster Hunter Stories 3 Review [First Impressions] | Simply Rejuvenating](https://img.game8.co/4438641/2a31b7702bd70e78ec8efd24661dacda.jpeg/show)

![Monster Hunter Stories 3 Review [First Impressions] | Simply Rejuvenating](https://img.game8.co/4438641/2a31b7702bd70e78ec8efd24661dacda.jpeg/thumb)
![The Seven Deadly Sins: Origin Review [First Impressions] | A Promising Start](https://img.game8.co/4440581/584e0bfb87908f12c4eab6e846eb1afd.png/thumb)


