 Frost Symaqus (Boss)
 Fighter Maya (Boss)
 Montmorancy (Boss)
 Zerato (Boss)
 Poison Naga (Elite)
 Indigo Imp
 Auxiliary Lots
 Alexa
Alexa Tirel Spearman
 Imp King
 Water Klineode
 Converted Caides (Boss
 Frost Caides (Boss)
 Jealous Caides (Boss)
 Clarissa (Boss)
 Challenger Dominiel (Boss)
 Sage Baal & Sezan (Boss)
 Dawn Dream Leech
 Jealous Symaqus
 Converted Symaqus
 The Sword Swordsman
 Elson
Elson Moss Dragona
 Raqix Elite
 Sea Dragona
 Raqix Flying Troop
 Karax Scout
 Gloom Testudo
 Elisia of the Ice
 Aquina of the Sea (Boss)
 Shadow Angara (Boss)
 Raqix Shredder (Boss)
 Dark Klineode
 Dusk-Skull Warrior
 Karax Charger
This survey will take about 1 minute.
Your answers will help us to improve our website.
Epic Seven
Nixied's Sanctum - Labyrinth
We regret to announce that we are ending the coverage of Epic Seven. Thank you for all the support in reading our coverage of updates, event guides and character releases for Epic Seven.
This article will guide you on how to clear the Labyrinth content Nixied's Sanctume for the game Epic Seven. Read on for more information on Boss and Chest Location.
List of Contents
How To Unlock
You can unlock this Labyrinth by clearing Adventure Stage Episode 1 Chapter 7-S6. Seven Flags Fortress.
Zone 1 - Aurora Forest
Main Route
 Enlarge
| Enemies | |||
|---|---|---|---|
 Tundra Angara (Boss) Tundra Angara (Boss) |
 Sapphirre Wyvern (Boss) Sapphirre Wyvern (Boss) |
 Frosted Silva (Elite) Frosted Silva (Elite) |
Tundra Angara |
 Wood Mushroom Wood Mushroom |
 Ocean Seed Ocean Seed |
Frosted Silva |
 Verdant Seed Verdant Seed |
 Ice Mushroom Ice Mushroom |
 Breeze Silva Breeze Silva |
 Swamp Angara Swamp Angara |
|
| ✦ | Clear Area 1 |
|---|---|
| ✦ | Repel Sapphire Wyvern |
| ✦ | Repel Angara Boss. |
Step 1:
Move forward then head South until you reach the first checkpoint.
Step 2-3 :
Continuing on, the first crossroad that you will encounter go East then move forward there will be a Gold Chest available on your path and head towards the second checkpoint you willl encounter a Warp Portal taking you to the next area.
Step 4:
It is advisable to take a Camp on the second checkpoint, it might take a while before you will reach the third checkpoit on this area. Move forward and you will encounter the first crossroad of the area there will locked areas the only choice to make is go East.
Step 5 6:
Continue moving forward until you reach a Barrier Stone interact with it and it will open some of the locked areas then go through the warp portal and you will be transported near the checkpoint.
Step 7-8:
The West area will now be unlocked continue moving foward of that part and you will encounter another Barrrier Stone and a Gold Chest. Move forward and enter though the Warp Portal.
Step 9-11:
You will go back to the start point of the map. Head West and and continue moving forward until you reach another checkpoint. You can save here now or Camp. Go East again until you reach a crossroad you encounter another Gold Chest here and a Warp Portal.
Step 12-14:
After going through the portal continue moving forward then head East and head towards until you reach another Barrier Stone and there will be another checkpoint near it. Continuing on the West area you will encounter another Barrier Stone and a checkpoint then continue moving until you go back to the fist crossroad that you encounte in that area.
Step 15:
Head North and you will encounter a Warp Portal that will take you near the start point of the map.
Step 16-17:
Go back to the first checkpoint and the area to the North will now be open. Head towards the last part of the map until you encounter the Boss Sapphire Wyvern, after defeating the boss you can now enter the Zone 2.
Optional Route
 Enlarge
To finish the star completion you will encounter the other boss Tundra Angara that can be encountered when doing the Step 15, insted of going through the portal move forward until you encounter the other boss and the remaining Gold Chest will also be there.
Zone 2 - Frozen Lake
Main Route
 Enlarge
| Enemies | |||
|---|---|---|---|
 Cold Eye Lich (Boss) Cold Eye Lich (Boss) |
 Dominiel (Boss) Dominiel (Boss) |
 Sun Dragona (Elite) Sun Dragona (Elite) |
 White Flux (Elite) White Flux (Elite) |
 Icy Testudo Icy Testudo |
Ocean Seed |
White Flux |
 Snow Slime Snow Slime |
 Frost Slime Frost Slime |
Sun Dragona |
 Stalactite Testudo Stalactite Testudo |
|
| ✦ | Clear Area 2 |
|---|---|
| ✦ | Rescue Dominiel |
| ✦ | Eliminate 2 Monsters by Gold Chest |
Step 1-6:
Proceed moving forward until you reach the first checkpoint of the map. Following the suggested route you head North then East. Continue moving forward until you reach the 2nd checkpoint. You can either finish the exploration here or still continue if you still have team moral left, then proceed at the area where you will encounter a Barrier Stone. After unlocking the barrier some of the closed parts will now be unlocked. Proceed moving forward and you will encounter a Cold Eye Lich (Boss) after that you will encounter a Goddess Statue Barrier interact with it and you will open another closed route.
Step 7-9:
Proceed to the first checkpoint, (use Waypoint to travel faster) then head East and continue moving forward at the crossroad proceed South until you reach a checkpoint then go North and proceed East continue moving until you another crossroad then go South until you reach another checkpoint. You can finish the exploration here if you don't have enough morale.
Step 10-11:
Continue proceeding East then North until you reach another Barrier Stone. After interacting with the stone some of the closed routes will be open. Use the waypoint to go back the last checkpoint and head West then you will encounter another Cold Eye Lich (Boss) after defeating the boss interact with the Goddess Statue and you will open another closed routes.
Step 12:
Use Waypoint and go to the last checkpoint then proceed North and move forward until the end. Reaching the last crossroad go East and you will encounter another Barrier Stone.
Step 13:
Go to the other checkpoint by using Waypoint (Refer to the image above) and continue moving North and you will encounter another Cold Eye Lich and a Goddess Statue by interacting with the statue it will open some closed routes.
Step 14-16:
You can continue moving forward then go West until you reach another checkpoint then go East then head West and continue moving forward until you reach another checkpoint and then press forward until you reach another Barrier Stone then interact with it.
Step 17:
Go back to second to the last checkpoint by using a waypoint then move North, at the crossroad head West and you will encounter another Cold Eye Lich (Boss) then interact with the Goddess Statue and it will open the last barrier blocking the exit to Zone 3.
Step 18:
Use the waypoint and go to the first checkpooint that you will encounter and head towards the Zone 3 exit. You will encounter Dominiel as the last boss before exiting to Zone 3.
Optional Route
 Enlarge
After completing the Zone 2 Map you had now unlocked all the closed areas making it a lot easier to 100% the Labyrinth (Refer to the image above) for information on where the Gold Chests are located. There are 4 Gold Chests in total for this area.
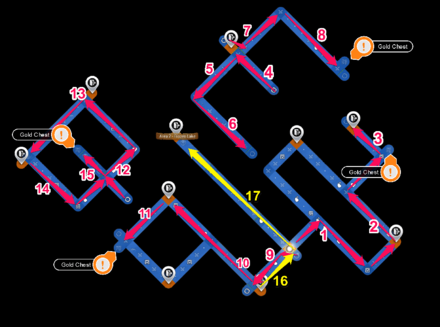
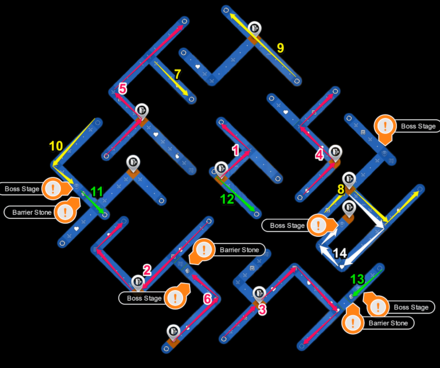
Zone 3 - Mountain Valley
Main Route
 Enlarge
| ✦ | Clear Area 3 |
|---|---|
| ✦ | Stop Zerato |
| ✦ | Eliminate 2 Monsters by Gold Chest |
Step 1-2:
Move forward then go East and you will encounter a Warp Portal, interact with it then move forward until you reach the first checkpoint then move North and you will encounter another Warp Portal to interact with.
Step 3-4:
Continue moving forward until you reach another checkpoint. You can go North to obtain the Gold chest or continue heading East then go South after the last crossroad the only way to go is West then continue moving forward until you reach another Warp Portal. Go through it and you will reach another checkpoint then continue forward, reaching another checkpoint go East until you reach the warp portal.
Step 5-6:
Head towards to the another checkpoint and you can go East to obtain another Gold Chest or you can go West then continue moving forward. If you encounter the first crossroad go North until you reach another warp portal interact with it then you will a checkpoint. Move forward and you will have a boss encounter (Fighter Maya (Boss) & Auxiliary Lots) at this part and after dealing with the boss you will encounter a Barrier Stone and interact with it to unlock some locked areas.
Step 7-8:
Use waypoint to travel to second to the last checkpoint that you encountered (Refer to the image above) then continue heading East and after reaching the crossroad head South until you reach another Warp Portal. After going through the portal move forward and you will reach another checkpoint then go South and head East to encounter another Warp Portal.
Step 9-10:
Continue continue moving North after your reach the checkpoint and go through the Warp Portal, then continue moving forward and go South, you will have a boss encounter (Forst Symaqus (Boss)) and a Barrier Stone unlocking locked areas in the zone.
Step 11-12:
After unlocking some certain areas you can continue moving forwards then go throug the Warp Portal and you will be back from the start. Continue moving South until you reach another Warp Portal.
Step 13-14:
Move forward then you will encounter another Boss fight (Frost Symaqus) and you will encounter the last Barrier Stone and you can now move forward to the exit. Use waypoints to reach the exit much faster (Refer to the image above), Before exiting the Zone you will encounter the last boss Zerato (Boss). Before proceeding to the other zone.
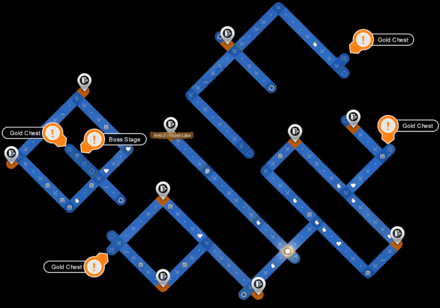
Optional Route
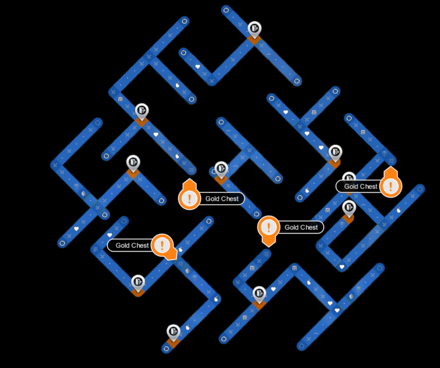 Enlarge
Coming back to complete the map you can obtain all the Gold Chest available on this zone. There is also another boss that can be defeated here (Montmorancy). Other than that, you can easily 100% explore rate this map
Zone 4 - Icicle Cave
Main Route
 Enlarge
| ✦ | Clear Area 4 |
|---|---|
| ✦ | Stop Challenger Dominiel |
| ✦ | Stop Rampaging Clarissa |
Step 1:
Move forward to the available route at the start of the run. There will be no other routes since their path will be blocked, after encountering a Warp Gate, go through it and you will be transported to the next area. Then continue moving forward until you reached the first checkpoint.
Step 2:
Continuing your journey, proceed moving North until you reach another checkpoint to save your run. Go North again, and you will encounter a Barrier Stone, interact with it, and you will unlock some blocked areas in the map. Move forward until you reach another Warp Portal and transport you to another area.
Step 3:
Follow our recommended path and continue moving forward, on this part you will encounter a boss stage consisting of Sage Baal & Sezan. It will be easy to deal with him with a full party with a DPS and Support to defeat him.
After defeating the boss, continue going North and you will encounter another Warp Portal transporting you near the start area.
Step 4:
Follow our recommended path and continue moving forward. On this par,t you will encounter a boss stage consisting of Sage Baal & Sezan. It will be easy to deal with him with a full party with a DPS and Support to defeat him.
After defeating the boss, continue going north, and you will encounter another Warp Portal transporting you near the start area.
Step 5:
Being teleported to the last area, follow the recommended path to clear this zone faster. Remember to save your progress when encountering a checkpoint before proceeding.
You will encounter Challenger Dominiel as the final boss of this zone, defeat the minions first before focusing on her since she will increase the CR of its allies when being attacked. After defeating her, exit through the stage then proceeds to zone 5.
Optional Route
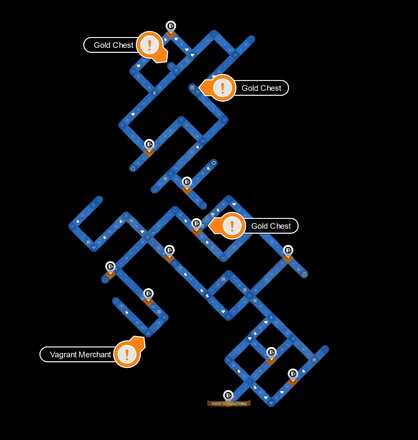 Enlarge
There are a total of 3 Gold Chests available on this zone, be sure to go back and obtain them all. It can give sweet rewards from opening it.
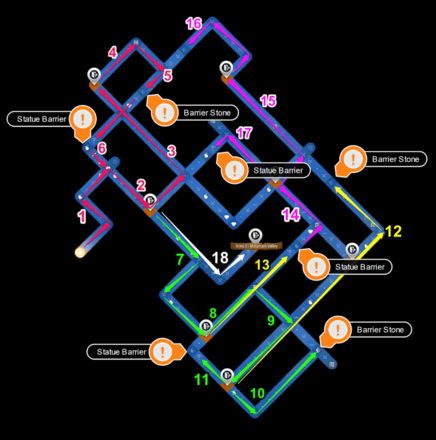
Zone 5 - Frostproof Valley
Main Route
 Enlarge
| ✦ | Clear Area 5 |
|---|---|
| ✦ | Persuade Challenger Dominiel |
| ✦ | Listen to Elisia of the Ice |
Step 1-4:
Proceed to move forward the area since it will only have one direction to explore through, go inside the Warp Portal, and you will be transported to the next area then continue going North until you reach the first checkpoint. Move forward, and you will encounter your first Boss battle against Aquina of the Sea.
After defeating the boss, tap the Barrer Stone to unlock more areas to explore, head East to continue your journey, then you will be transported to another area. During the third checkpoint, follow the recommended route to finishing this zone faster.
Step 5-8:
At the start of Step 5, as seen on the image above, continue moving North then go West after encountering another checkpoint. Tap the Barrier Stone again to unlock more areas to explore. Continue following the recommended route, refer to the image above.
When you are in the main area of Zone 5, you will open another Barrier Stone. Proceed to the center area, and you will encounter another boss stage with Challenger Dominiel.
Step 9:
You have to open 4 Barrier Stones before proceeding to the final stage. These stones are at the center part of the area, refer to the image above.
Step 10-13:
Proceed to the checkpoint after completing all Barrier Stones, then follow the recommended path by going to the right side first and continue moving forward until you encounter a boss fight with Cold Eye Lich.
Defeat the boss and open a Barrier Stone, then go through another Warp Portal, and it will teleport you near the checkpoint.
Step 14-16:
After doing the other side of the zone, head through the left side and continue moving forward by using the recommended route from the image above.
You will encounter a Converted Symaqus as the boss for this part and open a Barrier Stone after defeating it.
Step 17:
Head down to the final part of the Zone, and you will encounter the last boss Elisia of the Ice. This boss can inflict a lot of debuffs on your team. Be sure to bring heroes such as Angelic Montmorancy and Angelica to sustain your party, and dispel debuffs against the boss.
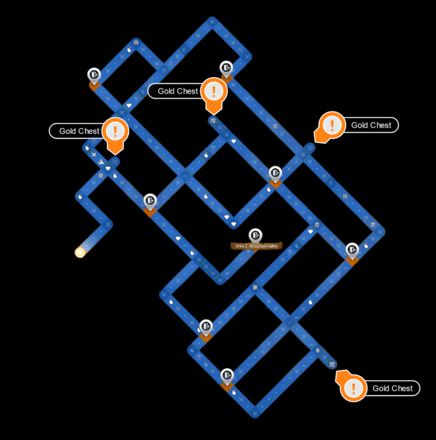
Optional Route
 Enlarge
This Zone will have 7 Gold Chest available, but the sweetest part of these chests is the free Epic Equipment that can be obtained by opening it. Be sure to get all of them since they are going to be worth it and are nice equipment.
Tips About Labyrinth
Camp

To raise team morale, you can do the Camp simulator where you can raise your team morale by having the perfect conversation. You can check each hero conversation to check if it can raise the the team's morale.
Related Links
 Tirel Castle in Chaos Tirel Castle in Chaos |
 Great Farche Labyrinth Great Farche Labyrinth |
 Nixied's Sanctum Nixied's Sanctum |
 Azmakalis (Raid) Azmakalis (Raid) |
Comment
4  Anonymous over 3 years
You're missing a whole piece in one of your labyrinths, in nixied
Author

Nixied's Sanctum - Labyrinth
Please participate in our site
improvement survey
03/2026
improvement survey
03/2026
Would you assist in
improving Game8's site?
improving Game8's site?

×
We are listening to our users' valuable opinions and discussing how to act on them.
The information collected through this survey will be used for the purpose of improving our services. In addition, the information will only be disclosed a part of a statistic in a format that will not allow identification of personal information.
Begin Survey
Not Now
×
Please rate each item regarding Game8.co's Advertisements.
Amount of Ads
Very Dissatisfied
Somewhat Dissatisfied
Fine
Somewhat Satisfied
Highly Satisfied
Placement of Ads
Timing of Ad Display
Ad Loading Speed
Safeness of Ads
Content of Ads
×
Please rate each item regarding Game8.co's Quality of Articles.
Amount of information
Very Dissatisfied
Somewhat Dissatisfied
Fine
Somewhat Satisfied
Highly Satisfied
Frequency of updates
Speed of new information
Accuracy of articles
Understandibility of articles
Readability of sentences
×
Please rate each item regarding Game8.co's Usability of the Site.
Ease of finding information
Very Dissatisfied
Somewhat Dissatisfied
Fine
Somewhat Satisfied
Highly Satisfied
Loading Speed
Use of Color
Font Size
Visibility of Images
Easy to Understand Layout
×
Please rate each item regarding Game8.co's Message Boards, Comments.
Ease of Writing
Very Dissatisfied
Somewhat Dissatisfied
Fine
Somewhat Satisfied
Highly Satisfied
Readability
Ease in Finding Information
Comment Quality
Comment Quantity
Admin Response
×
Please rate each item regarding Game8.co's Site's new design.
Please rate our site's new design
Very Dissatisfied
Somewhat Dissatisfied
Fine
Somewhat Satisfied
Highly Satisfied
Do you think that the website's design change makes the site easier to use?
Has the new design made it easier for you to find information on the site?
Has the new design improved the overall visual appeal of the site?
How would you rate your overall satisfaction with the new design of the site?
×
How likely are you to recommend Game8 to someone you know?
Very Unlikely
0
1
2
3
4
5
6
7
8
9
10
Very Likely
If you have other opinions regarding potential improvement to the website, please share them with us. We would appreciate your honest opinion.
Note: This is a free response section, so you can proceed without entering anything.
Note: Please be sure not to enter any kind of personal information into your response.
Note: Please be sure not to enter any kind of personal information into your response.
×
Thank You
×
Thank you for participating in our survey! Your answers will help us to improve the quality of our website and services.
We hope you continue to make use of Game8.
We hope you continue to make use of Game8.
Close
Rankings
- We could not find the message board you were looking for.
Gaming News


![Monster Hunter Stories 3 Review [First Impressions] | Simply Rejuvenating](https://img.game8.co/4438641/2a31b7702bd70e78ec8efd24661dacda.jpeg/thumb)

Popular Games

Genshin Impact Walkthrough & Guides Wiki
Honkai: Star Rail Walkthrough & Guides Wiki
Umamusume: Pretty Derby Walkthrough & Guides Wiki
Pokemon Pokopia Walkthrough & Guides Wiki
Resident Evil Requiem (RE9) Walkthrough & Guides Wiki
Monster Hunter Wilds Walkthrough & Guides Wiki
Wuthering Waves Walkthrough & Guides Wiki
Arknights: Endfield Walkthrough & Guides Wiki
Pokemon FireRed and LeafGreen (FRLG) Walkthrough & Guides Wiki
Pokemon TCG Pocket (PTCGP) Strategies & Guides Wiki


Recommended Games
Diablo 4: Vessel of Hatred Walkthrough & Guides Wiki
Fire Emblem Heroes (FEH) Walkthrough & Guides Wiki
Yu-Gi-Oh! Master Duel Walkthrough & Guides Wiki
Super Smash Bros. Ultimate Walkthrough & Guides Wiki
Pokemon Brilliant Diamond and Shining Pearl (BDSP) Walkthrough & Guides Wiki
Elden Ring Shadow of the Erdtree Walkthrough & Guides Wiki
Monster Hunter World Walkthrough & Guides Wiki
The Legend of Zelda: Tears of the Kingdom Walkthrough & Guides Wiki
Persona 3 Reload Walkthrough & Guides Wiki
Cyberpunk 2077: Ultimate Edition Walkthrough & Guides Wiki


All rights reserved
© Smilegate Megaport
The copyrights of videos of games used in our content and other intellectual property rights belong to the provider of the game.
The contents we provide on this site were created personally by members of the Game8 editorial department.
We refuse the right to reuse or repost content taken without our permission such as data or images to other sites.
Not updated. Zone 3 changed.