Tirel Castle in Chaos - Labyrinth
We regret to announce that we are ending the coverage of Epic Seven. Thank you for all the support in reading our coverage of updates, event guides and character releases for Epic Seven.
This article will guide you on how to clear the Labyrinth content Tirel Castle in Chaos for the game Epic Seven. Read on for more information on Boss and Chest Location.
List of Contents
Zone 1 - Hall of Silence
Main Route
 Enlarge
| Enemies | ||
|---|---|---|
 Tirel Spearman Tirel Spearman |
 Tirel Archer Tirel Archer |
 Elson (Boss) Elson (Boss) |
| ✦ | Clear Area 1 |
|---|---|
| ✦ | Beat Elson in a Fight |
| ✦ | Comfort Aither |
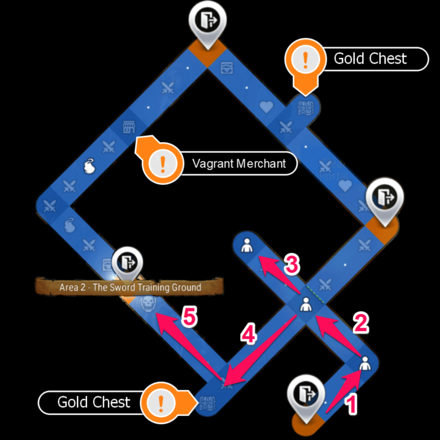
Step 1:
Go forward until you reach the first crossroad, You will encounter Crozet at the crossroad.
Step 2:
You will enounter the first enemies of this Labyrinth. It will consists of 2 Tirel Spearman and 2 Tirel Archer.
Step 3:
Move forward until you reach the throne room and talk to Aither. While moving forward you will encounter 2 Tirel Spearman.
Step 4:
You have to go back after reaching the throne room and head towards the left side of the second crossroad. You will encounter an Elite Tirel Spearman alongside with 2 Tirel spearman. After defeating the Elite monster you can go West to open the Gold Chest.
Step 5:
Heading towards the Zone 2, you will encounter Elson as the boss of this stage.
Optional Route
 Enlarge
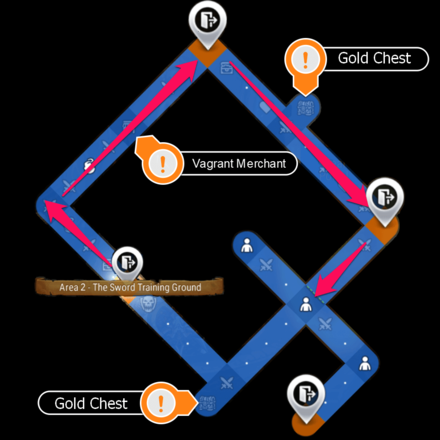
You can come back again to 100% explore the whole area you can just start or go to the latest Waypoint that you cleared from. You can obtain another Gold Chest and encounter the so-called Vagrant Merchant where it will sell really good items.
Zone 2 - The Sword Training Ground
Main Route
 Enlarge
| Enemies | ||
|---|---|---|
 Iseria (Boss) Iseria (Boss) |
 The Sword Archer (Elite) The Sword Archer (Elite) |
 The Sword Swordsman (Elite) The Sword Swordsman (Elite) |
 Tirel Spearman (Elite) Tirel Spearman (Elite) |
 The Sword Archer The Sword Archer |
 The Sword Swordsman The Sword Swordsman |
| ✦ | Clear Area 2 |
|---|---|
| ✦ | Convince Iseria of Yyour Ability |
| ✦ | Enter the Order of the Sword |
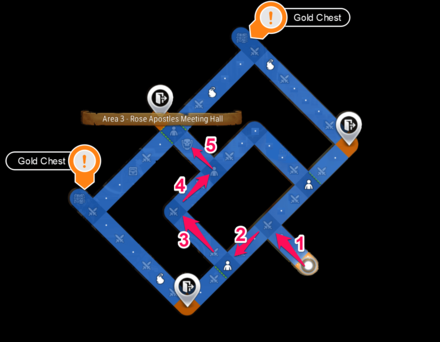
Step 1:
You will encounter the enemies at the crossroad, it will consist of 1 Elite tirel spearman and 2 normal monsters.
Step 2:
Moving forward you will encounter enemies just before the crossroad.
Step 3:
There will be a 2 battle stage for this route, after you pass through the sword swordsman and another enemy at the other end of the crossroad.
Step 4:
On this step it ill be wise to camp at the other end of the crossroad just when you see Alexa there. Because the next step will be battling the Boss.
Step 5:
The boss Iseria will be waiting for you just before proceeding to the Zone 3. After defeating the boss you can explore the Labyrinth more or exit to Zone 3.
Optional Route
 Enlarge
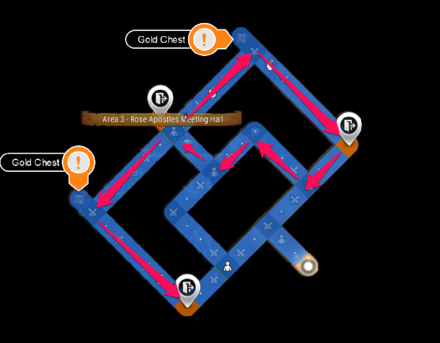
100% Completion
After defeating the boss if you still have enough energy to explore the Labyrinth you can open the 2 Gold Chest available in the Labyrith or you can come back again if your team morale is low and finished camping.
Zone 3 - Rose Apostles Meeting Hall
Main Route
 Enlarge
| Enemies | |||
|---|---|---|---|
 Mucacha (Boss) Mucacha (Boss) |
 Carmainerose Carmainerose |
 Rose Apostle Priest Rose Apostle Priest |
 Lumberjack Svoat Lumberjack Svoat |
 Tirel Spearman Tirel Spearman |
 Mighty Scout Mighty Scout |
 Leaf Svoat Leaf Svoat |
 Roozid Roozid |
| ✦ | Clear Area 3 |
|---|---|
| ✦ | Subdue Crazed Mucacha |
| ✦ | Flip Goddess Statue Switch |
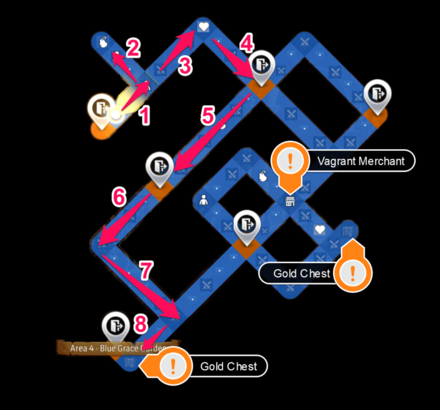
Step 1
Move forward until you reach the crossroad that Jena is guarding.
Step 2
Being unable to move forward go to the North direction and pray to the statue. The blocked path will now be open
Step 3 & 4
Continue moving forward until you reach the first checkpoint. You can now finish the exploration here or keep on exploring the Labyrinth.
Step 5
You will reach the 2nd checkpoint, if your team moral is now low and had used the Camping feature. It will be advisable to save up to this checkpoint and continue later on.
Step 6 & 7
After the second checkpoint, continue moving forward. You are now getting near to the Zone 4 entrance.
Step 8
Before reaching the zone 4 entrance you will encounter the Boss stage on this part the boss will consist of Mucacha and Roozid.
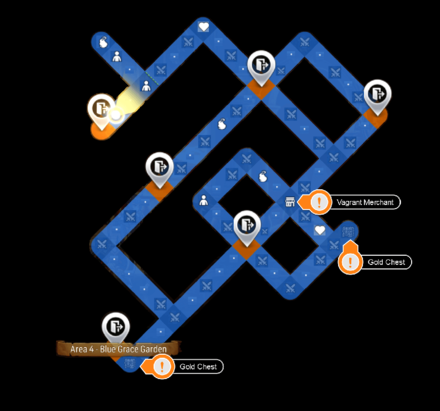
Optional Route
 Enlarge
After finishing the Main Route you can come back and complete the explore area to 100% the only boss that you will encounter is before reaching the other Gold chest. That boss will be the Interrogated girl or known as Carmainerose.
Zone 4 - Blue Grace Garden
Main Route
 Enlarge
| Enemies | ||||
|---|---|---|---|---|
 Clarissa (Boss) Clarissa (Boss) |
 Montmorancy (Boss) Montmorancy (Boss) |
 Tirel Spearman (Elite) Tirel Spearman (Elite) |
 Blue Cross Priest (Elite) Blue Cross Priest (Elite) |
|
 Tirel Spearman Tirel Spearman |
 Breeze Silva Breeze Silva |
 Blue Cross Priest Blue Cross Priest |
 Wood Mushroom Wood Mushroom |
|
 Mossy Testudo Mossy Testudo |
 Ice Mushroom Ice Mushroom |
|||
| ✦ | Clear Area 4 |
|---|---|
| ✦ | Calm Rampaging Clarissa |
| ✦ | Search for the Hidden Key |
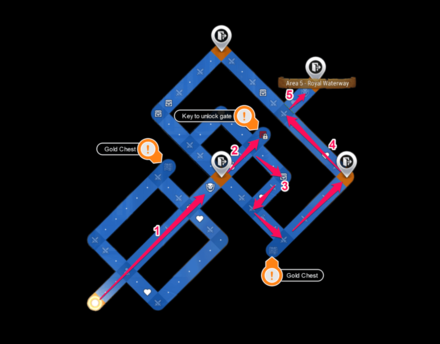
Step 1:
Proceed moving forward until you encounter the boss Montmorancy before reaching the first checkpoint.
Step 2:
At the crossroad, go East to reach the treasure room then interact with the treasure to pick up the key to open the gate to Zone 5.
Step 3 & 4:
It is recommended to go South for you to also open the Gold Chest at the right side of the map. Then proceed moving forward until you reach the Second checkpoint, it will be good to save at the second checkpoint before proceeding to the boss stage if your team morale is too low.
Step 5:
If you already picked up the Key you can now open the gate and proceed to encounter Clarissa the final boss before proceeding to Zone 5.
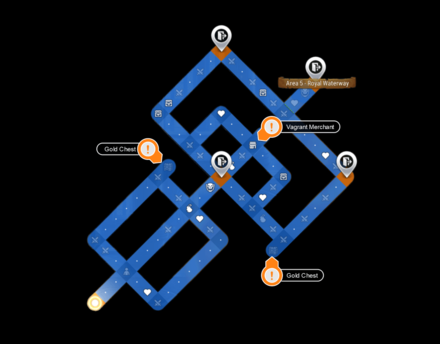
Optional Route
 Enlarge
You can complete the 100% explore rate of this zone by coming back to finish it, the only notable monsters that you will encounter are the Tirel Spearman (Elite) and Blue Cross Priest (Elite) when completing this zone. The other Gold Chest will be available at the left side of the map.
(Refer to image above).
Zone 5 - Royal Waterway
100% Explore Rate
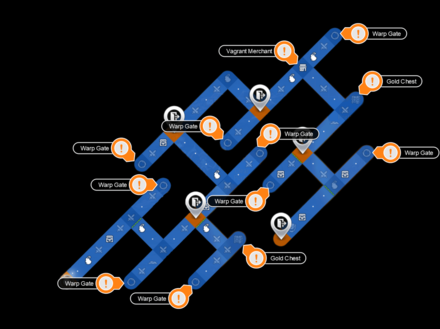 Enlarge
| Enemies | ||||
|---|---|---|---|---|
 Greedy Caides (Boss) Greedy Caides (Boss) |
 Greedy Aztesta (Elite) Greedy Aztesta (Elite) |
 Rusty Slime (Elite) Rusty Slime (Elite) |
 Greedy Aztesta Greedy Aztesta |
|
 Greedy Symaqus Greedy Symaqus |
 Dusk-Skull Warrior Dusk-Skull Warrior |
 Wood Slime Wood Slime |
 Rusty Slime Rusty Slime |
|
 Mud-Skull Warlock Mud-Skull Warlock |
 Mud-Skull Warrior Mud-Skull Warrior |
 Grass Slime Grass Slime |
||
| ✦ | Clear Area 5 |
|---|---|
| ✦ | Eliminate Greedy Caides |
| ✦ | Eliminate 2 Monsters by Gold Chest |
Notable Places in Zone 5
Gold Chests
There are two Gold Chest on this Labyrinth the one at the rightmost place in the map is where the gold chest will contain a Epic Item and the other chest will give you a random item. Clearing the gold chest can also clear one of the star completiion quests for this zone.
Greedy Caides (Boss)
The boss will be available at the very last checkpoint with the Boss Logo on it.
Tips About Labyrinth
Camp

To raise team morale, you can do the Camp simulator where you can raise your team morale by having the perfect conversation. You can check each hero conversation to check if it can raise the the team's morale.
Related Links
 Tirel Castle in Chaos Tirel Castle in Chaos |
 Great Farche Labyrinth Great Farche Labyrinth |
 Nixied's Sanctum Nixied's Sanctum |
 Azmakalis (Raid) Azmakalis (Raid) |
Comment
Author
Tirel Castle in Chaos - Labyrinth
improvement survey
03/2026
improving Game8's site?

Your answers will help us to improve our website.
Note: Please be sure not to enter any kind of personal information into your response.

We hope you continue to make use of Game8.
Rankings
- We could not find the message board you were looking for.
Gaming News
Popular Games

Genshin Impact Walkthrough & Guides Wiki

Honkai: Star Rail Walkthrough & Guides Wiki

Umamusume: Pretty Derby Walkthrough & Guides Wiki

Pokemon Pokopia Walkthrough & Guides Wiki

Resident Evil Requiem (RE9) Walkthrough & Guides Wiki

Monster Hunter Wilds Walkthrough & Guides Wiki

Wuthering Waves Walkthrough & Guides Wiki

Arknights: Endfield Walkthrough & Guides Wiki

Pokemon FireRed and LeafGreen (FRLG) Walkthrough & Guides Wiki

Pokemon TCG Pocket (PTCGP) Strategies & Guides Wiki
Recommended Games

Diablo 4: Vessel of Hatred Walkthrough & Guides Wiki

Fire Emblem Heroes (FEH) Walkthrough & Guides Wiki

Yu-Gi-Oh! Master Duel Walkthrough & Guides Wiki

Super Smash Bros. Ultimate Walkthrough & Guides Wiki

Pokemon Brilliant Diamond and Shining Pearl (BDSP) Walkthrough & Guides Wiki

Elden Ring Shadow of the Erdtree Walkthrough & Guides Wiki

Monster Hunter World Walkthrough & Guides Wiki

The Legend of Zelda: Tears of the Kingdom Walkthrough & Guides Wiki

Persona 3 Reload Walkthrough & Guides Wiki

Cyberpunk 2077: Ultimate Edition Walkthrough & Guides Wiki
All rights reserved
© Smilegate Megaport
The copyrights of videos of games used in our content and other intellectual property rights belong to the provider of the game.
The contents we provide on this site were created personally by members of the Game8 editorial department.
We refuse the right to reuse or repost content taken without our permission such as data or images to other sites.


![Monster Hunter Stories 3 Review [First Impressions] | Simply Rejuvenating](https://img.game8.co/4438641/2a31b7702bd70e78ec8efd24661dacda.jpeg/thumb)


