 Banshee Queen Sodalite (Boss)
 Burning Eye Lich (Boss)
 Fiery Dark Broom (Elite)
 Blood-Skull Warrior (Elite)
 Midnight Remus
 Dusk-Skull Warlock
 Blood-Skull Warlock
 Icy Dark Broom
 Steel-Skull Warrior
 General Purrgis (Boss)
 Wanderer Silk (Boss)
 Scarlet Imp (Elite)
 Cele Cannon (Elite)
 Orichalcum Gigantes
 Cele Minister
 Inpectio Minister
 Golden Pherus
 Orichalcum Minister
 Aranea Minister
 Indigo Imp
 Aranea Cannon
 Celestial Mercedes (Boss)
 Shadow Rose (Boss)
 Nightmare Keeper (Elite)
 Dusk Dream Leech (Elite)
 Imp King
 Jealous Symaqus
 Jealous Aztesta
 Wind Pherus
 Heat Aztesta
 Geed Nighthare
 Illusion Nighthare
 Greedy Aztesta
This survey will take about 1 minute.
Your answers will help us to improve our website.
Epic Seven
Great Farche Labyrinth
We regret to announce that we are ending the coverage of Epic Seven. Thank you for all the support in reading our coverage of updates, event guides and character releases for Epic Seven.
This article will guide you on how to clear the Labyrinth content Great Farche Labyrinth for the game Epic Seven. Read on for more information on Boss and Chest Location.
List of Contents
How To Unlock
You can enter this Labyrinth after clearing Adventure Stage:Episode 1: Ritania Chapter: 3S-6. Fool's Ruin.
Zone 1 - Distorted Gateway
Main Route
 Enlarge
| Enemies | |||
|---|---|---|---|
 Mirsa (Boss) Mirsa (Boss) |
 Lumberjack Svoat (Elite) Lumberjack Svoat (Elite) |
 Karax Infantry (Elite) Karax Infantry (Elite) |
Lumberjack Svoat |
 Mighty Knight Mighty Knight |
 Raqix Veteran Raqix Veteran |
 Raqix Flying Troop Raqix Flying Troop |
 Mighty Guardian Mighty Guardian |
| Karax Infantry |
|||
| ✦ | Clear Area 1 |
|---|---|
| ✦ | Repel Mirsa |
| ✦ | Eliminate 2 Monsters byy Gold Chests. |
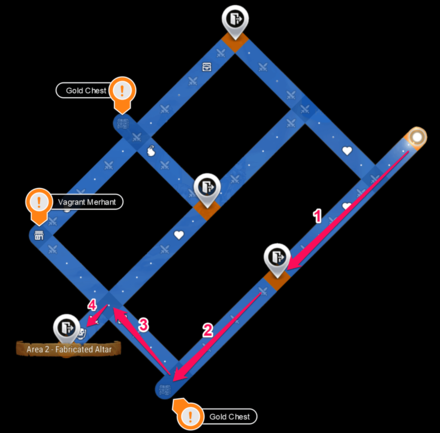
Step 1
Move forward to West until you reach the first checkpoint. You can go camping here or still move forward if your team morale can still manage.
Step 2
Continuin forward, you will encoounter a crossraod. You can go camping here since your team will have a low morale now when entering this part. You can go west to pick up the Gold Chest.
Step 3
Encountering the other crossroad in this part you will need to camp here now if you still haven't used your Camp.
Step 4
Before battling the boss, you will encounter first an Elite monster then after defeating that you will now battle Mirsa.
Optional Route
 Enlarge
The other Gold Chest will be available on the upper part of the map and the vagrant merchant is also available on the upper part.
(Refer to the image above)
Zone 2 - Fabricated Altar
Main Route
 Enlarge
| Enemies | |||
|---|---|---|---|
 Dark Corvus (Boss) Dark Corvus (Boss) |
 Callous Swordsman (Elite) Callous Swordsman (Elite) |
 Callous Spearman (Elite) Callous Spearman (Elite) |
 Fire Klineode Fire Klineode |
 Callous Archer Callous Archer |
Callous Spearman |
Callous Swordsman |
 Cult Enforcer Cult Enforcer |
| ✦ | Clear Area 2 |
|---|---|
| ✦ | Repel Dark Corvus |
| ✦ | Eliminate 2 Monsters by Gold Chests. |
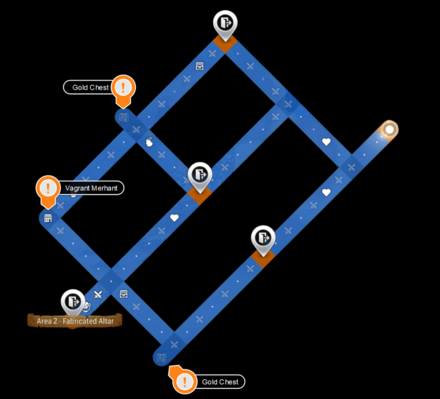
Step 1 & 2
Move forward then go East until you reach the second crossroad,, then go North to reach the first checkpoint.
Step 3
After reaching the first checkpoint, moving forward you will reach a crossroad then go South you can open one of the Gold Chest on the map. Continue heading West unti the second checkpoint. You will need to Camp on this checkpoint because for the next part you will now encounter the boss.
Step 4
Head towards North until you reach the boss Dark Corvus. After defeating the boss you can now enter the Zone 3.
Optional Route
 Enlarge
The other Gold Chest will be available on the upper part of the map and the Vagrant Merchant is near the first Gold Chest that you will obtain. Before reaching the 2nd gold chest you will encounter an Elite monster.
Zone 3 - Dusty Maze
Main Route
 Enlarge
| ✦ | Clear Area 3 |
|---|---|
| ✦ | Eliminate Burning Eye Mage |
| ✦ | Eliminate Banshee Queen Sodalite |
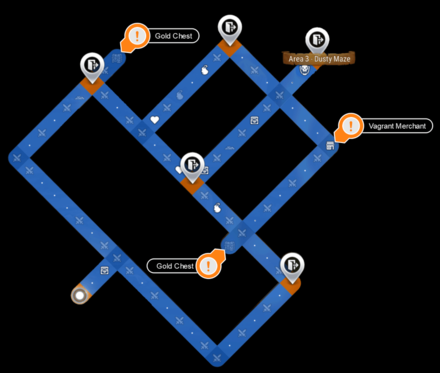
Step 1 & 2
Proceed moving forward and you will encounter at the far end of the crossroad the Vagrant Merchant. Proceed by going to East and you will encounter the first checkpoint.
Step 3
Cointue heading East because you will encounter less battles When you follow the recommended route.
Step 4
Moving forward you will encounter the boss Banshee Queen Sodalite, we recommended this route because this boss is much easier than facing the other boss, It will be like doing a Banshee Hunt on this stage.
Optional Route
 Enlarge
Coming back to finish the rest of this map will take you a lot of Labyrinth Compass to 100% explore. The other boss that you will encounter will be the Burning Eye Lich which is harder than the Banshee Queen. Also, the other Gold Chest can be picked up from the other side of the main route.
Zone 4 - Clockwork Study
Main Route
 Enlarge
| ✦ | Clear Area 4 |
|---|---|
| ✦ | Repel General Purrgis |
| ✦ | Repel Wanderer Silk |
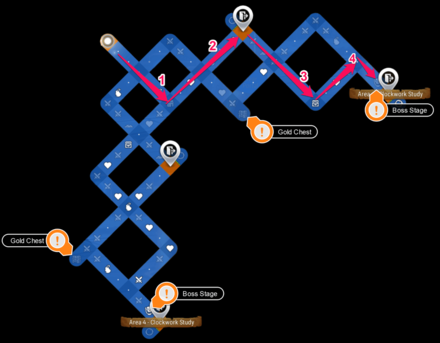
Step 1:
Moving forward, at the first crossroad that you will encounter go West and continue moving forward until you reach the first checkpoint.
Step 2:
After the first checkpoint proceed moving forward at the crossroad that you will encounter head South and for the second crossroad go West continue moving forward until you reach the second checkpoint.
Step 3:
Continuine on the main route you will encounter the first Gold Chest that can be obtained on this map then you proceed forwrard until you reach the Boss Stage.
Step 4:
The Boss that you will encounter is going to be General Purrgis, he will summon an army if he uses his ultimate but it can be clean up by using Arky making this stage a lot easier compared to Wanderer Silk.
Optional Route
 Enlarge
For the optional route, the boss that you will encounter here is going to be Wanderer Silk and Gold Chest at the other part of the Labyrinth map.
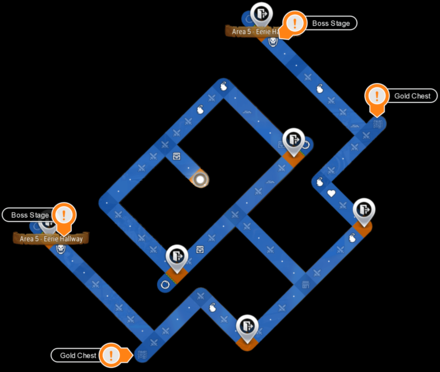
Zone 5 - Eerie Hallway
Main Route
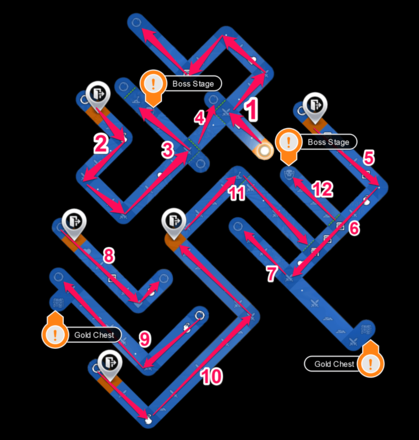 Enlarge
| ✦ | Clear Area 5 |
|---|---|
| ✦ | Repel Shadow Rose |
| ✦ | Eliminate Celestial Mercedes |
Step 1:
Move forward then head East, you can't go to other directions since it will be locked. each the fa end of the map and you will encounter a Warp Portal
Step 2 - 3:
After entering the Warp Portal you will now reach the first checkpoint then continue moving forwards until you encounter the boss Shadow Rose. Be careful when facing this boss especially when she activates her shadow. You will need a good healer and cleanser to face her. When you finally defeated the boss there will be a Lever and Warp Portal ahead interact with it and you will go back to the beginning.
Step 4:
Entering the Warp Portal head East and go to the opened barrierr and use the Warp Portal again.
Step 5 - 7:
Reaching the second checkpoint, continue moving forward until you reach another Warp Portal.
Step 8:
Another checkpoint will appear and you can rest and continue again. Move forward on this pace till the far end and you will see another Warp Portal.
Step 9:
Continue moving forward and you can also obtain one of the Gold Chest in the area, at the far end of this area you will encounter another Warp Portal.
Step 10:
Exiting the Warp Portal there will be another checkpoint. Continue moving forward and you will reach another checkpoint. If your team morale is low and you already used the Camp it will be better to save at this point.
Step 11:
Exiting the checkpoint continue moving forward and you will encounter a crossroad and a lever to open the remaining locked areas. After interacting with the lever, move forward and go to the unlocked area.
Step 12:
The last unlocked area will have the last boss It will be recommended to use your camp here and have a high morale team. You will encounter Celestial Mercedes on this part, bring a cleanser and healer to sustain your team.
Optional Route
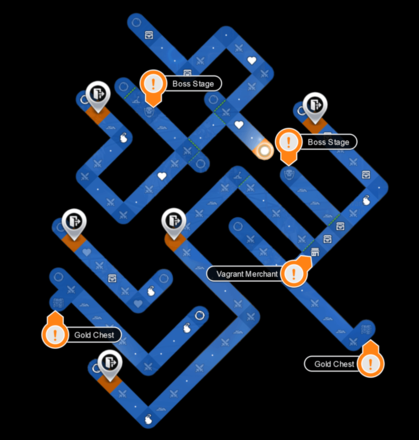
Since this map is almost complete especially when exploring this zone the other Gold Chest will be available before reching the third checkpoint.
Tips About Labyrinth
Camp
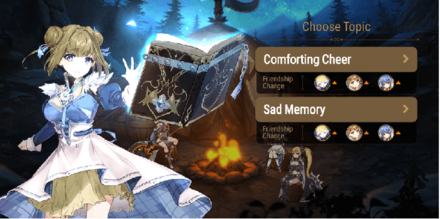
To raise team morale, you can do the Camp simulator where you can raise your team morale by having the perfect conversation. You can check each hero conversation to check if it can raise the the team's morale.
Related Links
 Tirel Castle in Chaos Tirel Castle in Chaos |
 Great Farche Labyrinth Great Farche Labyrinth |
 Nixied's Sanctum Nixied's Sanctum |
 Azmakalis (Raid) Azmakalis (Raid) |
Comment
Author

Great Farche Labyrinth
Please participate in our site
improvement survey
03/2026
improvement survey
03/2026
Would you assist in
improving Game8's site?
improving Game8's site?

×
We are listening to our users' valuable opinions and discussing how to act on them.
The information collected through this survey will be used for the purpose of improving our services. In addition, the information will only be disclosed a part of a statistic in a format that will not allow identification of personal information.
Begin Survey
Not Now
×
Please rate each item regarding Game8.co's Advertisements.
Amount of Ads
Very Dissatisfied
Somewhat Dissatisfied
Fine
Somewhat Satisfied
Highly Satisfied
Placement of Ads
Timing of Ad Display
Ad Loading Speed
Safeness of Ads
Content of Ads
×
Please rate each item regarding Game8.co's Quality of Articles.
Amount of information
Very Dissatisfied
Somewhat Dissatisfied
Fine
Somewhat Satisfied
Highly Satisfied
Frequency of updates
Speed of new information
Accuracy of articles
Understandibility of articles
Readability of sentences
×
Please rate each item regarding Game8.co's Usability of the Site.
Ease of finding information
Very Dissatisfied
Somewhat Dissatisfied
Fine
Somewhat Satisfied
Highly Satisfied
Loading Speed
Use of Color
Font Size
Visibility of Images
Easy to Understand Layout
×
Please rate each item regarding Game8.co's Message Boards, Comments.
Ease of Writing
Very Dissatisfied
Somewhat Dissatisfied
Fine
Somewhat Satisfied
Highly Satisfied
Readability
Ease in Finding Information
Comment Quality
Comment Quantity
Admin Response
×
Please rate each item regarding Game8.co's Site's new design.
Please rate our site's new design
Very Dissatisfied
Somewhat Dissatisfied
Fine
Somewhat Satisfied
Highly Satisfied
Do you think that the website's design change makes the site easier to use?
Has the new design made it easier for you to find information on the site?
Has the new design improved the overall visual appeal of the site?
How would you rate your overall satisfaction with the new design of the site?
×
How likely are you to recommend Game8 to someone you know?
Very Unlikely
0
1
2
3
4
5
6
7
8
9
10
Very Likely
If you have other opinions regarding potential improvement to the website, please share them with us. We would appreciate your honest opinion.
Note: This is a free response section, so you can proceed without entering anything.
Note: Please be sure not to enter any kind of personal information into your response.
Note: Please be sure not to enter any kind of personal information into your response.
×
Thank You
×
Thank you for participating in our survey! Your answers will help us to improve the quality of our website and services.
We hope you continue to make use of Game8.
We hope you continue to make use of Game8.
Close
Rankings
- We could not find the message board you were looking for.
Gaming News


![Monster Hunter Stories 3 Review [First Impressions] | Simply Rejuvenating](https://img.game8.co/4438641/2a31b7702bd70e78ec8efd24661dacda.jpeg/thumb)

Popular Games

Genshin Impact Walkthrough & Guides Wiki
Honkai: Star Rail Walkthrough & Guides Wiki
Umamusume: Pretty Derby Walkthrough & Guides Wiki
Pokemon Pokopia Walkthrough & Guides Wiki
Resident Evil Requiem (RE9) Walkthrough & Guides Wiki
Monster Hunter Wilds Walkthrough & Guides Wiki
Wuthering Waves Walkthrough & Guides Wiki
Arknights: Endfield Walkthrough & Guides Wiki
Pokemon FireRed and LeafGreen (FRLG) Walkthrough & Guides Wiki
Pokemon TCG Pocket (PTCGP) Strategies & Guides Wiki


Recommended Games
Diablo 4: Vessel of Hatred Walkthrough & Guides Wiki
Fire Emblem Heroes (FEH) Walkthrough & Guides Wiki
Yu-Gi-Oh! Master Duel Walkthrough & Guides Wiki
Super Smash Bros. Ultimate Walkthrough & Guides Wiki
Pokemon Brilliant Diamond and Shining Pearl (BDSP) Walkthrough & Guides Wiki
Elden Ring Shadow of the Erdtree Walkthrough & Guides Wiki
Monster Hunter World Walkthrough & Guides Wiki
The Legend of Zelda: Tears of the Kingdom Walkthrough & Guides Wiki
Persona 3 Reload Walkthrough & Guides Wiki
Cyberpunk 2077: Ultimate Edition Walkthrough & Guides Wiki


All rights reserved
© Smilegate Megaport
The copyrights of videos of games used in our content and other intellectual property rights belong to the provider of the game.
The contents we provide on this site were created personally by members of the Game8 editorial department.
We refuse the right to reuse or repost content taken without our permission such as data or images to other sites.