How to Beat Deadly Red Alert
The Game8 TRIBE NINE Team has ended coverage as of June 30, 2025. Information on certain pages may no longer be up-to-date. TRIBE NINE is also scheduled to end service on November 27, 2025. Thank you for your continued support!
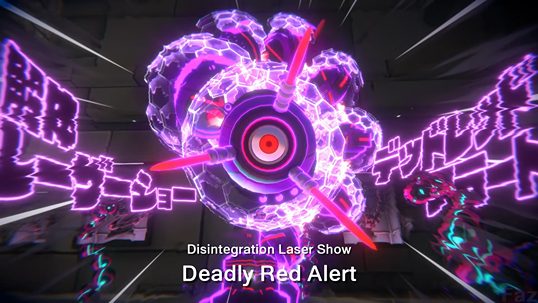
Deadly Red Alert is a boss in Chapter 3 of TRIBE NINE. Read on to see how to beat Deadly Red Alert, its location, the best team and characters to use against it, its attack patterns, as well as tips on how to defeat Deadly Red Alert.
Deadly Red Alert Counter Team Comp
2 Long Range Attackers + 1 Tank Character
| Recommended Team Comp | ||
|---|---|---|
| Long Range (Player) | Tank/Shield | Long Range |
 Miu Jujo Miu Jujo
|
 Roku Saigo Roku Saigo
|
 Yutaka Gotanda Yutaka Gotanda
|
Since Deadly Red Alert has a powerful melee attack, it's recommended to use a character that can attack from a distance.
By attacking from long range yourself and having a tank character like Saigo Roku draw the boss's attention, you'll be able to deal damage while minimizing the number of hits you take.
1 Long Range Attacker + 1 Tank + 1 Support
| Recommended Team Comp | ||
|---|---|---|
| Long Range (Player) | Tank/Shield | Support |
 Tsuki Iroha Tsuki Iroha
|
Roku Saigo
|
 Koishi Kohinata Koishi Kohinata
|
Deadly Red Alert can be challenged using the initial character along with this character formation. Use Tsuki Iroha’s Tactical Skill to Break the enemy's stance, then follow up with Chain Skills and Ultimate Skills to maximize firepower. With Roku and Koishi on the team, your party’s durability will remain stable throughout the fight.
| Player Character | Explanation |
|---|---|
| Tsuki Iroha | ・Good long-range attacker, very useful against aggressive bosses who fight close-range. ・Her tactical skills can easily disrupt the enemy's posture, opening up opportunities to perform Chain Skills. ・Ultimate Skill has high damage output. | Miu Jujo | ・Is a long-ranged damage dealer. |
| 2nd & 3rd Members | Explanation |
| Miu Jujo | ・ Sets up crystals to automatically attack using skills ┗ You can freely adjust their position. ・ Her intense burst damage from the Ultimate is also powerful. ┗ Ultimate Skill greatly recovers allies' HP when it falls below 50%. |
 Tsuruko Semba Tsuruko Semba | ・She can deploy a recovery field while dealing damage from long range. Even if she isn't your main controllable character, she should still be prioritized when building your team. |
| Roku Saigo | ・Extremely good as a tank. Defense stats are high, making him highly durable. ・Boasts high defensive stats and exceptional durability. |
| Koishi Kohinata | ・A healer with ranged recovery abilities. If you focus on healing a tank like Roku Saigo, he can maintain Dead Red Alert’s attention, making it easier for long-range characters to attack safely and stabilize the fight. |
 Minami Oi Minami Oi | ・Has the ability to heal with her Secondary attacks. ・When chain skills are activated, she can give shields to allies and reduce damage. |
How to Beat Deadly Red Alert
| How to Beat Deadly Red Alert |
|---|
|
|
It’s Recommended To Take Out the Tentacles First
It's recommended to take out the tentacles around Deadly Red Alert first. By defeating all of them, you can knock the enemy down, creating an opportunity to attack without retaliation.
Move Carefully While Paying Attention to the Spinning Attack
Be cautious of Deadly Red Alert's spinning attack while moving. This is especially important for characters who focus on melee attacks, as getting caught in the attack can result in heavy damage. Pay close attention to its wind-up animation.
Dodge the Laser Attacks by Moving Left and Right
When Deadly Red Alert begins charging its laser attack, it's best to dodge to either the left or right. If you're close to Deadly Red Alert, the laser will hit more quickly, so make sure to create some distance in advance.
Avoid standing on the purple floor. After Deadly Red Alert's laser attack, a purple floor will appear—be careful not to stay on it. Remaining on it too long will cause you to take damage, so it's important to move to a different area to continue the fight.
Avoid the Bullets as Much as Possible
Try to avoid the projectiles that Deadly Red Alert fires. While each individual shot deals little damage, getting hit will stun you, making it easier to take the next attack.
Use Long Ranged Characters
| Recommended Long-Range Attackers | ||
|---|---|---|
|
Tsuruko Semba
|
Tsuki Iroha
|
Yutaka Gotanda
|
Deadly Red Alert's spinning attack has very little wind-up and is quite powerful—failing to dodge it can result in heavy damage.
Using ranged characters like Tsuruko Semba or Tsuki Iroha allows you to fight more safely from a distance.
Deadly Red Alert Abilities and Attack Patterns
| Deadly Red Alert Abilities and Attack Patterns |
|---|
|
|
Spinning Attacks
It's best to either dodge backward or parry Deadly Red Alert's spinning attack. Since it has very little wind-up and is difficult to anticipate, using a ranged character is recommended if you're not confident in your dodging skills.
Lasers
Deadly Red Alert’s laser attack has a noticeable charge-up animation beforehand, so you can dodge it by moving left or right while retreating. Since the laser deals high damage, it’s a good idea to retry the fight if you fail to avoid it.
Long Ranged Attacks
Deadly Red Alert's ranged attacks travel slowly, so take your time to watch them carefully and dodge. In most cases, simply moving left or right is enough to avoid them, but if you're using a melee character, be careful—the shots land quickly at close range.
Deadly Red Alert Location
Magata Building - Chapter 3
Deadly Red Alert is located in Magata Building in Chapter 3. It is the mid-boss that appears at the end of Chapter 3 of the main story. If you want to fight him again, look for the “Dead Red Alert” icon on the map, as he will appear in the field after you defeat him again.
TRIBE NINE Related Guides
All Story Walkthroughs
| All Story Walkthroughs |
|---|
| Chapter 0 |
| Chapter 1 |
| Chapter 2 |
| Chapter 3 |
All Story Bosses
| All Chapter 0 Bosses | |
|---|---|
| Endrone | |
| All Chapter 1 Bosses | |
| S.H.A.R.K. | |
| All Chapter 2 Bosses | |
| Brave Diver | Destroyer |
| Sui Yakumo | - |
| All Chapter 3 Bosses | |
| Rakuzakai | Deadly Red Alert |
| Tentacles | - |
All Graffiti Locations
| All Graffiti Locations | |
|---|---|
| All Shinagawa Graffiti Locations | All Minato Graffiti Locations |
| All Neo Chiyoda Graffiti Locations | - |
Comment
Author

How to Beat Deadly Red Alert
Rankings
- We could not find the article you were looking for.
- We could not find the message board you were looking for.
Gaming News


![Everwind Review [Early Access] | The Shaky First Step to A Very Long Journey](https://img.game8.co/4440226/ab079b1153298a042633dd1ef51e878e.png/thumb)

![Monster Hunter Stories 3 Review [First Impressions] | Simply Rejuvenating](https://img.game8.co/4438641/2a31b7702bd70e78ec8efd24661dacda.jpeg/thumb)
Popular Games

Genshin Impact Walkthrough & Guides Wiki
Honkai: Star Rail Walkthrough & Guides Wiki
Umamusume: Pretty Derby Walkthrough & Guides Wiki
Pokemon Pokopia Walkthrough & Guides Wiki
Resident Evil Requiem (RE9) Walkthrough & Guides Wiki
Monster Hunter Wilds Walkthrough & Guides Wiki
Wuthering Waves Walkthrough & Guides Wiki
Arknights: Endfield Walkthrough & Guides Wiki
Pokemon FireRed and LeafGreen (FRLG) Walkthrough & Guides Wiki
Pokemon TCG Pocket (PTCGP) Strategies & Guides Wiki


Recommended Games
Diablo 4: Vessel of Hatred Walkthrough & Guides Wiki
Fire Emblem Heroes (FEH) Walkthrough & Guides Wiki
Yu-Gi-Oh! Master Duel Walkthrough & Guides Wiki
Super Smash Bros. Ultimate Walkthrough & Guides Wiki
Pokemon Brilliant Diamond and Shining Pearl (BDSP) Walkthrough & Guides Wiki
Elden Ring Shadow of the Erdtree Walkthrough & Guides Wiki
Monster Hunter World Walkthrough & Guides Wiki
The Legend of Zelda: Tears of the Kingdom Walkthrough & Guides Wiki
Persona 3 Reload Walkthrough & Guides Wiki
Cyberpunk 2077: Ultimate Edition Walkthrough & Guides Wiki


All rights reserved
Game Copyright©Akatsuki Games Inc. All Rights Reserved
The content we provide on this site were created personally by members of the Game8 editorial department.
We refuse the right to reuse or repost content taken without our permission such as data or images to other sites.
©Akatsuki Games Inc. (Provider)