How to Beat S.H.A.R.K (Chapter 1 Boss)
The Game8 TRIBE NINE Team has ended coverage as of June 30, 2025. Information on certain pages may no longer be up-to-date. TRIBE NINE is also scheduled to end service on November 27, 2025. Thank you for your continued support!
S.H.A.R.K. is the final boss of Chapter 1 in TRIBE NINE. Read on to see how to beat S.H.A.R.K., its location, the best team and characters to use against it, its attack patterns, as well as tips on how to defeat S.H.A.R.K.
List of Contents
S.H.A.R.K. Counter Team Comp
Balanced Team (DPS, Tank, Support)
| Recommended Characters | ||
|---|---|---|
| Player | Tank | Flexi-Support |
 Tsuki Iroha Tsuki Iroha
|
 Roku Saigo Roku Saigo
|
 Koishi Kohinata Koishi Kohinata
|
This is a well-balanced team that uses a DPS, tank, and a support character. In this party comp, it's recommended to control Tsuki, and use her Strategy Skill which triggers break. She throws a pitch at the target, making it easier to break S.H.A.R.K.'s posture.
Roku as the tank can keep S.H.A.R.K. more occupied on himself, making it easier for Tsuki and Koishi to fulfill their roles and deal damage. The team benefits from Koishi's recovery skills as well as her attack that deals area-of-effect (AoE) damage.
2 Long-Range Attackers + 1 Tank
| Recommended Characters | ||
|---|---|---|
| Player | Tank | Long-Range |
 Tsuruko Semba Tsuruko Semba
|
Roku Saigo
|
 Yutaka Gotanda Yutaka Gotanda
|
This team is a more aggressive composition that focuses on damage-dealing and ranged attacks. S.H.A.R.K. has seven health bars and a high damage output. Its attacks are also difficult to dodge, which may be made more difficult when using a close-range attack.
For this reason, it's recommeded to have 2 long-range attackers, such as Tsuruko and Yutaka. By focusing on long-range attacks and having a tank character like Roku draw the boss's attention, you can reduce damage taken and proceed with the fight.
| Player Character | Explanation |
|---|---|
| Tsuruko Semba | ・Can attack from a distance while moving, minimizing damage taken and dealing solid damage. ・Can create healing fields, making her very effective. ・Ultimate skill greatly restores HP when allies are below 50%. |
| Yutaka Gotanda | ・Can attack while moving, giving him high survivability. ・His ultimate skill boosts his critical rate, making him more powerful. |
| Tsuki Iroha | ・Her strategy skill can break enemies' stances, leading to easy chain attacks. ・Her ultimate skill is powerful, making her a solid damage dealer. |
| 2nd & 3rd Members | Explanation |
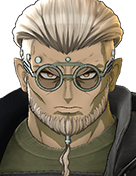
| Roku Saigo | Highly Recommended for the Setup ・Both of his primary and secondary attacks can draw the enemy's attention, making him an excellent tank. ・High defense stats give him strong durability. |
| Tsuruko Semba | Prioritize even if she's not the main character ・She can deal damage from a distance while providing a healing field. Prioritize her for the setup even if she's not the main character. |
| Koishi Kohinata | ・A healer who can provide area recovery. Complements playstyles of Roku and other tanks, who can help keep the attention on them and make ranged attacks more stable. |
 Minami Oi Minami Oi | ・Can heal with secondary attacks. ・Chain Skills provide shields to allies, reducing damage. |
 Q Q | ・His strategy skill draws aggro from the S.H.A.R.K., making it easier for ranged attackers to deal damage unhindered. ・Compared to Roku, Q is less durable, so it’s recommended to pair him with Koishi or Tsuruko for their healing abilities. |
How to Beat S.H.A.R.K.
| How to Beat S.H.A.R.K. |
|---|
|
|
Use Long-Range Characters as Your Main Attacker
| Long-Range Attackers | ||
|---|---|---|
|
Tsuruko Semba
(Guest) |
Tsuki Iroha
|
Yutaka Gotanda
|
Since S.H.A.R.K. shows fast attack animations and deals heavy damage in close range, characters like Tsuruko, Yutaka, and Tsuki are recommended to use.
These characters specialize in ranged attacks, and S.H.A.R.K.’s rapid attack motions make close-range combat risky, as you might take significant damage that is difficult to avoid.can deal damage from a distance and avoid taking hits, making them ideal for this boss fight.
Tsuruko is highly recommended due to her ease of use, and ability to deal damage from afar and heal allies.
Use Guest Characters
| Guest Characters | ||
|---|---|---|
|
Tsuruko Semba
|
Yutaka Gotanda
|
Q
|
If your own characters are underleveled, use the guest characters instead to defeat enemies more easily. In particular, Tsuruko Semba is excellent as a ranged attacker and makes the battle much easier.
If you're struggling to win, consider switching out your entire party to the guest characters.
Counterattack S.H.A.R.K's Opening Attack
S.H.A.R.K will perform a rush attack toward your character at the start of the fight. Time a counterattack to exploit the opening and deal damage.
Use Bombs to Stun
S.H.A.R.K performs a Bomb Placement→Rush combo.
After this action, position yourself behind the deployed bomb. Then, feed the bomb to S.H.A.R.K to knock them down, giving you a chance to land a flurry of attacks.
Prioritize Dodging in the Second Half and Wait for Openings
Once S.H.A.R.K's HP drops below half, its attacks become more aggressive. It's not uncommon to get caught in a wide-range ring attack followed by a rush, which will lead to a quick defeat.
Don’t panic and rush down the boss in the latter half. Instead, play cautiously and look for safe opportunities to attack.
Equip Patimon with High Sub-Stats
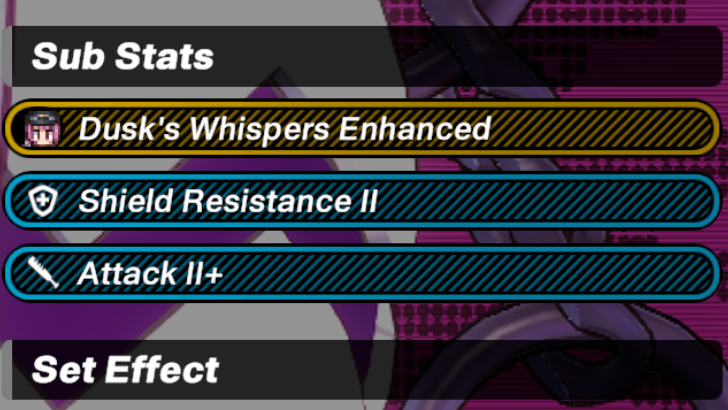
If you are unable to defeat S.H.A.R.K., it's important to review the Patimon you have equipped. Specifically, equip Patimon with high sub-stats, such as "Attack Power+" for damage dealers and "Defense Power+" for tank characters.
You can equip 3 types of Patimon to increases certain stats. Head Patimon increases Defense, Body Patimon increases Max. HP, and Accessories Patimon increases Attack.
Review Patimon Set Effects

Patimon’s set effects activate with two sets. If you feel your damage is insufficient, try activating the "Attacker" set effect. If you want to increase durability, aim to activate the "Defender" set effect.
Level Up Tension Cards
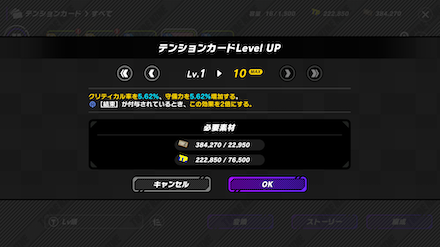
Tension cards can be easily leveled up and their effects increased using "Kane" and "T Points." If you're struggling, consider leveling up your tension cards.
Consider Lowering the Difficulty If You Can't Win
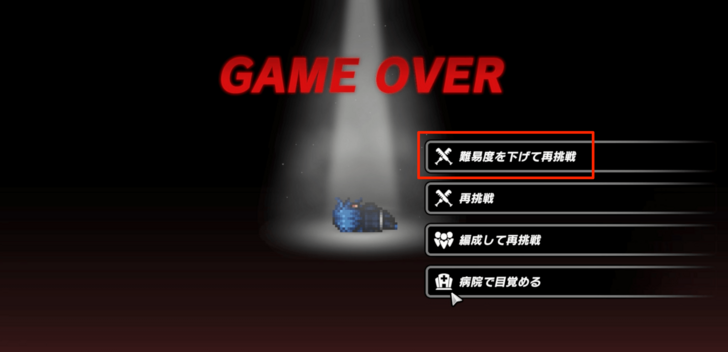
If all your characters are defeated and you get a game over, you'll be given the option to "Retry at Lower Difficulty." At a lower difficulty, your characters get significantly boosted, mainly in HP and damage reduction. If you’re stuck, consider lowering the difficulty to enjoy the story.
S.H.A.R.K. Abilities and Attack Patterns
| S.H.A.R.K. Abilities and Attack Patterns |
|---|
|
|
Charge Attack
A high-speed charge followed by a ring attack. The ring is created from the charge's residual force, and if you can stop S.H.A.R.K. with a counter, you can reduce the damage.
Bite Attack
A single biting attack. It's relatively easy to dodge without needing to go for a perfect dodge, so simply dash away from S.H.A.R.K. to avoid it.
Three Consecutive Bite Attacks
Three consecutive bite attacks. The third bite comes a beat later, so watch S.H.A.R.K.’s movements closely when dodging.
Tail-Swipe Attack
A tail-swipe attack. You won't get hit unless you're close to S.H.A.R.K., but the motion is small, so be cautious when attacking at close range and make sure to watch S.H.A.R.K.’s movements.
Spin Attack
A rotating attack that releases a water beam. Since S.H.A.R.K. rotates clockwise, simply move to the left to dodge.
Bomb Placement → Charge Attack
S.H.A.R.K. shoots out bombs along the stage's perimeter, then charges toward the player. Even with a tank character, S.H.A.R.K. will always target the playable character.
Position yourself behind the bombs and make S.H.A.R.K. charge into them, so it knocks itself down. This allows you to deal damage.
Digging into the Ground → Attack from the Ground → Slam Attack
After diving underground, S.H.A.R.K. emerges from beneath the player and performs a high-damage slam attack.
When the background music stops, it signals that S.H.A.R.K. is digging out of sight. After the WARNING
sign appears, S.H.A.R.K. will pop up, so spam dodges when you see the WARNING
text to avoid the attack.
Also, there are two attack hitboxes—one when S.H.A.R.K. emerges and one when it performs the slam—so continue dodging after S.H.A.R.K. surfaces to avoid getting hit.
Ring-Shaped Area Attack
After digging underground, S.H.A.R.K. launches rings from the center to the outer edges of the field. The center of the field is safe, so try to fight near the middle.
Whirlwind → Water Ring + Charge Attack
S.H.A.R.K. creates a whirlwind followed by falling rings and a high-speed charge attack. Move to a safe spot when the rings fall and dodge the high-speed charge after the WARNING
sign appears.
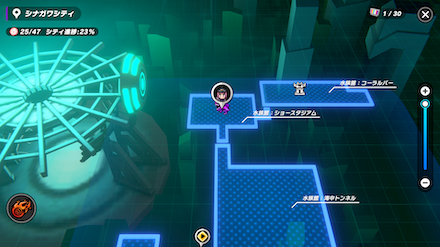
S.H.A.R.K. Location
End of Main Story Chapter 1 - Aquarium
| Map Image | Overview Image |
|---|---|
 |
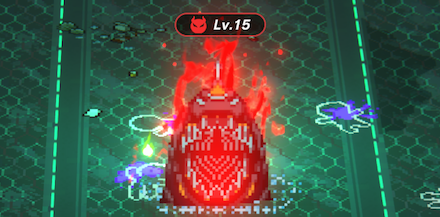 |
S.H.A.R.K. is the final boss of Chapter 1 in the main story. This boss is significantly stronger than the enemies you have faced so far, so be sure to prepare well before challenging it.
Chance of Detonator Tension Card Drop
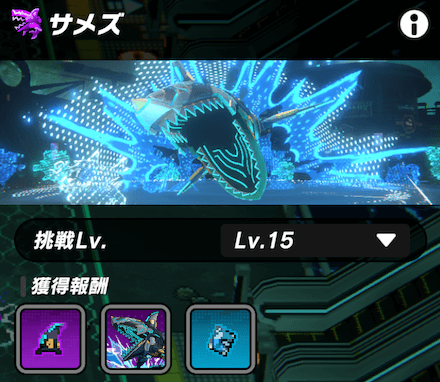
Once S.H.A.R.K. is defeated, you have the option to adjust the challenge level and attempt to fight again. The Detonator Tension Card has a chance to drop during this encounter, so it is advisable to farm for it.
S.H.A.R.K. Boss Fight (Cleared)
Playing as Tsuruko Semba
| Recommended Characters | ||
|---|---|---|
|
Tsuruko Semba
Player |
Q
|
Roku Saigo
|
Playing as Tsuki Iroha
| Recommended Characters | ||
|---|---|---|
|
Tsuki Iroha
Player |
Koishi Kohinata
|
Roku Saigo
|
TRIBE NINE Related Guides
All Story Walkthroughs
| All Story Walkthroughs |
|---|
| Chapter 0 |
| Chapter 1 |
| Chapter 2 |
| Chapter 3 |
All Story Bosses
| All Chapter 0 Bosses | |
|---|---|
| Endrone | |
| All Chapter 1 Bosses | |
| S.H.A.R.K. | |
| All Chapter 2 Bosses | |
| Brave Diver | Destroyer |
| Sui Yakumo | - |
| All Chapter 3 Bosses | |
| Rakuzakai | Deadly Red Alert |
| Tentacles | - |
All Graffiti Locations
| All Graffiti Locations | |
|---|---|
| All Shinagawa Graffiti Locations | All Minato Graffiti Locations |
| All Neo Chiyoda Graffiti Locations | - |
Comment
Author

How to Beat S.H.A.R.K (Chapter 1 Boss)
Rankings
- We could not find the article you were looking for.
- We could not find the message board you were looking for.
Gaming News


![Everwind Review [Early Access] | The Shaky First Step to A Very Long Journey](https://img.game8.co/4440226/ab079b1153298a042633dd1ef51e878e.png/thumb)

![Monster Hunter Stories 3 Review [First Impressions] | Simply Rejuvenating](https://img.game8.co/4438641/2a31b7702bd70e78ec8efd24661dacda.jpeg/thumb)
Popular Games

Genshin Impact Walkthrough & Guides Wiki
Honkai: Star Rail Walkthrough & Guides Wiki
Umamusume: Pretty Derby Walkthrough & Guides Wiki
Pokemon Pokopia Walkthrough & Guides Wiki
Resident Evil Requiem (RE9) Walkthrough & Guides Wiki
Monster Hunter Wilds Walkthrough & Guides Wiki
Wuthering Waves Walkthrough & Guides Wiki
Arknights: Endfield Walkthrough & Guides Wiki
Pokemon FireRed and LeafGreen (FRLG) Walkthrough & Guides Wiki
Pokemon TCG Pocket (PTCGP) Strategies & Guides Wiki


Recommended Games
Diablo 4: Vessel of Hatred Walkthrough & Guides Wiki
Fire Emblem Heroes (FEH) Walkthrough & Guides Wiki
Yu-Gi-Oh! Master Duel Walkthrough & Guides Wiki
Super Smash Bros. Ultimate Walkthrough & Guides Wiki
Pokemon Brilliant Diamond and Shining Pearl (BDSP) Walkthrough & Guides Wiki
Elden Ring Shadow of the Erdtree Walkthrough & Guides Wiki
Monster Hunter World Walkthrough & Guides Wiki
The Legend of Zelda: Tears of the Kingdom Walkthrough & Guides Wiki
Persona 3 Reload Walkthrough & Guides Wiki
Cyberpunk 2077: Ultimate Edition Walkthrough & Guides Wiki


All rights reserved
Game Copyright©Akatsuki Games Inc. All Rights Reserved
The content we provide on this site were created personally by members of the Game8 editorial department.
We refuse the right to reuse or repost content taken without our permission such as data or images to other sites.
©Akatsuki Games Inc. (Provider)