Incineroar Guide: Matchup Chart and Combos
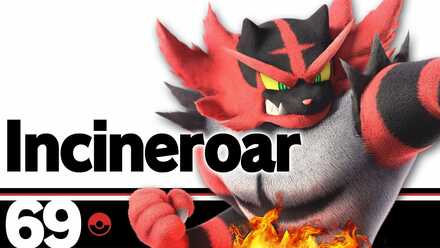
This is a guide to using Incineroar in Super Smash Bros. Ultimate. Incineroar's bread and butter combos, how to unlock, frame data, alt costumes and skins, as well as Incineroar's matchups, counters, and tier list placement can all be found here.
List of Contents
Incineroar Tier and Overview
Stats and General Info
| Incineroar | |
|---|---|
 |
|
| Game Series | Pokémon |
| Smash Bros. Debut | SSBU |
| Fighter Number | 69 |
| Unlock Order | 46 |
| Number of Jumps | 2 |
| Weight | 116 Units (6/87) |
| Dash Speed | 1.18 (89/87) |
| Air Speed | 0.88 (81/87) |
| Fast Fall Speed | 2.816 (22/87) |
| Special Attributes | None |
Tier List Placement
 |
 Tier
Tier
|
A powerful brawler with a unique Revenge mechanic
Incineroar is a character with good close range combat, thanks to good frame data, as well as a number of powerful moves. His signature Revenge zechanic is triggered by Down B, and if he is hit while the move is active, it will power him up significantly. When fully buffed, moves such as his command grab side special become immensely powerful, capable of KOing extremely early. Incineroar should fight using a mix of his long lasting moves such as Nair and neutral B to rack up damage, then try and go for a KO with a back throw or Side Special.
Although his frame data is rather good for a heavy, Incineroar has poor mobility, and will struggle to keep up with faster characters. His recovery is also terrible, perhaps one of the worst in the game. Incineroar will have a hard time getting back to the stage, so it is important to avoid getting thrown off. Lastly, Revenge can be cancelled if Incineroar is grab, meaning that other grapplers could give him a hard time.
Incineroar's Strengths and Weaknesses
| Strengths | ・Very powerful back throw ・Extremely powerful Side B ・Several long lasting hitboxes (B, Nair), and decent frame data ・Excellent KO power and damage output, especially when combined with Revenge |
|---|---|
| Weaknesses | ・Terrible recovery ・Poor mobility, and easily comboed ・Can lose Revenge if grabbed |
Incineroar Matchup Chart
Matchup Chart
|
|
|
| -2 | |
|---|---|
| -1 | |
| 0 | |
| +1 | |
| +2 | |
Notes About Matchup Chart
1. -2 = Disadvantage. -1 = Slight Disadvantage or Even. 0 = Even. +1 = Slight Advantage or Even. +2 = Advantage.
2. The matchup chart was based around both the opinions of professional players of each character, as well as our own experience through playing Incineroar.
3. Characters within each tier are unordered
4. Pokemon Trainer's individual Pokemon (Squirtle, Ivysaur, and Charizard) as well as Echo fighters with no significant difference than their regular counterpart are not shown.
5. For other characters who are not shown here, we are still investigating the matchup.
Incineroar Combos
| Bread and Butter Combos |
|---|
| DTilt→Fair or Neutral Special |
| DTilt→UTilt→Nair or Up Air (Combo confirms at 20%) |
| DTilt→DTilt→UTilt→Up Air (Combo confirms at 0% depending on the weight class) |
| Down Throw Combos |
| Down Throw→Initial Dash→Neutral Special |
| Down Throw→Forward Smash (Combo confirms at 0%, delay required) |
| Down Throw→Initial Dash into Up Smash or Nair |
Bread and Butter Combo Guide
| DTilt→Fair or Neutral Special |
|---|
| Down Tilt attack to Forward Air or Neutral Special is your go-to starter combo for Incineroar. This combo won't connect if your opponent's too low percentage, but it becomes more dependable at higher levels. Neutral Special has a large risk of being where you drop the combo, but there is a lot of damage when a combo is landed. |
| DTilt→UTilt→Nair or Up Air |
|---|
| This combo only confirms on 20% damage to the enemy. Though the range is limited, you can score more damage than the previous combo. Down Air finisher will launch the opponent to the side, while Up Air wil launch them upwards, so choose your last move depending on the situation. |
| DTilt→DTilt→UTilt→Up Air |
|---|
| This combo confirms on 0% damage to the enemy, and while it is the hardest to pull off, this deals the most damage. |
Down Throw Combo Guides
| Down Throw→Initial Dash→Neutral Special |
|---|
| It is a basic combo of the Down Throw combos. From 0% to 70%, it can be done reliably, but the transition becomes difficult to connect. If your opponent's damage is high, they will get launched higher with the throw, so make the step part a dash or the jump part a big jump. |
| Down Throw→Forward Smash |
|---|
| This is also a combo that is limited to 0% opponent damage. If you perform the forward smash at the fastest speed, it will not connect, so wait for a moment before doing it. |
| Down Throw→Initial Dash into Up Smash or Nair |
|---|
| This is a combo that deals the same amount of damage with fewer steps than other combos. Note that the up smash connects between 0% and 20%, but as the damage increases, it becomes more difficult to connect. You can alternatively us a neutral air in place of up smash, but on higher damages make sure to dash more or jump higher. |
Incineroar Frame Data and Moveset
Best Out of Shield Options
| Move | Frames |
|---|---|
| Neutral Air | 8 Frames |
| Up Air | 10 Frames |
| Back Air | 10 Frames |
| Up B | 11 Frames |
| Shield Grab | 11 Frames |
| Foward Air | 11 Frames |
| Up Smash | 13 Frames |
Incineroar has pretty decent out of shield options, with neutral air as the go-to option, thanks to its quick startup, long lasting hitbox, and combo potential. Up B, while a bit slower, gains armor from frame 4, allowing Incineroar to tank the opponents next attack and win the interaction. While up smash is quite slow, it can also be used to punish very unsafe moves that end with the opponent close to Incineroar.
Jab (Neutral Attack)
| 1v1 Damage (%) | Startup Frames | Active Frames | Cooldown Frames | |
|---|---|---|---|---|
| Jab 1 (A) |
3.0 | 5 | 2 | 17 |
| Jab 2 | 3.36 | 4 | 2 | 26 |
| Jab 3 | 5.64 | 4 | 2 | 32 |
Jab
Incineroar's jab has a quick startup. It's mainly used as a get-off-me tool at close range, but since Incineroar has better get-off-me tools, such as Neutral Air and Darkest Lariat, there isn't much reason to use jab, other than to pressure shields.
Dash Attack / Tilts
| 1v1 Damage (%) | Startup Frames | Active Frames | Cooldown Frames | |
|---|---|---|---|---|
| Dash Attack (Dash + A) |
15.6 | 8 | 4 | 30 |
| Dash Attack (Weak Hit) | 10.8 | 12 | 4 | 26 |
| Forward Tilt (← or → + A) |
15.6 | 12 | 3 | 22 |
| Up Tilt (↑ + A) |
10.8 | 6 | 6 | 23 |
| Down Tilt (↓ + A) |
10.8 | 9 | 3 | 18 |
Dash Attack
Incineroar's dash attack has a quick startup, as well as great damage and range. It's a valuable for a slow fighter like Incineroar, because it gives him a quick burst option to approach opponents.
Forward Tilt
Incineroar's forward tilt is great in terms of damage, range, and knockback. Although it has a slow startup, its strong knockback allows it to be used as a KO move.
Up Tilt
Incineroar's up tilt has quick startup. Since Incineroar's head is intangible during the attack, it's used most effectively as an anti-air attack for snuffing out aerial approaches from the opponent.
Down Tilt
Incineroar's down tilt has somwhat quick startup. It's mostly used as a combo starter for Incineroar's aerials or other moves.
Smash Attacks
| 1v1 Damage (%) | Startup Frames | Active Frames | Cooldown Frames | |
|---|---|---|---|---|
| Forward Smash (Smash ← or → + A) |
24.0/19.2 | 16 | 3 | 33 |
| Up Smash (Smash ↑ + A) |
20.4 | 13 | 6 | 29 |
| Down Smash (Smash ↓ + A) |
19.2 | 18 | 3 | 37 |
Forward Smash
Incineroar's forward smash deals great damage and knockback. The sweetspot at the tip of the move has particularly strong knockback, being able to KO opponents at even less than 100%.
Up Smash
Incineroar's up smash likewise deals great damage and knockback, though it has somewhat slow startup. While it won't be effective against attacks that cross up Incineroar's sheild, it can also be utilized as an out of shield option to hit opponents in front of Incineroar, or to catch jumps.
Down Smash
Incineroar's down smash similarly deals great damage and knockback. Although it has a slow startup, Incineroar immediately performs a high jump at the beginning of the move, shifting its hurtbox, so you can use it to avoid an opponent's attack and follow up with one of your own.
Aerials
| 1v1 Damage (%) | Startup Frames | Active Frames | Cooldown Frames | |
|---|---|---|---|---|
| Neutral Air (A + no direction while airborne) |
15.6 | 5 | 2 | 35 |
| Neutral Air (Weak Hit) | 8.4 | 7 | 19 | 16 |
| Forward Air (Hold ← or → in the direction you are facing + A while airborne) |
14.4/15.6 | 8 | 3 | 34 |
| Forward Air (Weak Hit) | 10.8/11.52 | 11 | 4 | 30 |
| Back Air (← or → Opposite of the direction you are facing + A while airborne) |
13.2/15.6 | 7 | 4 | 31 |
| Up Air (↑ + A While Airborne) |
9.6 | 7 | 5 | 20 |
| Down Air (↓ + A While Airborne) |
18.0/16.8 | 16 | 4 | 25 |
| Down Air (Weak Hit) | 10.8 | 20 | 2 | 23 |
Neutral Air
Incineroar's neutral air has a very quick startup. Incineroar's entire body comprises the hitbox of the attack, so it's great as a get-off-me tool at close range.
Forward Air
Incineroar's forward air has quick startup and deals great damage. It's effective to use as a spacing tool due to its long range. It can be comboed into from a down throw or down tilt to rack up damage.
Back Air
Incineroar's back air has quick startup, as well as great damage and knockback. It has some of the best startup of all of Incineroar's kill moves, making it a very useful KO option.
Up Air
Incineroar's up air has quick startup. It doesn't deal too much damage, but its wide range makes it easy to connect hits, which makes it good for juggling opponents in disadvantage.
Down Air
Incineroar's down air has the ability to meteor spike. Since Incineroar has a pretty weak recovery, it's best to avoid going for it too much as it presents a huge risk, but it can be used to edgeguard fighters like Donkey Kong who are vulnerable to attacks from above.
Specials
| 1v1 Damage (%) | Startup Frames | Active Frames | Cooldown Frames | |
|---|---|---|---|---|
| Neutral Special (B) |
19.2/14.4 | 5 | 6 | 74 |
| Neutral Special (Weak Hit 1) | 14.4/12.0 | 15 | 2 | 68 |
| Neutral Special (Weak Hit 2) | 13.2/10.8 | 23 | 8 | 54 |
| Neutral Special (Weak Hit 3) | 12.0/9.6 | 37 | 8 | 40 |
| Neutral Special (Weak Hit 4) | 10.8/8.4 | 50 | 2 | 33 |
| Neutral Special (Weak Hit 5) | 9.6/7.2 | 56 | 2 | 27 |
| Side Special - Grab (← or → + B) |
- | 16 | 17 | 25 |
| Side Special - Lariat Attack | 24.0 | 7 | 1 | 39 |
| Side Special - Back Body Drop | 14.4 | 8 | 1 | 33 |
| Side Special - Chest Bounce, Failure | 4.8 | - | 1 | - |
| Up Special Hit 1 (↑ + B) |
3.6 | 11 | 1 | 68 |
| Up Special Hit 1 (Weak Hit 1) | 4.8 | 13 | 3 | 64 |
| Up Special Hit 1 (Weak Hit 2) | 3.0 | 16 | 9 | 55 |
| Up Special Hit 2 | 13.2/8.4 | 38 | 21 | 21 |
| Up Special Hit 2 (Anti-Air) | 4.2 | ? | ? | ? |
| Up Special (Landing) | 10.8/6.6 | (1) | (4) | (57) |
| Down Special - Body Hit (↓ + B) |
Counterattack | 3 | 20 | 34 |
| Down Special - Counter | 3.0 | 7 | 2 | 16 |
Neutral Special (Darkest Lariat)
Incineroar's Darkest Lariat is a spin attack. This special has quick startup, as well as intangibility during startup, so it can be used instead of neutral air as a quick get-off-me tool.
Additionally, since you can move laterally during the attack by tilting the stick, you can still try to head towards and hit your opponent even if you initially miss.
Side Special (Alolan Whip)
For its side special, Incineroar throws its opponent at wrestling ring ropes and attacks them after they bounce back to him. The attack can be triggered by pressing the special button again. The type of attack is determined by your timing when pressing the special button again.
The best timing will trigger the Lariat, which you activate by pressing the special button right as the opponent reaches Incineroar. It deals strong damage and knockback, and is a powerful KO option, especially when Incineroar has Revenge stacked. The other attack is the Back Body Drop, which is activated by pressing the button at any other time before the opponent reaches Incineroar. A failed attack also deals slight damage and knocks the opponent slightly away.
Up Special (Cross Chop)
Incineroar jumps then dives onto its opponent in its up special. While going up, you can laterally shift the landing position by moving left and right on the move stick.
It's mainly used for recovery, although it is somewhat poor as a recovery tool. However, since it deals strong damage and has damage-based armor during its climb, you could also make use of it as a KO move.
Down Special (Revenge)
Incineroar's down special is a unique counterattack. Unlike a normal counterattack, Incineroar doesn't negate the opponent's attack and counters extra damage. Instead, Incineroar weakens the opponent's attack and counters with its own light attack, and gains a buff, strengthening its next attack. The buff effect lasts until Incineroar lands the next hit or for a duration of 60 seconds if Incineroar doesn't land a hit. The effect is also cancelled if Incineroar is thrown or takes 36% or more damage.
| Summary of Revenge Effects |
|---|
|
Grab / Throws
| 1v1 Damage (%) | Startup Frames | Active Frames | Cooldown Frames | |
|---|---|---|---|---|
| Pummel | 1.92 | 1 | 1 | 19 |
| Grab (Normal) | - | 7 | 3 | 28 |
| Dash Grab | - | 11 | 3 | 32 |
| Pivot Grab | - | 12 | 3 | 29 |
| Forward Throw (Throw) (← or → While Grabbing) |
14.4 | 58 | 1 | 23 |
| Back Throw (Hitbox) (← or → While Grabbing) |
16.8 | 28/30 | 1 | 23/21 |
| Up Throw (Throw) (← or → While Grabbing) |
14.4 | 27 | 1 | 28 |
| Down Throw (Throw) (← or → While Grabbing) |
10.8 | 22 | 1 | 11 |
Forward Throw
Incineroar spins and hurls its opponent forward. It can't be used for combos due to the endlag of the attack. However, it deals strong damage and knockback, which makes it a viable KO move at high percents near the ledge.
Back Throw
Incineroar performs a German suplex for its back throw. It also can't be used for combos, but it is also very powerful, and can KO opponents near the ledge. When combined with Revenge, it becomes even stronger.
Up Throw
Incineroar jumps and throws its opponent upward. If the opponent has about 150% damage, you can possibly KO them.
Down Throw
Incineroar slams its opponent to the ground for its down throw. It's the only throw of Incineroar that both does high damage and can be used as a combo starter, so it is the go-to throw at lower percents.
Final Smash
| Attack | How to Use | Effect |
|---|---|---|
| Max Malicious Moonsault | Press B after obtaining the Smash Ball | Incineroar charges forward in flames to catch an opponent. In the air, it will punch them several times upward, before slamming them down to the ground in a powerful exposion. Only one opponent can be caught initially, but nearby opponents will be hurt by the blast as well. |
Incineroar Balance Changes
Version 13.0.0 Balance Patch
| Change | |
|---|---|
| Down Smash Attack | Increased power. Extended launch distance. |
| Up Air Attack | Increased attack power and maintained launch distance. |
| Up Special | Increased attack power and maintained launch distance of the high-damage window while descending. Increased attack power and maintained launch distance of the high-damage window for the explosion. |
Version 8.0.0 Balance Patch
| Change | |
|---|---|
| Up Smash Attack | Extended launch distance. |
| Grab Attack | Increased the speed for grabs, dash grabs, and turning and grabbing. |
| Forward Throw | Extended launch distance. |
| Side Special | Increased the speed of grabs. Extended launch distance for when the Lariat hits. |
| Down Special | Reduced vulnerability. Increased the power up amount when the move succeeds. |
Version 7.0.0 Balance Patch
| Change | |
|---|---|
| Side Special | Extended launch distance when opponents that are not grabbed with a side special are caught up in the lariat or back body drop. |
Version 6.0.0 Balance Patch
| Change | |
|---|---|
| Neutral Attack 3 | Increased power. Extended launch distance. |
| Forward Air Attack | Increased the amount of time hit detection lasts. Decreased power for the latter half of the time hit detection lasts. |
| Down Air Attack | Made it easier to trigger a meteor effect when you hit with the high-damage range. |
| Neutral Special | Increased the power at the beginning of the move. Increased the range at the beginning of the move and increased the duration of the move. |
| Down Special | Increased the amount of time the damage-reducing pose is effective. Extended launch distance of the flames after receiving an opponent's attack. Reduced vulnerability when receiving or not receiving an opponent’s attack. |
Version 3.1.0 Balance Patch
| Change | |
|---|---|
| Neutral Attack 1 | Adjusted the launch distance when hitting with the elbow and made it easier to hit multiple times when continuing with Neutral Attack 2. |
| Neutral Attack 2 | Made it easier to hit multiple times when continuing with Neutral Attack 3. |
Version 2.0.0 Balance Patch
| Change | |
|---|---|
| Up Smash Attack | Extended launch distance. |
| Up Air Attack | Shortened the amount of time you cannot grab edges after using the move. |
| Down Air Attack | Shortened the landing time after using the move. |
| Up Throw | Extended launch distance. |
| Up Special | Extended vertical and horizontal distance. |
How to Unlock Incineroar
| Unlocking Via Smash Mode |
|---|
| 46th Fighter Unlocked After unlocking Rosalina & Luna, let 10 minutes pass OR play another battle in smash after soft-resetting OR return to the menu from World of Light |
| Unlocking via Classic Mode |
| Clear Classing Mode 4 times using Samus. |
| Unlocking via World of Light |
| Southwest Area |
There are three ways to unlock Incineroar. Completing any of these, then defeating Incineroar when they appear in the “a New Challenger Appears” screen will allow you to use them afterward.
Incineroar Alt Costumes and Skins
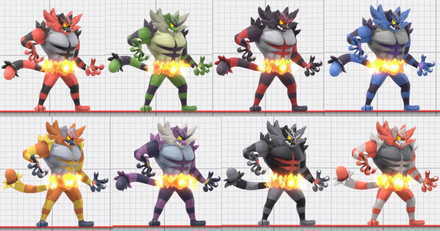
Incineroar Reveal Trailer
Smash Ultimate Character Guides
 Go back to the SSBU Top Page |
|
 List of Fighters |
 Tier List |
 Guide for Beginners Guide for Beginners |
 Tips and Tricks Tips and Tricks |
 World of Light Guide World of Light Guide |
 Spirit List Spirit List |
 Stages Stages |
 List of Items List of Items |
 Updates Updates |
 Message Boards Message Boards |
Comment
His MU chart is almost the same as Ganon 💀
Author
Incineroar Guide: Matchup Chart and Combos
improvement survey
03/2026
improving Game8's site?

Your answers will help us to improve our website.
Note: Please be sure not to enter any kind of personal information into your response.

We hope you continue to make use of Game8.
Rankings
- We could not find the message board you were looking for.
Gaming News
Popular Games

Genshin Impact Walkthrough & Guides Wiki

Honkai: Star Rail Walkthrough & Guides Wiki

Umamusume: Pretty Derby Walkthrough & Guides Wiki

Pokemon Pokopia Walkthrough & Guides Wiki

Resident Evil Requiem (RE9) Walkthrough & Guides Wiki

Monster Hunter Wilds Walkthrough & Guides Wiki

Wuthering Waves Walkthrough & Guides Wiki

Arknights: Endfield Walkthrough & Guides Wiki

Pokemon FireRed and LeafGreen (FRLG) Walkthrough & Guides Wiki

Pokemon TCG Pocket (PTCGP) Strategies & Guides Wiki
Recommended Games

Diablo 4: Vessel of Hatred Walkthrough & Guides Wiki

Cyberpunk 2077: Ultimate Edition Walkthrough & Guides Wiki

Fire Emblem Heroes (FEH) Walkthrough & Guides Wiki

Yu-Gi-Oh! Master Duel Walkthrough & Guides Wiki

Super Smash Bros. Ultimate Walkthrough & Guides Wiki

Pokemon Brilliant Diamond and Shining Pearl (BDSP) Walkthrough & Guides Wiki

Elden Ring Shadow of the Erdtree Walkthrough & Guides Wiki

Monster Hunter World Walkthrough & Guides Wiki

The Legend of Zelda: Tears of the Kingdom Walkthrough & Guides Wiki

Persona 3 Reload Walkthrough & Guides Wiki
All rights reserved
© 2018 Nintendo
Original Game: © Nintendo / HAL Laboratory, Inc.
Characters: © Nintendo / HAL Laboratory, Inc. / Pokémon. / Creatures Inc. / GAME FREAK inc. / SHIGESATO ITOI / APE inc. / INTELLIGENT SYSTEMS /
SEGA / CAPCOM CO., LTD. / BANDAI NAMCO Games Inc. / MONOLITHSOFT / CAPCOM U.S.A., INC. / SQUARE ENIX CO., LTD.
The copyrights of videos of games used in our content and other intellectual property rights belong to the provider of the game.
The contents we provide on this site were created personally by members of the Game8 editorial department.
We refuse the right to reuse or repost content taken without our permission such as data or images to other sites.


![Monster Hunter Stories 3 Review [First Impressions] | Simply Rejuvenating](https://img.game8.co/4438641/2a31b7702bd70e78ec8efd24661dacda.jpeg/thumb)


I find that fox’s smash move is really hard to hit and doesn’t so much damage