Trouble in Paradise Walkthrough and How to Craft the Legendary Bait
Trouble in Paradise is a Side Quest that can be unlocked during Chapter 12 of Final Fantasy 7 Rebirth (FF7 Rebirth). Read on to learn more about how to unlock Trouble in Paradise, how to complete it, as well as the available rewards for completing the side quest.
List of Contents
How to Unlock Trouble in Paradise
Reach Chapter 2 and Complete the Lifeline in Peril Side Quest
You will need to progress to Chapter 2 of the main story and complete the Lifeline in Peril side quest. Once you do, you can go ahead and complete the next quest requirement.
Lifeline in Peril Quest Walkthrough
Reach Chapter 12 and Complete The Hardest Sell Side Quest
You will also need to progress until you reach Chapter 12 of the main story and complete The Hardest Sell side quest. From there, head towards the Community Noticeboard in Costa del Sol and accept the quest.
The Hardest Sell Quest Walkthrough
How to Complete Trouble in Paradise
- Talk to Mayor Kapono
- Talk with Kyrie
- Collect the Materials Needed
- Complete Classified Intel: The Sultan of Stench
- Complete Classified Intel: The Wyvern Awoken
- Transmute the Legendary Bait
- Defeat the Fiends Using the Bait
- Return to Kyrie and Mayor Kapono
Talk to Mayor Kapono

After you've accepted the quest from the billboard, head to Bar del Sol and talk with Mayor Kapono. From there, a cutscene will play out and you will have to find the Merc called Kyrie.
Talk with Kyrie

Follow the objective marker on the map and head northeast towards the beach area so you could talk to Kyrie. From there, she will give you the Transmuter Chip: Legendary Bait and ask that you gather materials for it.
Collect the Materials Needed
| Material | How to Get |
|---|---|
| Pearl Ginger Roots x5 | All Regions |
| Ether Onion Locations and Crafting Recipes x5 | All Regions |
| Jabberwock Horn x1 | Complete Classified Intel: The Wyvern Awoken |
| Great Malboro Tendril x1 | Complete Classified Intel: The Sultan of Stench |
The first two materials needed to collect for the Legendary Bait are fairly easy to locate, given that Ether Onions and Pearl Ginger Roots are available in every region.
For the Jabberwock Horn and Great Malboro Tendril, you will have to complete Expedition Intels in both Gongaga and Cosmo Canyon.
From there, you will have to unlock Classified Intels that are needed to locate the Great Malboro and Jabberwock. Defeating the former will unlock the Great Marlboro Tendril, while the latter will reward you with the Jabberwock Horn.
All Classified Intel Locations (Secret Bosses)
Complete Classified Intel: The Sultan of Stench and Defeat Great Malboro
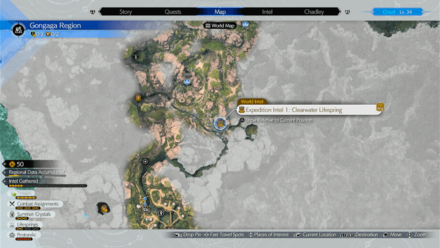
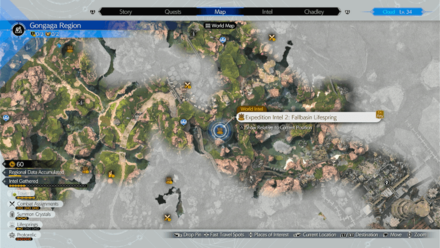
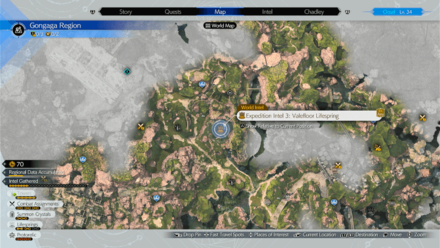
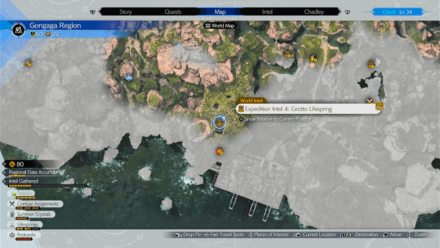
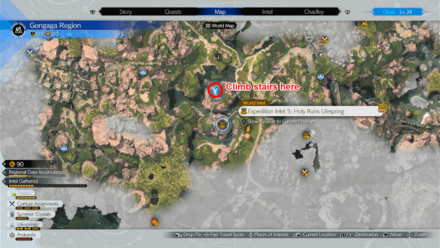

For the Expedition Intel in Gongaga, you must complete a total of 4 until you reach Expedition Intel 4: Grotto Lifespring.
This will help you unlock Classified Intel: The Sultan of Stench and find the Great Malboro. Defeat it to earn 1x Great Malboro Tendril.
Gongaga Region: Map and All Locations
Complete Classified Intel: The Wyvern Awoken and Defeat Jabberwock

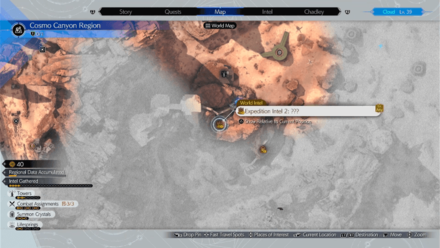
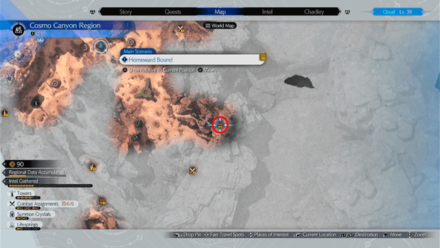
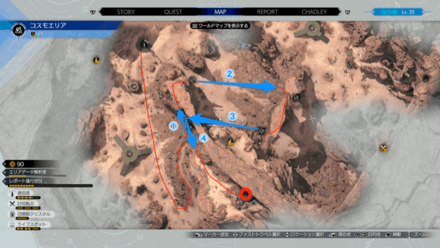

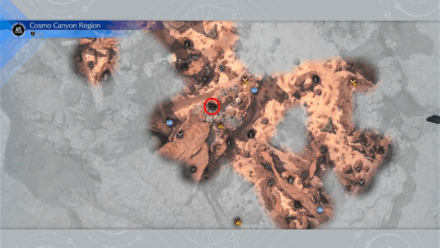
For the Expedition Intel in Cosmo Canyon, you must complete a total of 6 until you reach Expedition Intel 6: Plateau Ruins Lifespring.
This will help you unlock Classified Intel: The Wyvern Awoken and find the Jabberwock. Defeat it to earn 1x Jabberwock Horn.
Cosmo Canyon Region: Map and All Locations
Transmute the Legendary Bait

After you've acquired all materials, transmute the Legendary Bait. Do note that you need to have Craftsmanship Level 14 in order to transmute the Legendary Bait.
Defeat the Fiends Using the Bait

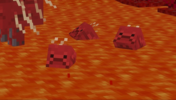
Once you've transmuted the Legendary Bait, head towards the objective marker part of the Trouble in Paradise Quest and use the Legendary Bait to lure the Sea Devil fiends in battle.
Defeat the fiends in battle once you've encountered them on the beach. Try to have someone with Ice and Lightning materia equipped to pressure and exploit the fiends' weaknesses.
Return to Kyrie and Mayor Kapono

After you've defeated the fiends, report back to Kylie and Mayor Kapono so you complete the quest and receive the rewards.
Trouble in Paradise Rewards
List of Rewards
| Rewards for Completing Trouble in Paradise |
|---|
| ▸ Secrets of the Ninja Vol. VI (10 SP for Yuffie) ▸ 10 Party EXP ▸ Player EXP (based on current level) |
Increase Favorability With Yuffie

Completing Trouble in Paradise will also increase your friendship with Yuffie. This will affect the events that will occur when you visit the Gold Saucer later in the game.
Romance and Relationship Guide
Secrets of the Ninja Vol. XIII in Hard Mode
While playing in Hard Mode, completing this side quest will reward you the Secrets of the Ninja Vol. XIII for Yuffie. You can access Hard Mode after completing your first playthrough of the game in any difficulty.
Trouble in Paradise Information
Information and Overview
| Basic Information | |||||
|---|---|---|---|---|---|
 Recommended Level: 42 |
|||||
| Availability | Region | Side Quest Giver | |||
| Chapter 12 | Corel | Mayor Kapono | |||
| Unlock Requirement | Complete the ''Lifeline in Peril'' and "The Hardest Sell" side quests. | ||||
FF7 Rebirth Related Guides

Side Quest Guides
| All Side Quest Guides |
|---|
| Best Side Quests to Do |
Grasslands Side Quests
| Side Quest List | Flowers from the Hill | Lifeline in Peril | A Rare Card Lost |
|---|---|---|
| Livestock's Bane | Where the Wind Blows | Hustle and Grind |
Junon Side Quests
| Side Quest List | Stuck in a Rut | When Words Won't Do | The Hardest Sell |
|---|---|---|
| Calling All Frogs | Dreaming of Blue Skies | Beneath Still Waters |
| Tides of War and Worry | ||
Corel Side Quests
Gongaga Side Quests
| Side Quest List | The Pursuit of Perfection | O Chicken, Where Art Thou | Teach Me, Great Warrior |
|---|---|---|
| The Spice of Life | Escape from Endless Writer's Block | Woodland Vigil |
Cosmo Canyon Side Quests
| Side Quest List | Bonds of Trust | Absence of a Sign | From Whence Life Flows |
|---|---|---|
| Promises to Keep | Victim of Circumstance | |
Nibel Side Quests
| Side Quest List | Esoteric Secrets of the Elders | My White-Haired Angel | Lament of the Damned |
|---|---|---|
Comment
Author

Trouble in Paradise Walkthrough and How to Craft the Legendary Bait
Rankings
- We could not find the message board you were looking for.
Gaming News
![Neverness to Everness (NTE) Review [Beta Co-Ex Test] | Rolling the Dice on Something Special](https://img.game8.co/4414628/dd3192c8f1f074ea788451a11eb862a7.jpeg/show)


Popular Games

Genshin Impact Walkthrough & Guides Wiki
Honkai: Star Rail Walkthrough & Guides Wiki
Arknights: Endfield Walkthrough & Guides Wiki
Umamusume: Pretty Derby Walkthrough & Guides Wiki
Wuthering Waves Walkthrough & Guides Wiki
Pokemon TCG Pocket (PTCGP) Strategies & Guides Wiki
Abyss Walkthrough & Guides Wiki
Zenless Zone Zero Walkthrough & Guides Wiki
Digimon Story: Time Stranger Walkthrough & Guides Wiki
Clair Obscur: Expedition 33 Walkthrough & Guides Wiki


Recommended Games
Fire Emblem Heroes (FEH) Walkthrough & Guides Wiki
Pokemon Brilliant Diamond and Shining Pearl (BDSP) Walkthrough & Guides Wiki
Diablo 4: Vessel of Hatred Walkthrough & Guides Wiki
Super Smash Bros. Ultimate Walkthrough & Guides Wiki
Yu-Gi-Oh! Master Duel Walkthrough & Guides Wiki
Elden Ring Shadow of the Erdtree Walkthrough & Guides Wiki
Monster Hunter World Walkthrough & Guides Wiki
The Legend of Zelda: Tears of the Kingdom Walkthrough & Guides Wiki
Persona 3 Reload Walkthrough & Guides Wiki
Cyberpunk 2077: Ultimate Edition Walkthrough & Guides Wiki


All rights reserved
© SQUARE ENIX CO., LTD. All Rights Reserved.
CHARACTER DESIGN: TETSUYA NOMURA/ROBERTO FERRARI
LOGO ILLUSTRATION: © 1997 YOSHITAKA AMANO
The copyrights of videos of games used in our content and other intellectual property rights belong to the provider of the game.
The contents we provide on this site were created personally by members of the Game8 editorial department.
We refuse the right to reuse or repost content taken without our permission such as data or images to other sites.