This survey will take about 1 minute.
Your answers will help us to improve our website.
Kirby and the Forgotten Land
Alivel Mall (Staff Side) Waddle Dee Locations and Missions Walkthrough
This is a walkthrough for the Alivel Mall (Staff Side) stage in Kirby and the Forgotten Land. Read on to learn how to clear all Alivel Mall (Staff Side) stage missions, see Waddle Dee and Figure locations, Enemy Information, and more!
| Previous Stage | Next Stage |
|---|---|
| Searching the Oasis | Moonlight Canyon |
List of Contents
Alivel Mall (Staff Side) Walkthrough Video
Alivel Mall (Staff Side) Missions and Abilities
Missions List
| Mission | Waddle Dees |
|---|---|
| 3 | |
| 5 | |
| 1 | |
| 1 | |
| 1 |
Waddle Dee Locations for All Missions
Copy Abilities
 Sleep Sleep
|
 Hammer Hammer
|
 Bomb Bomb
|
 Cutter Cutter
|
Alivel Mall (Staff Side) Mission Completion Order
This stage only has one area. Follow the table below to clear each mission in order.
Area 1
Alivel Mall (Staff Side) Hidden Waddle Dee Locations
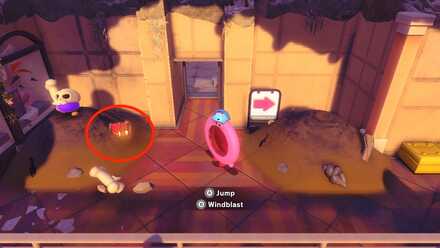
1: Use Ring Mouth Kirby to Break the Wall
After defeating the two sword enemies in the room below, destroy the bomb block to reveal a metal ring. Return to the previous room and open the hole as Ring Mouth Kirby to find the Waddle Dee.
How to Break the Wall
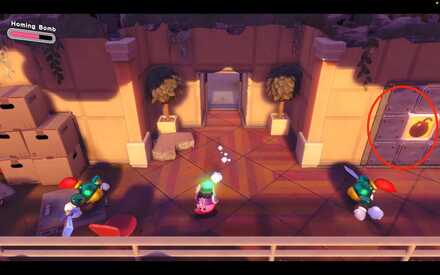 Break the bomb block on the right side to get the metal ring. |
 Use Ring Mouth Kirby to break the wall. The Waddle Dee is in the secret room. |
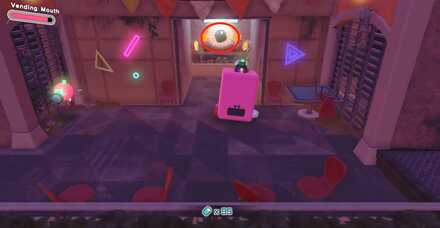
2: Use Vending Mouth Kirby to Reveal the Secret Room
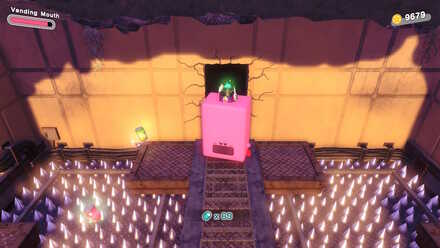
Use Vending Mouth Kirby to fit through the rectangular hole. This will break the wall and reveal the hidden Waddle Dee.
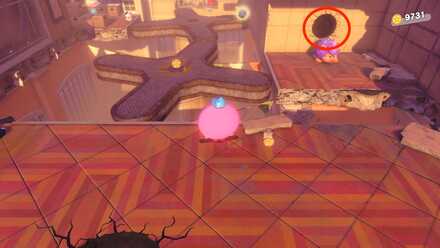
3: Rescue after Defeating Wild Bonkers
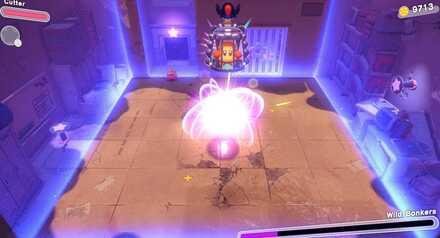
Defeating the Mid-Boss Wild Bonkers will lower the cage holding the Waddle Dee, allowing you to rescue it.
4: Use Ring Mouth to Blow Away the Dirt
Blow away the dirt covering the Treasure chest as Ring Mouth Kirby to save the Waddle Dee inside.
5: Break Through the Hole in the Ground with Water-Balloon Mouth
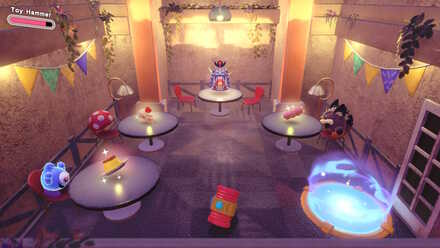
Breaking through the hole in the ground with Water-Balloon Mouth Kirby will reveal an underground cafe where the last hidden Waddle Dee is located.
Alivel Mall (Staff Side) Ice Cream Locations
1: On the Table Next to the Giant Ice Cream Cone (White)
Proceeding along the main path in the first area will lead you to a giant ice cream cone. The ice cream will be on top of the table.
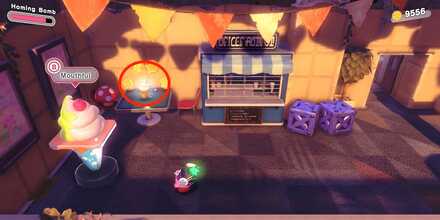
2: Inside the Room Near the Broken Clock (Blue)
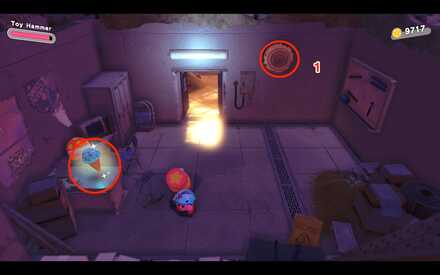
Enter the room near the broken clock to find the ice cream on the table. Be sure to hit the knob (1) before leaving to knock down the clock to use as a metal ring.
3: Inside the Boxes by Giant Ice Cream Cone (Ice Cream Sandwich)
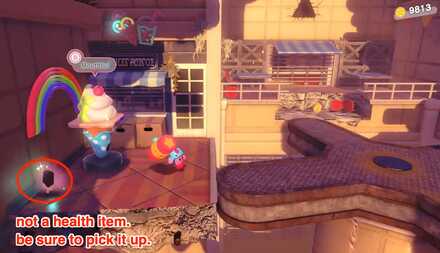
The last ice cream can be found inside some boxes next to the giant ice cream cone in the final area. It looks different from the previous ones, so be sure not to miss it.
How to Defeat Wild Bonkers With the Cutter Ability
Pile on Damage with Charge Shots
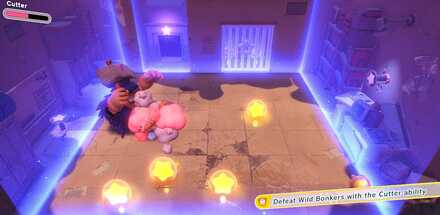
While Wild Bonkers moves around a lot, many of his attacks have him stand in one position. Use this opportunity to fire charged Cutter shots at him if you have the Chakra Cutter equipped. The longer you hold the B Button to charge, the more damage you will do.
Alivel Mall (Staff Side) Mouthful Mode Holes
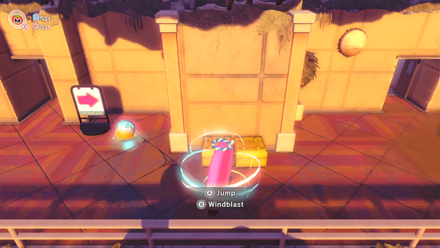
1: Fit in the Triangular Hole with Cone Mouth Kirby
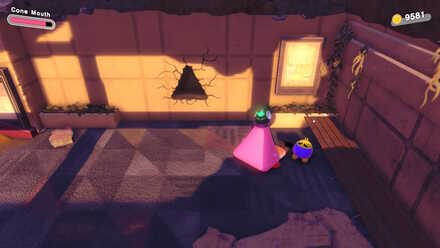
Swallow the Giant ice cream cone to use Cone Mouth. Then head right and jump into the triangular space to open the new area.
2: Fit in the Circular Hole with Ring Mouth
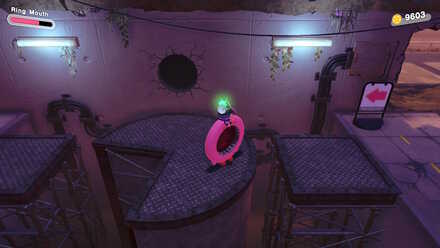
Defeat the two sword enemies in the new room and destroy the bomb block to find a metal ring. Then return to the previous room and open the hole as Ring Mouth Kirby.
3: Fit in the Rectangular Hole with Vending Mouth
After getting Vending Mouth Kirby, head to the warp pad on the left to make it back to the top level. Proceed carefully across the platforms and go inside the rectangular hole.
4: Use Ring Mouth for the Circular Hole Near the Platforms
Avoid the large hole in the ground and head towards the hole in the wall near the platforms. Kirby's mobility is limited in Ring Mouth mode, so watch your footing in this area.
5: Use Water-Balloon Mouth for the Hole in the Ground
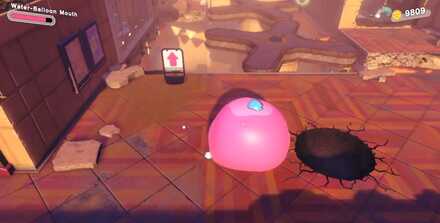
Breaking open the previous wall with Ring Mouth Kirby will reveal a water spout you can use to transform into Water-Balloon Kirby. Fall into the hole in the ground and break the floor in this form.
6: Cone Mouth will Break the Final Hole
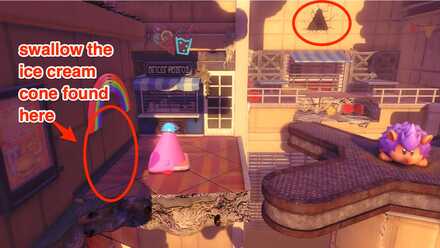
The Hole leading to the final area requires Cone Mouth Kirby. Swallow the ice cream cone nearby and enter the hole.
Alivel Mall (Staff Side) Blueprint Location
Hammer the Two Posts to get the Wild Hammer Blueprint
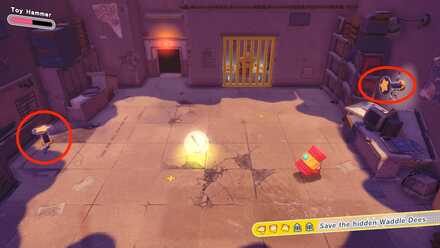
Defeating Wild Bonkers will allow you to get the Hammer Copy Ability. Hammer the two posts in the area to raise the cage behind you, revealing the treasure chest with the Blueprint.
Alivel Mall (Staff Side) Figure Locations
1: Destroy the Boxes after Defeating the Sword Enemies

After defeating the sword enemies in the new area, destroy the boxes on the left side to find the first figure.
2: Use Vending Mouth Kirby to Destroy the Boxes
Destroy the boxes behind the vending machine with the Soda Shot ability to get the next Figure.
3: Blow Away the Dust Using the Ring Mouth
After defeating Wild Bonkers, use the Hammer copy ability on the next area to hit the nail in the room with the large yellow enemy.
Inhale the ring and use it to blow away the dust from the previous area to find the third figure underneath it.
4: On the Far Platform in the Final Area
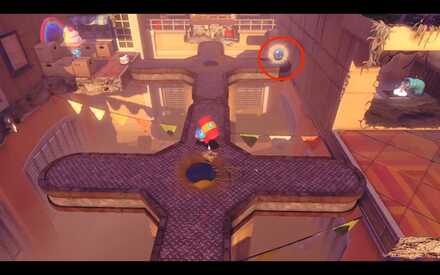
Before finishing the level, be sure to pick up the last figurine on the rotating platforms.
Kirby and the Forgotten Land Related Guides
Originull Wasteland Walkthrough and Stage List
| List of Stages | |
|---|---|
 The Wastes Where Life Began The Wastes Where Life Began
|
 Searching the Oasis Searching the Oasis
|
 Alivel Mall (Staff Side) Alivel Mall (Staff Side)
|
 Moonlight Canyon Moonlight Canyon
|
 Collector in the Sleepless Valley Collector in the Sleepless Valley
|
|
Comment
Author

Alivel Mall (Staff Side) Waddle Dee Locations and Missions Walkthrough
Please participate in our site
improvement survey
04/2026
improvement survey
04/2026
Would you assist in
improving Game8's site?
improving Game8's site?

×
We are listening to our users' valuable opinions and discussing how to act on them.
The information collected through this survey will be used for the purpose of improving our services. In addition, the information will only be disclosed a part of a statistic in a format that will not allow identification of personal information.
Begin Survey
Not Now
×
Please rate each item regarding Game8.co's Advertisements.
Amount of Ads
Very Dissatisfied
Somewhat Dissatisfied
Fine
Somewhat Satisfied
Highly Satisfied
Placement of Ads
Timing of Ad Display
Ad Loading Speed
Safeness of Ads
Content of Ads
×
Please rate each item regarding Game8.co's Quality of Articles.
Amount of information
Very Dissatisfied
Somewhat Dissatisfied
Fine
Somewhat Satisfied
Highly Satisfied
Frequency of updates
Speed of new information
Accuracy of articles
Understandibility of articles
Readability of sentences
×
Please rate each item regarding Game8.co's Usability of the Site.
Ease of finding information
Very Dissatisfied
Somewhat Dissatisfied
Fine
Somewhat Satisfied
Highly Satisfied
Loading Speed
Use of Color
Font Size
Visibility of Images
Easy to Understand Layout
×
Please rate each item regarding Game8.co's Message Boards, Comments.
Ease of Writing
Very Dissatisfied
Somewhat Dissatisfied
Fine
Somewhat Satisfied
Highly Satisfied
Readability
Ease in Finding Information
Comment Quality
Comment Quantity
Admin Response
×
Please rate each item regarding Game8.co's Site's new design.
Please rate our site's new design
Very Dissatisfied
Somewhat Dissatisfied
Fine
Somewhat Satisfied
Highly Satisfied
Do you think that the website's design change makes the site easier to use?
Has the new design made it easier for you to find information on the site?
Has the new design improved the overall visual appeal of the site?
How would you rate your overall satisfaction with the new design of the site?
×
How likely are you to recommend Game8 to someone you know?
Very Unlikely
0
1
2
3
4
5
6
7
8
9
10
Very Likely
If you have other opinions regarding potential improvement to the website, please share them with us. We would appreciate your honest opinion.
Note: This is a free response section, so you can proceed without entering anything.
Note: Please be sure not to enter any kind of personal information into your response.
Note: Please be sure not to enter any kind of personal information into your response.
×
Thank You
×
Thank you for participating in our survey! Your answers will help us to improve the quality of our website and services.
We hope you continue to make use of Game8.
We hope you continue to make use of Game8.
Close
Rankings
- We could not find the message board you were looking for.
Gaming News

![Forza Horizon 6 Review [Preview] | Beautiful Roads With a Whole Lot of Oversteer](https://img.game8.co/4460981/a7254c24945c43fbdf6ad9bea52b5ce9.png/show)


![Forza Horizon 6 Review [Preview] | Beautiful Roads With a Whole Lot of Oversteer](https://img.game8.co/4460981/a7254c24945c43fbdf6ad9bea52b5ce9.png/thumb)
Popular Games

Genshin Impact Walkthrough & Guides Wiki
Crimson Desert Walkthrough & Guides Wiki
Umamusume: Pretty Derby Walkthrough & Guides Wiki
Honkai: Star Rail Walkthrough & Guides Wiki
Monster Hunter Stories 3: Twisted Reflection Walkthrough & Guides Wiki
Wuthering Waves Walkthrough & Guides Wiki
The Seven Deadly Sins: Origin Walkthrough & Guides Wiki
Pokemon TCG Pocket (PTCGP) Strategies & Guides Wiki
Pokemon Pokopia Walkthrough & Guides Wiki
Zenless Zone Zero Walkthrough & Guides Wiki


Recommended Games
Monster Hunter World Walkthrough & Guides Wiki
Fire Emblem Heroes (FEH) Walkthrough & Guides Wiki
Pokemon Brilliant Diamond and Shining Pearl (BDSP) Walkthrough & Guides Wiki
Super Smash Bros. Ultimate Walkthrough & Guides Wiki
Diablo 4: Vessel of Hatred Walkthrough & Guides Wiki
Cyberpunk 2077: Ultimate Edition Walkthrough & Guides Wiki
Yu-Gi-Oh! Master Duel Walkthrough & Guides Wiki
Elden Ring Shadow of the Erdtree Walkthrough & Guides Wiki
The Legend of Zelda: Tears of the Kingdom Walkthrough & Guides Wiki
Persona 3 Reload Walkthrough & Guides Wiki


All rights reserved
© HAL Laboratory, Inc. / Nintendo
The copyrights of videos of games used in our content and other intellectual property rights belong to the provider of the game.
The contents we provide on this site were created personally by members of the Game8 editorial department.
We refuse the right to reuse or repost content taken without our permission such as data or images to other sites.