This survey will take about 1 minute.
Your answers will help us to improve our website.
Zelda: Link's Awakening (Remake)
Level 8 - Turtle Rock Walkthrough
This is a walkthrough for the Turtle Rock, the eigth dungeon in The Legend of Zelda: Links Awakening (Remake) for the Nintendo Switch. Use this guide to learn how to reach this dungeon, solve the dungeon's puzzles, and defeat the bosses to complete this dungeon.
| ◀︎ Previous Dungeon | Next Dungeon ▶︎︎ |
|---|---|
| Eagle's Tower | Wind Fish's Egg |
List of Contents
Getting to Turtle Rock
Getting to Turtle Rock Objectives
| No. | Objective |
|---|---|
| 1 | 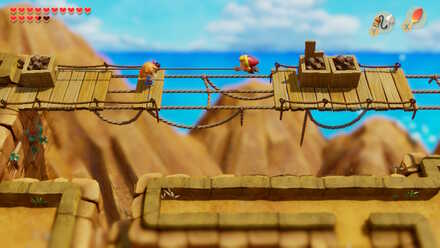 Leave Eagle's Tower, and hop down the ledge. Go through the cave on the left side, and head back toward the house near where you picked up the Bird Key. Walk to the wooden bridge left of the house and Hookshot over to the wooden crate. Here you will see Marin, who reveals that she was put there by monsters. Hookshot to the crate to her left to grab and save her. After this, the owl will come and tell you to head west. Go left and hit the lone grass in the area. It will reveal a staircase that will bring you to the next area. |
| 2 | 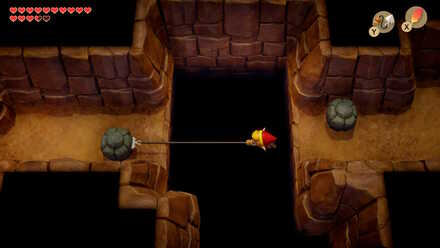 Go to the left in this cave, jump down the ledge, and take the stairs. Hookshot over the gap and emerge from the cave. Heart Piece #25 can be obtained by bombing the southern wall in the underground area. ▶︎ Heart Piece Locations: All 32 Pieces of Heart |
| 3 | After you leave the cave, there will be many falling rocks, as well as Mini-Moldorms that you will need to watch out for as you make your way up. |
| 3.1 | 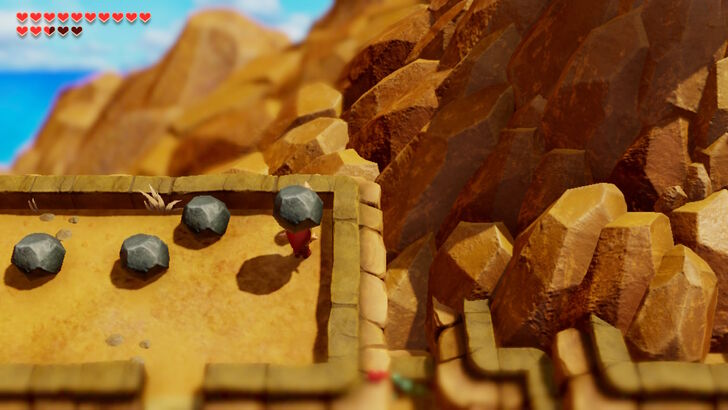 After climbing to the top, you will see a series of boulders. Lifting the top left boulder from this corner will reveal Secret Seashell #49. ▶︎ Secret Seashells Locations: Map of All 50 Seashells |
| 3.2 | 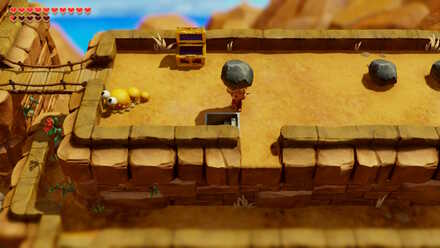 Just south of the treasure chest on the top of this mountain, there is a boulder that can be lifted to reveal a hidden staircase. Go down it and light the torch with Magic Powder to speak with Li'l Devil. It can upgrade your capacity for Magic Powder, Arrows, or Bombs (whichever you have yet to upgrade). ▶︎ All Li'l Devil Locations |
| 4 | 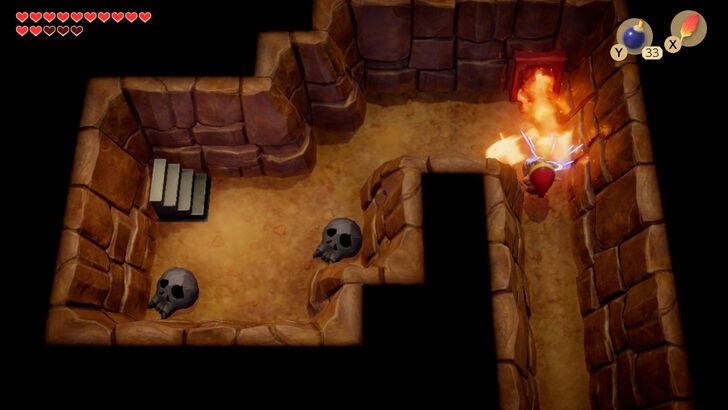 Continue west and grab the 50 rupees from the chest, then cross the bridge. Hop down the ledge and make your way to the cracked wall, defeating the Like Like and Shrouded Stalfos in the way. Blow up the wall and enter the cave. In this cave, there will be some fire shooting out from the wall, preventing you from moving forward. Use your Mirror Shield to block the fire and walk past it. |
| 4.1 | 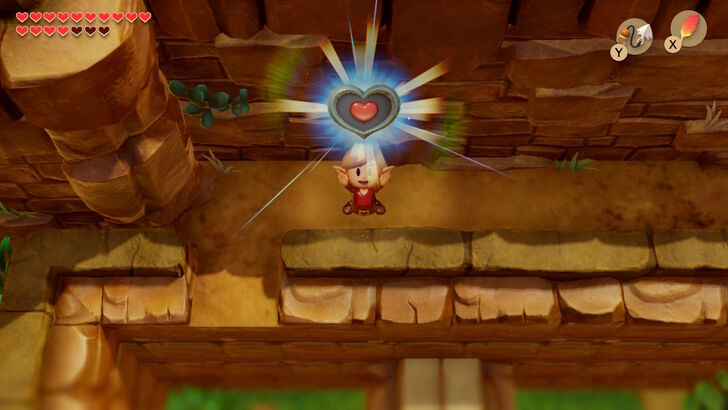 Before getting to the cracked wall, there is a small path that leads to the left. Follow it to the end to pick up Piece of Heart #27. |
| 5 | 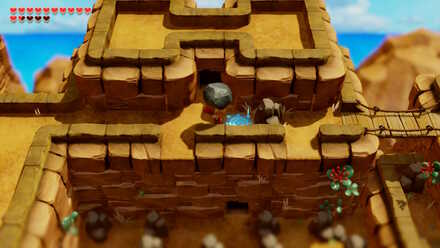 After emerging from the cave, lift the rock to your right to activate the Warp Point here. Continue left, but watch out for the Leevers that will pop up out of the sand. |
| 5.1 | 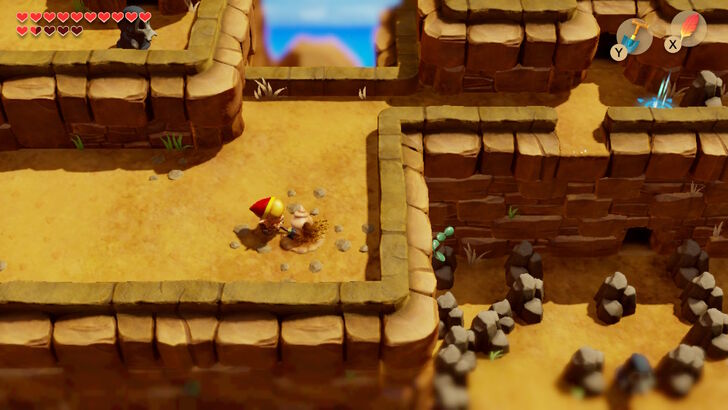 Go left and down and you will see some rocks in the ground. Dig in the center with your Shovel to obtain Secret Seashell #32.. |
| 6 | 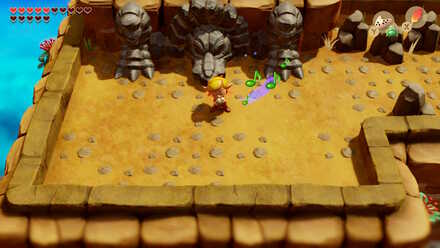 After reaching the far left, you will see two new enemies, called Dactos. Defeat them, then use your Ocarina to play the Frog's Song of Soul in front of the large dragon shaped rocks here. This will initiate battle with Turtle Rock. After defeating it, you can enter the dungeon. ▶︎ Turtle Rock Mini-Boss Guide |
Mini-Boss: Turtle Rock
Drop Bombs After Dodging

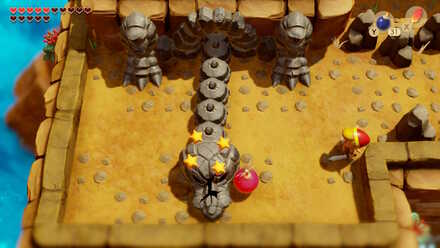
Turtle Rock will pull its head back and shiver before lashing forward in your direction. Dodge this attack and it will hit its head on the wall, stunning it.
Then, drop a bomb near its head. After successfully landing three bombs, its protective rock will break open, revealing its face.
Turtle Rock Weakness and Locations
Slash With Sword After Face Breaks
 |
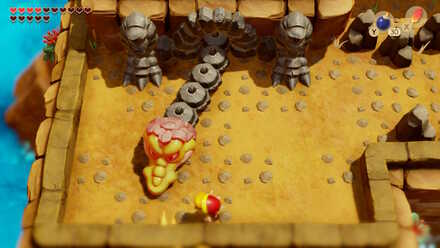 |
Despite this, the battle does not really change. Turtle Rock will now lift his head before striking so that you cannot reach him. When it hits the wall and stuns himself, you can attack with your sword instead now.
Repeat this until he is defeated, pick up the fairy he drops, then enter the tunnel where his head previously was.
Turtle Rock Dungeon Walkthrough
| Tail Cave Walkthrough Contents | |
|---|---|
| Map and Items | Objectives |
| Mini-Boss | Boss |
Turtle Rock Map and Items
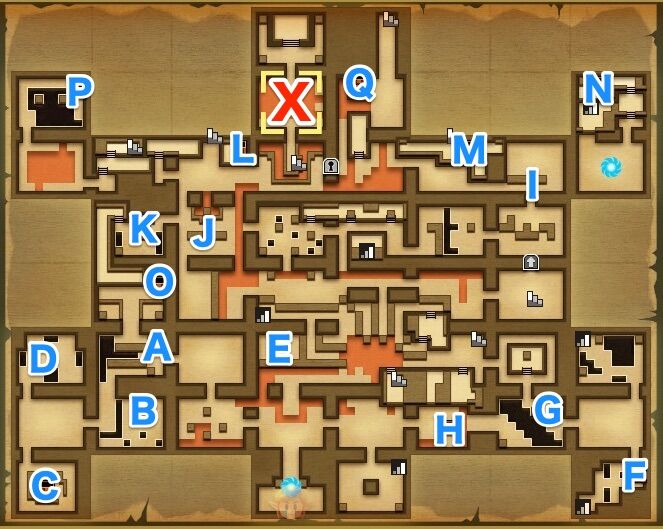
| Location on Map | Item |
|---|---|
| A | 20 Rupees |
| B | 50 Rupees |
| C | Compass |
| D | Small Key #1 |
| E | Map |
| F | Stone Bea |
| G | Small Key #2 |
| H | Trick Treasure Chest |
| I | Small Key #3 |
| J | Small Key #4 |
| K | Small Key #5 |
| L | 50 Rupees] |
| M | Small Key #6 |
| N | Magic Rod |
| O | Small Key #7 |
| P | Nightmare Key |
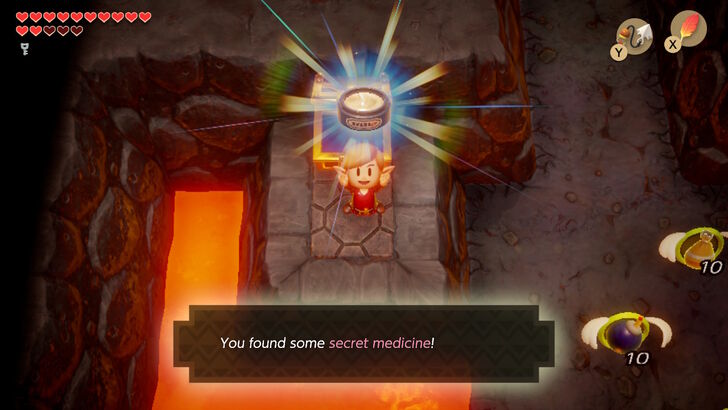
| Q | Secret Medicine |
Turtle Rock Objectives
Going to Rover
| No. | Objective |
|---|---|
| 1 | 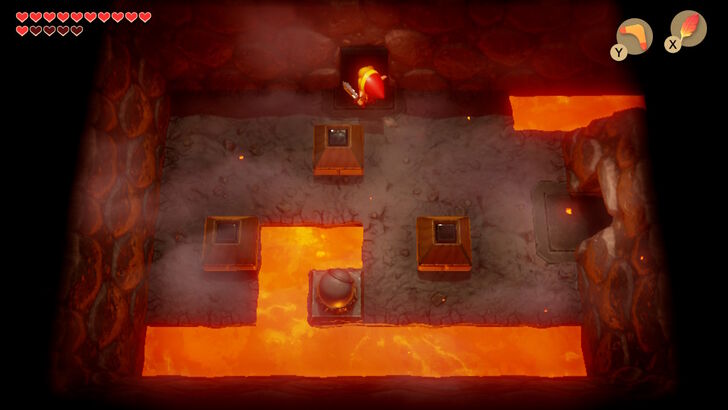 After entering Turtle Rock, head straight into the next room and defeat the Vire. You will need to use Roc's Feather to jump up and hit him with your sword. Stunning him with the Boomerang or using the Bow will make this much easier. After defeating him, head through the left door that opens up. Defeat the three Ropes and shield the Beamos, then go through the upper door. |
| 2 | 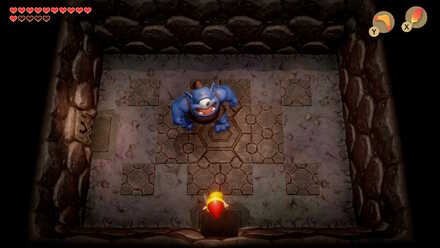 Upon entering the next room, you will immediately be greeted by a Blue Hinox. Avoid his grabs and use your sword, boomerang, and bombs to take him out. |
| 3 | 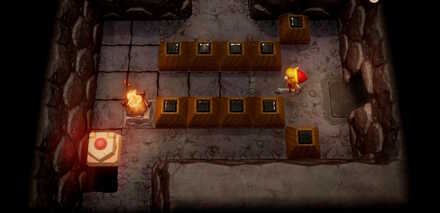 After beating them, go through the left door. This will be the first time you will see a moving block. When you activate it, it will make a new path. You can control where it goes as it moves. Use it to make a path going downwards. If you make it loop around the wall so that it fills in all the gaps, a treasure chest will appear with 20 Rupees. |
| 4 | 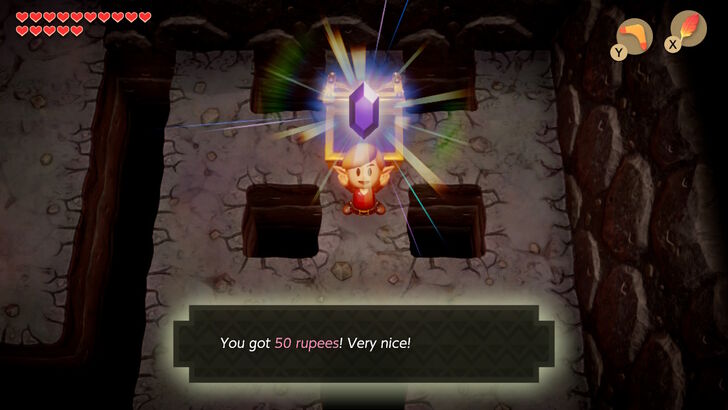 Enter the path south from the room with the moving bloack, Then, take out the Sparks here and obtain 50 Rupees. Continue to the left room. |
| 5 | 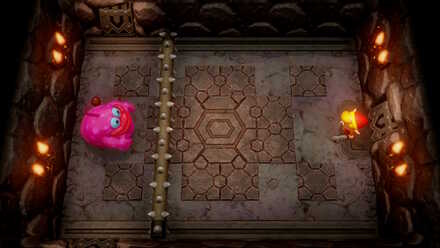 In the next room we encounter another familiar mini-boss: Spike Roller. His patterns have not changed a bit, so hop over his roller with Roc's Feather and wail on him on the other side until he is defeated. |
| 6 | 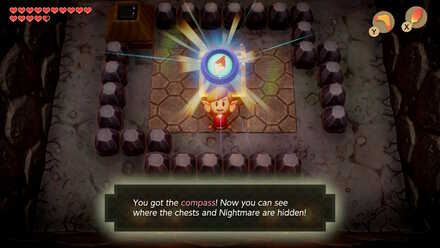 Go into the southern door, and you will spot a treasure chest, although it is being guarded by a Vacuum Mouth. Take it out when it is not pulling you in with a hit from your sword, then open the chest to obtain the Compass. |
| 7 | 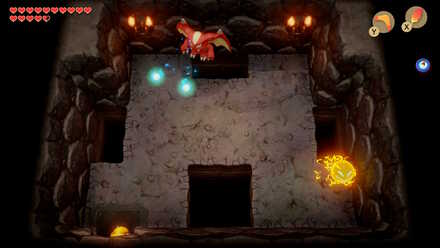 Return back to the previous room where you fought the Spike Roller, and this time go north. You will defeat the Vire here to reveal Small Key #1. Pick it up, and use Manbo's Mambo to return to the beginning of the dungeon. |
| 8 | 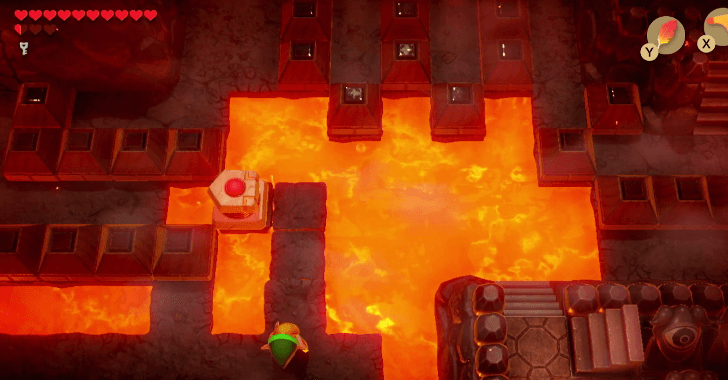 From where you fought the first Vire, hop over the lava and go north. You will see another moveable block here that will allow you to create tiles over the lava. Use it to reach the leftmost platform. |
| 9 | 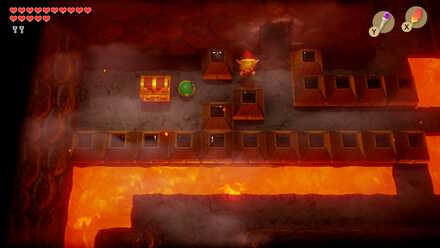 Before blowing up the wall with a bomb, push the top and bottom blocks to your left forward and the center block down to reach the nearby chest. Open it up to receive the Map. |
| 10 | 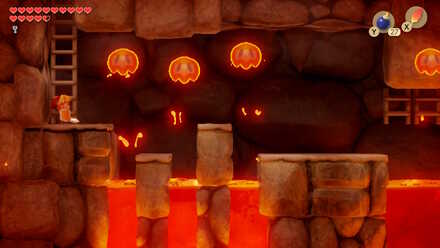 Blow up the wall and enter the next area. From here, go left and head down the stairs to go through an underground passage. There are many Podoboos here, so be sure to time your jumps. |
| 11 |  Emerge and defeat the three Ropes here to open the north door. Grab the treasure chest containing the Stone Beak before going through it. |
| 12 | 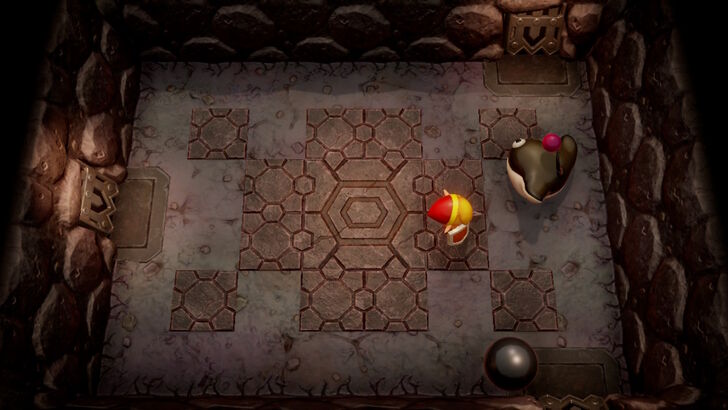 Here you will face yet another familiar foe in the form of Rover. Just like before, pick up his ball and chase him into a corner, then repeatedly throw it at him until he is defeated. |
Collecting Small Keys
| No. | Objective |
|---|---|
| 13 | 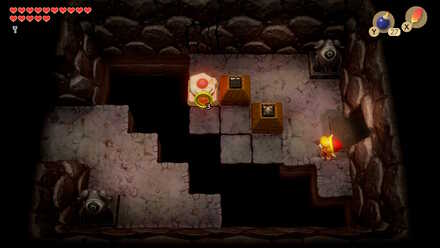 Go into the left room and use the moveable block here to fill in all of the empty spaces. This will unlock Small Key #2. ▶︎ Small Key #2 Puzzle Solution |
| 14 | Continue left. Hop over the lava. The treasure chest contains a Zol, so open or skip it, then continue left. This room has several pots, two sparks, 10 uses of Magic Powder, and a fairy in the bottom right pot. Take what you need and continue left to the next room, which will be the first dungeon room with the Vire. |
| 15 | 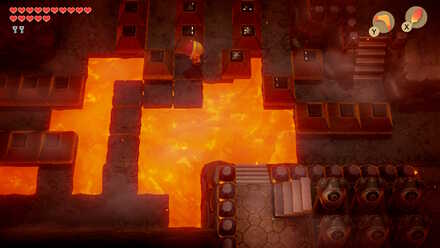 Go up to return to the huge lava room with the moveable block. Activate it then move it so that it creates a path three tiles up, then two tiles right, and then one tile up. This will make a path that connects to three blocks north of you. Push the right block through the lava. Then, go forward and unlock the block at the end of the path. |
| 16 | 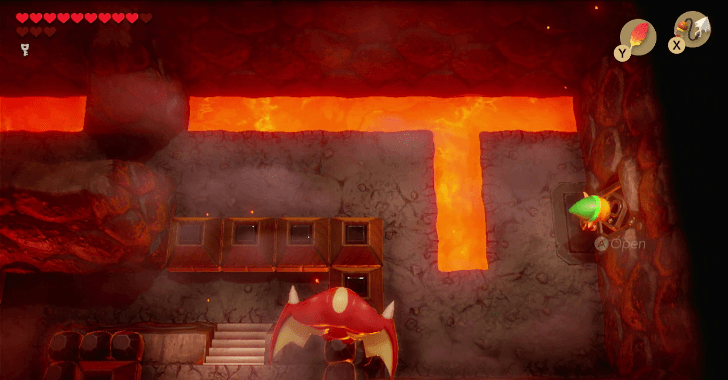 Walk forward and go right. Ignore the Vire, and unlock the door here, then go through it. |
| 17 | There are four Blade Traps here, and a Red Stalfos. Go past them and use the revolving door in the north to go up a room. |
| 18 | Walk around this room and defeat the four Zol, then go through the door that opens. |
| 19 | 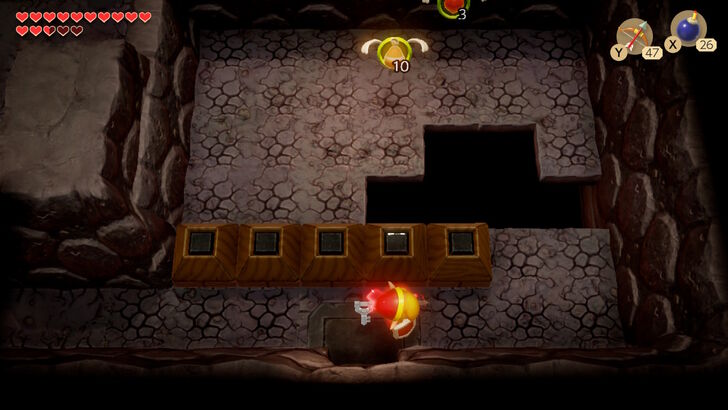 Here there are two Gibdos to face. The easiest way to defeat them is to just throw a bomb and blow up the floor they walk on. Doing so will net you Small Key #3. |
| 20 | 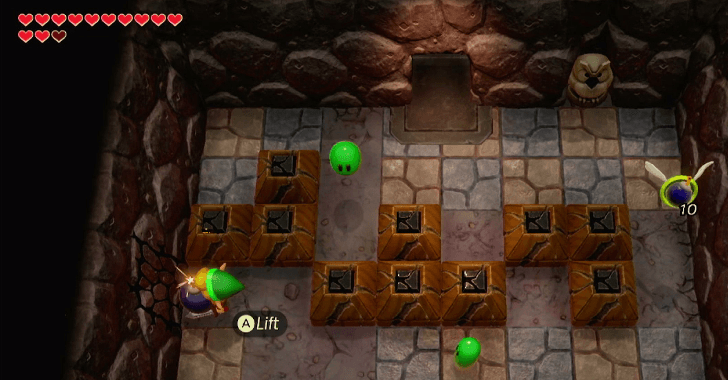 Go back to the previous room, and walk over to the left side wall. While slightly difficult to spot, this wall is indeed cracked, so use a bomb to blow it open. |
| 21 | 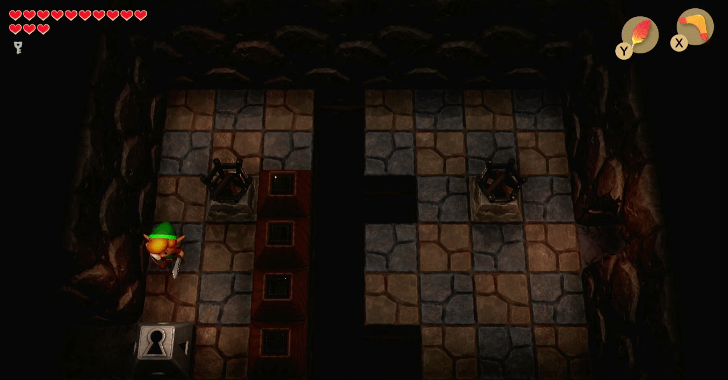 Hop over to the other side, defeat the Zol, and go through the locked block. You will show up in another dark room. Defeat the rope here, bomb the left side of the south wall, and go through the left door. |
| 22 | 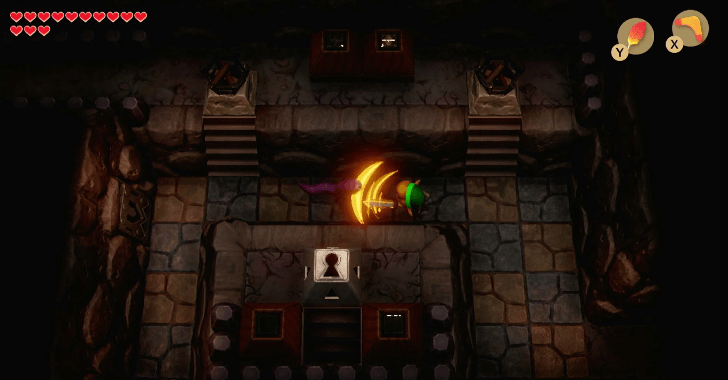 Hop over to the other side, defeat the Zol, and go through the locked block. You will show up in another dark room. Defeat the rope here. Then, bomb the left side of the south wall, and go through the new entrance. |
| 23 | 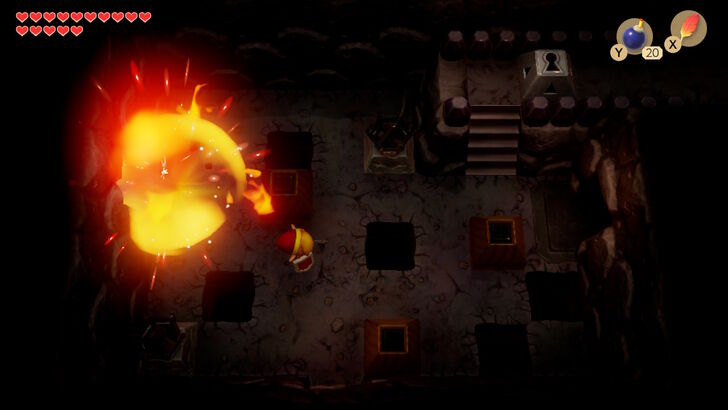 Place a bomb on the left side of the south wall, and the center of the left wall. Continue through the left wall. |
| 24 | 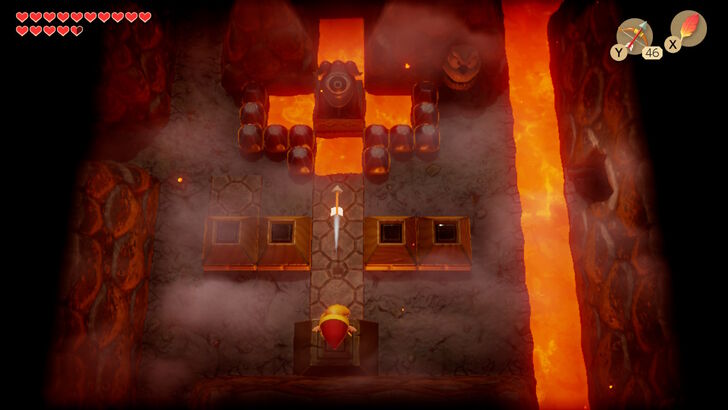 Hop over the lava here, then go to the raised block on the bottom-center area of the room. Stand on it, equip your Bow, and shoot the statue in the eye. This will allow you to obtain Small Key #4. Pick it up, and continue into the left room. |
| 25 | 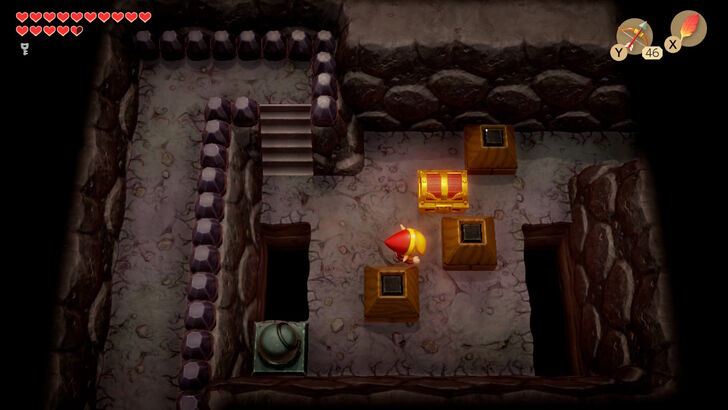 Block the Beamos' blast to stun him. Push the block left of the treasure chest upwards, then push the block under the chest left a space. Open up the treasure chest to obtain Small Key #5. Then go back a room. If you blocked yourself in the room by pushing the blocks in the wrong direction, walk up the stairs and head south, then re-enter the room and go back. |
| 26 | 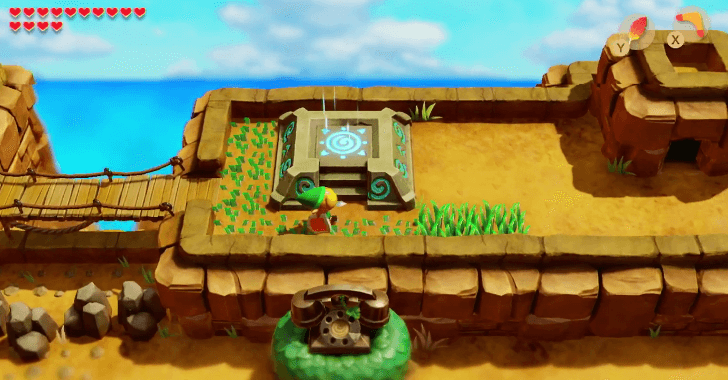 Head north from the room with the statue. In this room, you can open the chest by defeating the Vire and two Ropes. Go through the newly opened door, then go up the stairs and hookshot to the chest for 50 Rupees. Take the stairs to the outside of Turtle Rock. You can climb up some stairs and obtain Piece of Heart #28. Walk across the bridge here and activate the Warp Point, then enter the cave to show up back in Turtle Rock. |
| 27 | 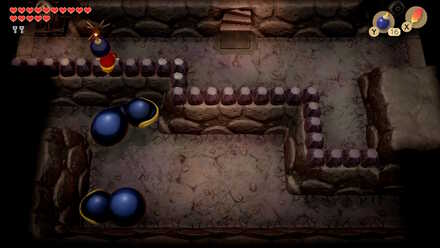 Now that you are above the Dodongo Snakes, you will have to throw bombs from above them. The easiest method is to wait until they come to the bottom left corner and throw a bomb as they move. Feed them three bombs each to reveal a treasure chest for Small Key #6. |
Small Key #2 Puzzle Solution
|
 |
 |
 |
 |
 |
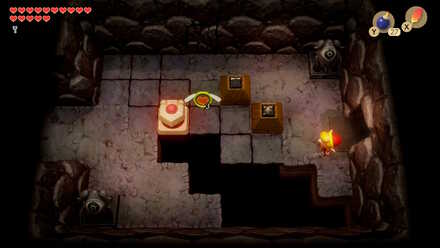
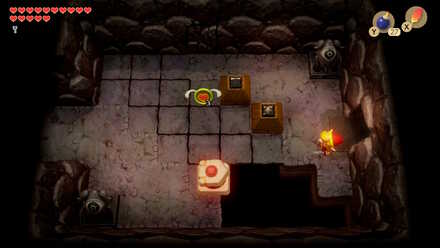
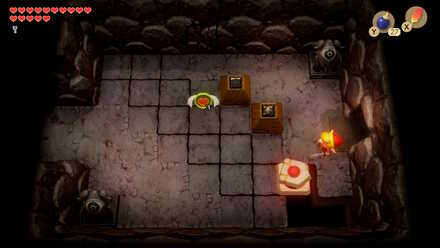
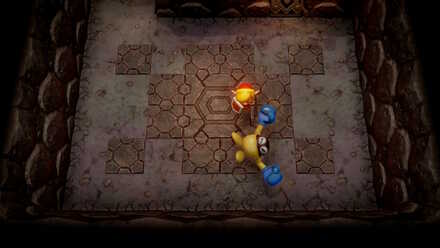
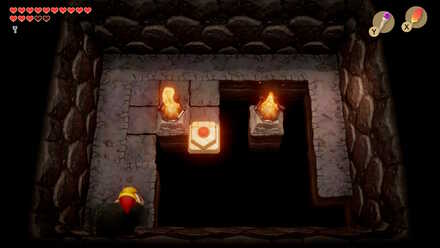
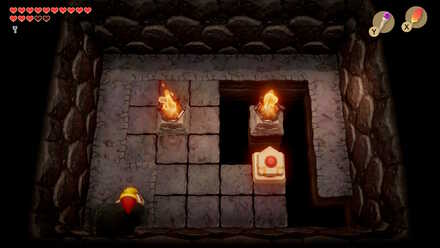
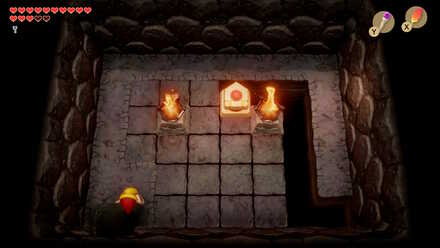
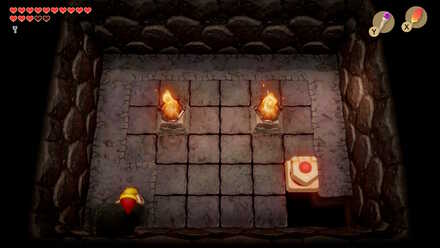
The trick in this room is to continuously hold down the left stick, changing directions before the block has completely moved into the next space, following the path demonstrated in the images here. Filling in the tiles will make Small Key #2 fall to the ground.
Finding the Magic Rod
| No. | Objective |
|---|---|
| 28 | 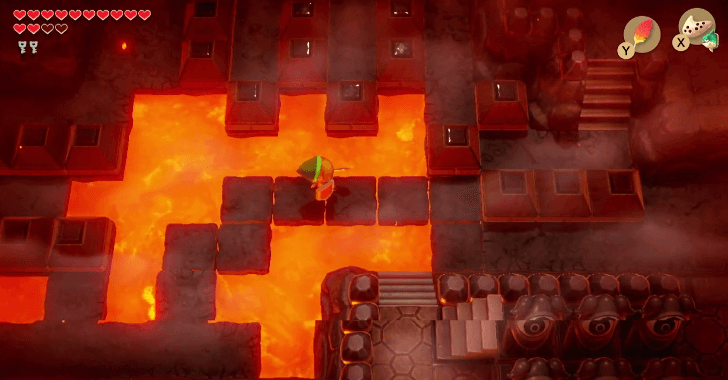 Warp back to the start of the dungeon, and go back to the big lava room with a moveable block by going up two rooms. Move the moving tile so that you can go to the rightmost side of the screen. |
| 29 |  Bomb the cracked wall on the far right side of the room, and enter the next room. Once here, hit the switch to turn it orange. |
| 30 | Make your way back to the moveable block you just used earlier. You will have to go around by going down after exiting the room or warping back to dungeon entrance. Push it so that it lands in between the three brown cubes again. Push the right block and continue north. |
| 31 | Make your way back to the moveable block you just used earlier. You will have to go around by going down after exiting the room or warping back to dungeon entrance. Push it so that it lands in between the three brown cubes again. Push the right block and continue north. |
| 32 | 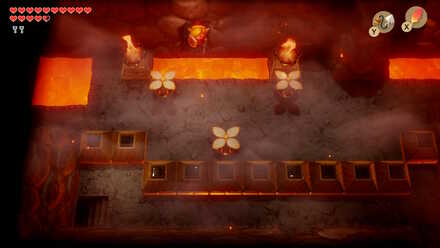 Go left, then hop over the lava to go through the second opening that you bombed from the other side in Objective No.23. It will be the one north of the three Peahats. |
| 33 | 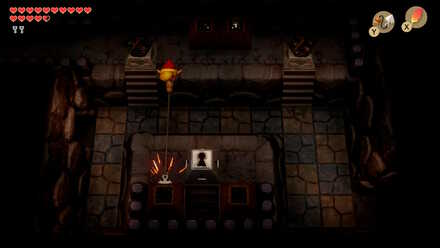 Climb up the stairs and unlock the block, then continue right. Hookshot to the blocks near the locked block in this room, then open the block and go down the stairs. Time your jumps in the underground passage here so as not to get hit by the jumping Podobos, and climb the right side ladder. Hop down the ledge to the next room and encounter the Mini-Boss: Blaino. ▶︎ Blaino Mini Boss Guide |
| 34 | 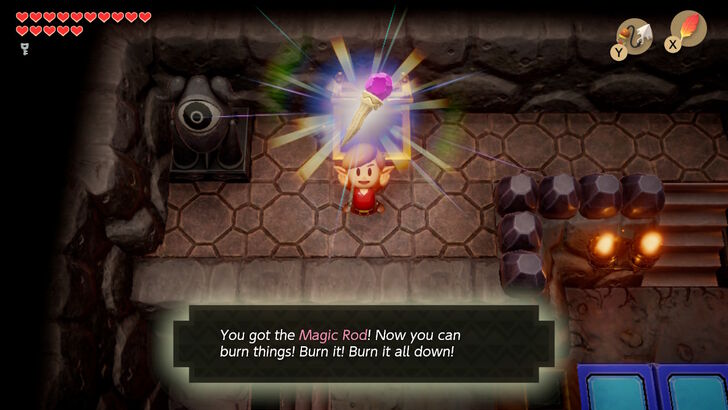 After defeating them, they will leave behind a Warp Zone and a fairy. Pick up the fairy and go through the next room. Open the treasure chest here for the Magic Rod. |
Mini-Boss: Blaino
Attack After Wind-Up Punch
Blaino will always face right or left, in your direction. Occasionally, he will pull his fist back and charge up before releasing a big punch.
Dodge it, then slash away at his back or side. Be extra careful while dodging as this punch is unblockable.
Finding the Nightmare
| No. | Objective |
|---|---|
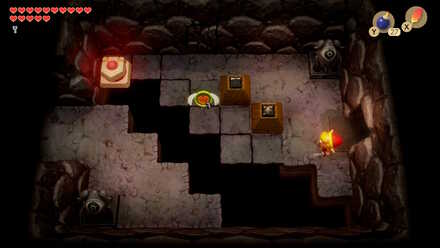
| 35 |  Return back through the underground passage. From here, head west until you reach the room with the eye statue that you shot earlier at Objective No 24. Go up the stairs and head south through the next room, and hop down the ledge. Use the Magic Rod to light the torches on both sides of the room. This will reveal a treasure chest containing Small Key #7. Go south, then push the block here right. |
| 36 | 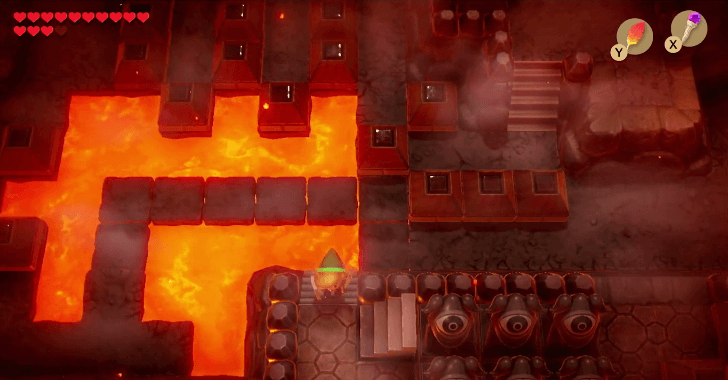 Make your way back to the huge lava room with the moving platform. Move the block toward the right so you can reach the stairs at the bottom of the room. Alternatively, you could try and get the Secret Medicine if you have collected all the Small Keys. ▶︎ Secret Medicine Optional Route |
| 37 | 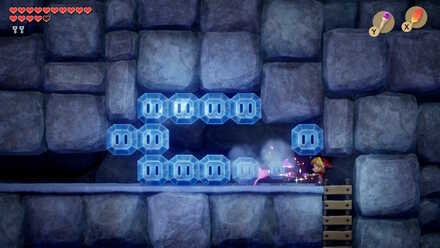 Go up them and use your Magic Rod to burn the ice blocking your path. |
| 38 | 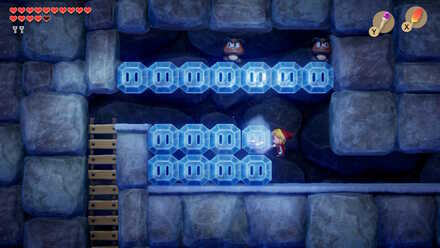 Walk into the next room and melt the top row of ice so you can cross to the other side. Emerge and go down the stairs. |
| 39 | 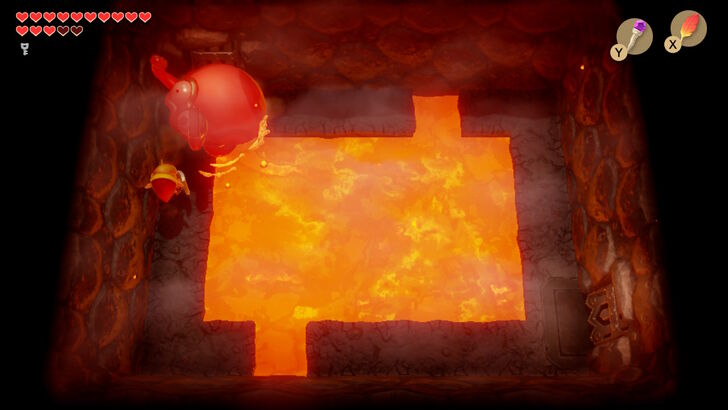 In your second battle with Hydrosaur, you have less space to work with than before. Jump over the monster with the Roc's Feather when it charges at you, the immediately turn around and slash at its back. Do this repeatedly until it is defeated. ▶︎ Hydrosaur Weakness | 40 | Go through the newly opened door. Use the moveable block to fill all the gaps on the floor. Once it's complete, the Nightmare Key will be revealed. ▶︎ Nightmare Key Puzzle Solution |
| 41 | 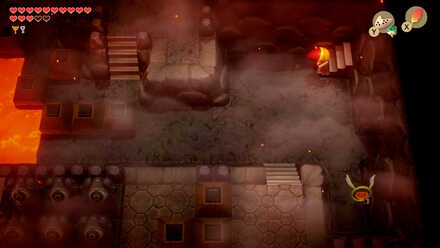 Head to the large room with lava and the moving block. Use it to create a path to the right side of the room. Walk over the path to the other side of the room and climb the stairs in the upper right corner. |
| 42 | 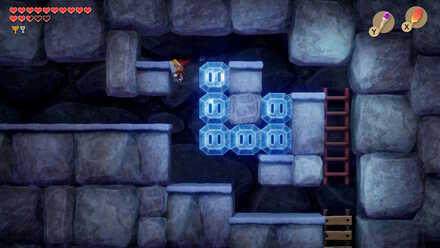 You will need to melt the ice here so that you can get through to the next room. However, be sure to leave the column of ice made of three blocks in the photo. You will need to walk off of it to land in the opening. To remove the ice block in the entrace, you have to hit it while you are failling. |
| 43 | 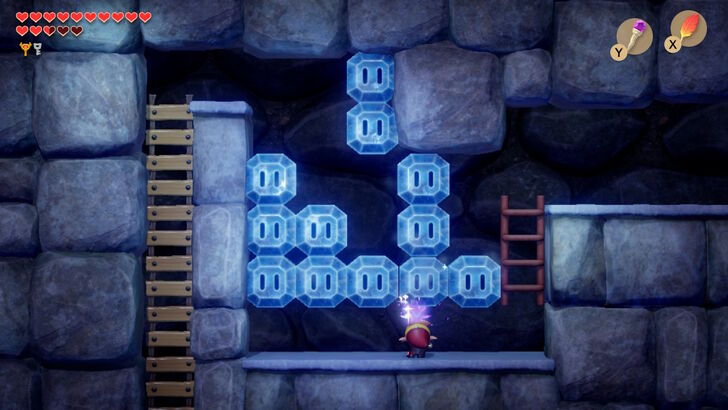 In the next room, melt the bottom row of ice, then go under the column of ice blocking your path and melt it. This will allow you to jump to the remaining ice stairs and arrive at the ladder. Go down the ladder and arrive in front of the Nightmare Lair. Open it up and go inside. |
| 44 |  Defeat Hot Head and you will receive the Thunder Drum. ▶︎ Hot Head Boss Guide |
Nightmare Key Puzzle Solution
 |
 |
 |
 |
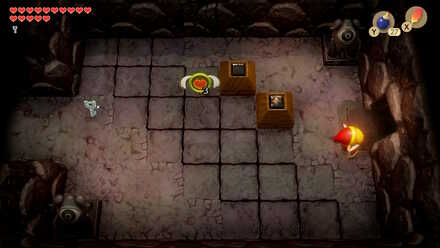
Follow the path shown in the pictures to work your way from top left to bottom right. After doing so, a treasure chest with the Nightmare Ke will be revealed. Open it up, and head toward the nightmare lair.
Secret Medicine Optional Route
You will need to have obtained Small Key #7. From where you picked up the Nightmare Key, go back a room, hop over the lava, then go through the door on the right.
Climb up the stairs, then hop down the ledge on the right and enter the next room. Walk past the enemies and continue east, until you reach a locked door. Go through it, hop over the lava, and go up the stairs.
Continue forward into the next room, and use your Hookshot to latch on to the treasure chest on the other side. Open it up the receive the Secret Medicine.
Turtle Rock Boss (Nightmare): Hot Head
Attack with Magic Rod
Shoot them with the Magic Rod when they emerge. It will temporarily cause the flames that engulf his head to cease. While he flies around the room, continue shooting them with your Magic Rod.
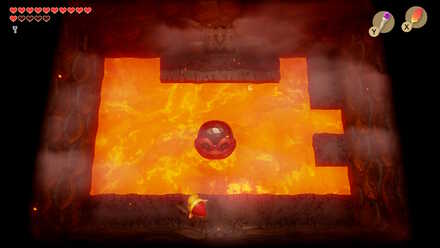
Dodge by Standing in Front
Initially, Hot Head will emerge from a random part of the lava and then fall back into it, splashing lava in an X-shape right before submerging. If you stand directly in front of his face, or behind/to the side of it, the lava will land to your sides so you can easily avoid it.
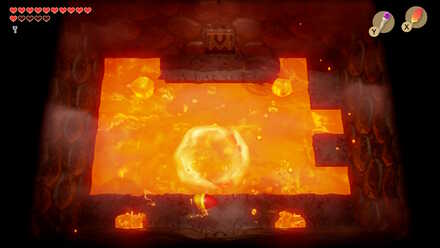
Continue Shooting When They Shrink

After enough hits, their head will split at the sides, revealing its spiky inside. They will continue to emerge and submerge from the lava, but at a much faster rate now. Continue shooting them with your Magic Rod.
Link's Awakening Related Guides

List of All Dungeons and Story Walkthrough
All Dungeon Walkthroughs
Comment
2  James M over 5 years
my bad, it was included, I just did things in a different order and missed it in the article.
Author

The Legend of Zelda: Link's Awakening Walkthrough & Guides Wiki
Level 8 - Turtle Rock Walkthrough
Please participate in our site
improvement survey
03/2026
improvement survey
03/2026
Would you assist in
improving Game8's site?
improving Game8's site?

×
We are listening to our users' valuable opinions and discussing how to act on them.
The information collected through this survey will be used for the purpose of improving our services. In addition, the information will only be disclosed a part of a statistic in a format that will not allow identification of personal information.
Begin Survey
Not Now
×
Please rate each item regarding Game8.co's Advertisements.
Amount of Ads
Very Dissatisfied
Somewhat Dissatisfied
Fine
Somewhat Satisfied
Highly Satisfied
Placement of Ads
Timing of Ad Display
Ad Loading Speed
Safeness of Ads
Content of Ads
×
Please rate each item regarding Game8.co's Quality of Articles.
Amount of information
Very Dissatisfied
Somewhat Dissatisfied
Fine
Somewhat Satisfied
Highly Satisfied
Frequency of updates
Speed of new information
Accuracy of articles
Understandibility of articles
Readability of sentences
×
Please rate each item regarding Game8.co's Usability of the Site.
Ease of finding information
Very Dissatisfied
Somewhat Dissatisfied
Fine
Somewhat Satisfied
Highly Satisfied
Loading Speed
Use of Color
Font Size
Visibility of Images
Easy to Understand Layout
×
Please rate each item regarding Game8.co's Message Boards, Comments.
Ease of Writing
Very Dissatisfied
Somewhat Dissatisfied
Fine
Somewhat Satisfied
Highly Satisfied
Readability
Ease in Finding Information
Comment Quality
Comment Quantity
Admin Response
×
Please rate each item regarding Game8.co's Site's new design.
Please rate our site's new design
Very Dissatisfied
Somewhat Dissatisfied
Fine
Somewhat Satisfied
Highly Satisfied
Do you think that the website's design change makes the site easier to use?
Has the new design made it easier for you to find information on the site?
Has the new design improved the overall visual appeal of the site?
How would you rate your overall satisfaction with the new design of the site?
×
How likely are you to recommend Game8 to someone you know?
Very Unlikely
0
1
2
3
4
5
6
7
8
9
10
Very Likely
If you have other opinions regarding potential improvement to the website, please share them with us. We would appreciate your honest opinion.
Note: This is a free response section, so you can proceed without entering anything.
Note: Please be sure not to enter any kind of personal information into your response.
Note: Please be sure not to enter any kind of personal information into your response.
×
Thank You
×
Thank you for participating in our survey! Your answers will help us to improve the quality of our website and services.
We hope you continue to make use of Game8.
We hope you continue to make use of Game8.
Close
Rankings
- We could not find the message board you were looking for.
Gaming News


![Everwind Review [Early Access] | The Shaky First Step to A Very Long Journey](https://img.game8.co/4440226/ab079b1153298a042633dd1ef51e878e.png/thumb)

![Monster Hunter Stories 3 Review [First Impressions] | Simply Rejuvenating](https://img.game8.co/4438641/2a31b7702bd70e78ec8efd24661dacda.jpeg/thumb)
Popular Games

Genshin Impact Walkthrough & Guides Wiki
Honkai: Star Rail Walkthrough & Guides Wiki
Umamusume: Pretty Derby Walkthrough & Guides Wiki
Pokemon Pokopia Walkthrough & Guides Wiki
Resident Evil Requiem (RE9) Walkthrough & Guides Wiki
Monster Hunter Wilds Walkthrough & Guides Wiki
Wuthering Waves Walkthrough & Guides Wiki
Arknights: Endfield Walkthrough & Guides Wiki
Pokemon FireRed and LeafGreen (FRLG) Walkthrough & Guides Wiki
Pokemon TCG Pocket (PTCGP) Strategies & Guides Wiki


Recommended Games
Diablo 4: Vessel of Hatred Walkthrough & Guides Wiki
Cyberpunk 2077: Ultimate Edition Walkthrough & Guides Wiki
Fire Emblem Heroes (FEH) Walkthrough & Guides Wiki
Yu-Gi-Oh! Master Duel Walkthrough & Guides Wiki
Super Smash Bros. Ultimate Walkthrough & Guides Wiki
Pokemon Brilliant Diamond and Shining Pearl (BDSP) Walkthrough & Guides Wiki
Elden Ring Shadow of the Erdtree Walkthrough & Guides Wiki
Monster Hunter World Walkthrough & Guides Wiki
The Legend of Zelda: Tears of the Kingdom Walkthrough & Guides Wiki
Persona 3 Reload Walkthrough & Guides Wiki


All rights reserved
© 1993-2019 Nintendo
The copyrights of videos of games used in our content and other intellectual property rights belong to the provider of the game.
The contents we provide on this site were created personally by members of the Game8 editorial department.
We refuse the right to reuse or repost content taken without our permission such as data or images to other sites.
It never shows how to get into the three rooms in the center it just skips how to get in and jump f Photos