This survey will take about 1 minute.
Your answers will help us to improve our website.
Zelda: Link's Awakening (Remake)
List of All Mini-Bosses
A list of all Mini-Bosses found in The Legend of Zelda: Link's Awakening (Remake) for the Nintendo Switch. Read on to see where each Mini-Boss is found and how to beat them!
List of Contents
List of Mini-Bosses
Mini-Bosses are found in dungeons, as well as in mini-dungeons completed between dungeons. They do not respawn after defeating them. Inside a dungeon, defeating a Mini-Boss will usually create a warp point to the start of a dungeon, and sometimes leave a fairy behind.
| Enemy | Location(s) | How to Beat |
|---|---|---|
 Spike Roller Spike Roller
|
Tail Cave, Turtle Rock | Try to hit his face before he can cross the other side of the spikes. Doing this will make him move back a little, giving you more time to attack him. |
 King Moblin King Moblin
|
Goponga Swamp | Raise your shield when King Moblin is not charging its attack. Move up and down at the last second to bait his horizontal charge attack. |
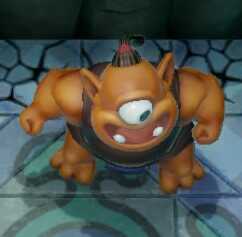 Yellow Hinox Yellow Hinox
|
Bottle Grotto | Attack with your sword only after his attacks. You cannot block any of his attacks with your shield. |
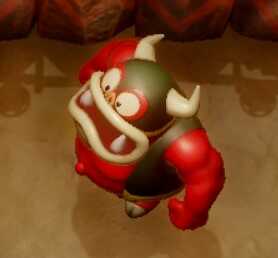
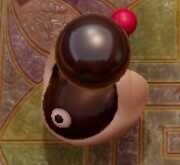
 Dodongo Snakes Dodongo Snakes
|
Key Cavern, Face Shrine, Turtle Rock | Dodongo Snakes are always found in pairs. Place a bomb in front of it to make it eat it. Dodongo Snake will refuse to eat the second bomb if you try to drop it too fast. Lay the bomb down right before it moves into the next space. |
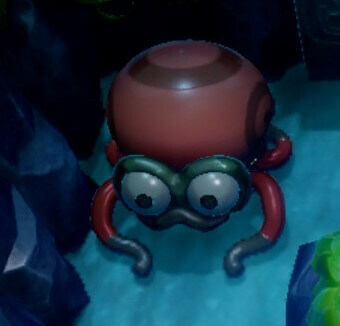
 Giant Buzz Blob Giant Buzz Blob
|
Color Dungeon | Use your Magic Powder to transform him in to a large blue Zol. Doing this will make him vulnerable to your sword. |
 Stone Hinox Stone Hinox
|
Color Dungeon | Drop and throw your bombs after dodging the tremors from his jump. You will not be able to jump if you are carrying a bomb. |
 Hydrosaur Hydrosaur
|
Angler's Tunnel, Turtle Rock | Stay on one corner and raise your shield then instantly attack once the Hydrosaur passes you. |
 Master Strafos Master Strafos
|
Catfish's Maw | Swing your sword before he attacks, making his bones collapse. Instantly place a bomb before he can stand up. |
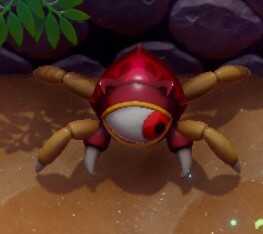 Gohma Gohma
|
Catfish's Maw | Use your Hookshot when he opens his eyes to stun them leaving the eye open for a while. Use this moment to attack the eye multiple times. If you have the Bow, you can also shoot their eyes. |
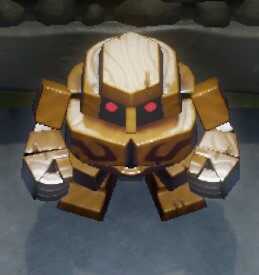
 Armos Knight Armos Knight
|
Ancient Ruins | Use the Charged Sword attack to penetrate his defense, striking his back side. After his helmet vanishes, you can use arrows on him. |
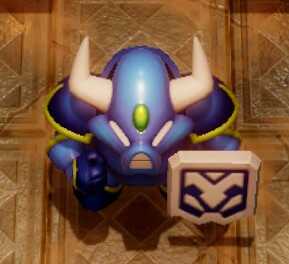
 Rover Rover
|
Face Shrine, Turtle Rock | Move away as far as you can when Rover is holding the ball. Once you get the ball, try to corner Rover before throwing the ball. Doing this will make the ball bounce back to you while dealing damage to Rover, making the fight easier. |
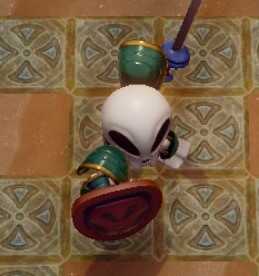
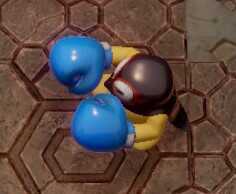
 Red Hinox Red Hinox
|
Eagle's Tower | Attack with your sword only after his attacks. You cannot block any of his attacks with your shield. |
 Grim Creeper Grim Creeper
|
Eagle's Tower | Position yourself to the corner of the screen, then face towards the direction of the flies. Spam your sword attacks until the fight is over. Doing this correctly will guarantee a flawless fight. |
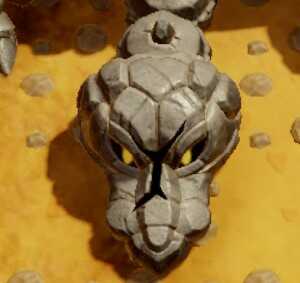 Turtle Rock Turtle Rock
|
Western Tal Tal Mountains | Use bombs on the first few attacks to crack open the stone protecting the head making him vulnerable to sword attacks. |
 Blue Hinox Blue Hinox
|
Turtle Rock | Attack with your sword only after his attacks. You cannot block any of his attacks with your shield. |
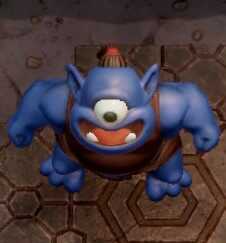
 Blaino Blaino
|
Turtle Rock | His attacks are always going horizontally, so you can dodge easily by moving vertically. |
Link's Awakening Related Guides

Enemy Types
| Overworld Enemies | Dungeon Enemies |
| Traps | Mini-Bosses |
Author

The Legend of Zelda: Link's Awakening Walkthrough & Guides Wiki
List of All Mini-Bosses
Please participate in our site
improvement survey
03/2026
improvement survey
03/2026
Would you assist in
improving Game8's site?
improving Game8's site?

×
We are listening to our users' valuable opinions and discussing how to act on them.
The information collected through this survey will be used for the purpose of improving our services. In addition, the information will only be disclosed a part of a statistic in a format that will not allow identification of personal information.
Begin Survey
Not Now
×
Please rate each item regarding Game8.co's Advertisements.
Amount of Ads
Very Dissatisfied
Somewhat Dissatisfied
Fine
Somewhat Satisfied
Highly Satisfied
Placement of Ads
Timing of Ad Display
Ad Loading Speed
Safeness of Ads
Content of Ads
×
Please rate each item regarding Game8.co's Quality of Articles.
Amount of information
Very Dissatisfied
Somewhat Dissatisfied
Fine
Somewhat Satisfied
Highly Satisfied
Frequency of updates
Speed of new information
Accuracy of articles
Understandibility of articles
Readability of sentences
×
Please rate each item regarding Game8.co's Usability of the Site.
Ease of finding information
Very Dissatisfied
Somewhat Dissatisfied
Fine
Somewhat Satisfied
Highly Satisfied
Loading Speed
Use of Color
Font Size
Visibility of Images
Easy to Understand Layout
×
Please rate each item regarding Game8.co's Message Boards, Comments.
Ease of Writing
Very Dissatisfied
Somewhat Dissatisfied
Fine
Somewhat Satisfied
Highly Satisfied
Readability
Ease in Finding Information
Comment Quality
Comment Quantity
Admin Response
×
Please rate each item regarding Game8.co's Site's new design.
Please rate our site's new design
Very Dissatisfied
Somewhat Dissatisfied
Fine
Somewhat Satisfied
Highly Satisfied
Do you think that the website's design change makes the site easier to use?
Has the new design made it easier for you to find information on the site?
Has the new design improved the overall visual appeal of the site?
How would you rate your overall satisfaction with the new design of the site?
×
How likely are you to recommend Game8 to someone you know?
Very Unlikely
0
1
2
3
4
5
6
7
8
9
10
Very Likely
If you have other opinions regarding potential improvement to the website, please share them with us. We would appreciate your honest opinion.
Note: This is a free response section, so you can proceed without entering anything.
Note: Please be sure not to enter any kind of personal information into your response.
Note: Please be sure not to enter any kind of personal information into your response.
×
Thank You
×
Thank you for participating in our survey! Your answers will help us to improve the quality of our website and services.
We hope you continue to make use of Game8.
We hope you continue to make use of Game8.
Close
Rankings
- We could not find the message board you were looking for.
Gaming News


![Everwind Review [Early Access] | The Shaky First Step to A Very Long Journey](https://img.game8.co/4440226/ab079b1153298a042633dd1ef51e878e.png/thumb)

![Monster Hunter Stories 3 Review [First Impressions] | Simply Rejuvenating](https://img.game8.co/4438641/2a31b7702bd70e78ec8efd24661dacda.jpeg/thumb)
Popular Games

Genshin Impact Walkthrough & Guides Wiki
Honkai: Star Rail Walkthrough & Guides Wiki
Umamusume: Pretty Derby Walkthrough & Guides Wiki
Pokemon Pokopia Walkthrough & Guides Wiki
Resident Evil Requiem (RE9) Walkthrough & Guides Wiki
Monster Hunter Wilds Walkthrough & Guides Wiki
Wuthering Waves Walkthrough & Guides Wiki
Arknights: Endfield Walkthrough & Guides Wiki
Pokemon FireRed and LeafGreen (FRLG) Walkthrough & Guides Wiki
Pokemon TCG Pocket (PTCGP) Strategies & Guides Wiki


Recommended Games
Diablo 4: Vessel of Hatred Walkthrough & Guides Wiki
Cyberpunk 2077: Ultimate Edition Walkthrough & Guides Wiki
Fire Emblem Heroes (FEH) Walkthrough & Guides Wiki
Yu-Gi-Oh! Master Duel Walkthrough & Guides Wiki
Super Smash Bros. Ultimate Walkthrough & Guides Wiki
Pokemon Brilliant Diamond and Shining Pearl (BDSP) Walkthrough & Guides Wiki
Elden Ring Shadow of the Erdtree Walkthrough & Guides Wiki
Monster Hunter World Walkthrough & Guides Wiki
The Legend of Zelda: Tears of the Kingdom Walkthrough & Guides Wiki
Persona 3 Reload Walkthrough & Guides Wiki


All rights reserved
© 1993-2019 Nintendo
The copyrights of videos of games used in our content and other intellectual property rights belong to the provider of the game.
The contents we provide on this site were created personally by members of the Game8 editorial department.
We refuse the right to reuse or repost content taken without our permission such as data or images to other sites.