The Siege of Fort Hateno Challenge Walkthrough

This is a guide for The Siege of Fort Hateno, a Challenge in Hyrule Warriors: Age of Calamity. Read on to learn the best way to clear the challenge as well as obtainable rewards, materials and more!
List of Contents
The Siege of Fort Hateno Basic Information
| The Siege of Fort Hateno | |
|---|---|
| Challenge Level Range | 71-80 |
| Recommended Level | 78 |
| Region | Necluda |
| Special Conditions | No Healing Items Appear Time Limited |
| Unlock Conditions | Clear the Challenge: Versus Calamity Ganon |
| First-Clear Rewards |
・
・
・
|
|---|
The Siege of Fort Hateno - Materials and Enemies
Battlefield-Specific Materials
Main Enemies
|
・
|
The Siege of Fort Hateno Walkthrough

| Objectives |
|---|
|
The Siege of Fort Hateno - Tips and Strategy Guide
This challenge is one of the most difficult challenges in the game. It requires you to defeat the three most powerful enemies in the game: Astor, Harbinger Ganon, and Calamity Ganon while at the same time defending an allied stronghold.
More so, healing items (apples) do not drop and it is time-limited. These are some tips and strategy guide in approaching this challenge effectively!
Over-level At Least 3 Characters

We suggest over-leveling at least 3 characters that are good at fighting Powerful Foes (duelist). Two of the characters will be responsible for defeating Astor and Harbinger Ganon while the third one is for protecting the Allied Stronghold. The fourth one is whoever you choose!
We also suggest being level 80 and above for each of the three characters.
How to Level Up Fast and Reach the Max Level
Optimize Unit Placement and Switching
Unit placement is key to this challenge. Two units must be responsible for Astor and Harbinger Ganon while the others are for protecting the Allied Stronghold.
Top-Half and Bottom-Half
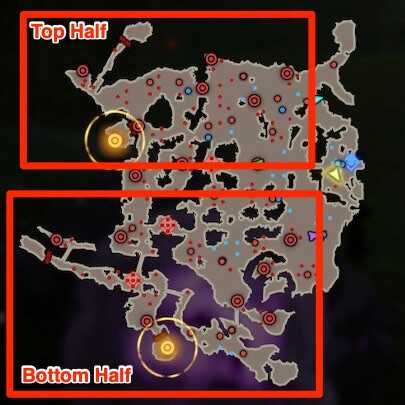
Assign characters responsible for the top-half and bottom-half of the map where Astor and Harbinger Ganon are located respectively.
We suggest using characters that are great against Powerful Foes like Link, Mipha, King Rhoam, and Sidon.
Allied Stronghold

Defending the Allied Stronghold is very important because the timer only ticks down when there is a Powerful Foe in the Allied Stronghold. Whenever an enemy enters the Allied Stronghold, defeat them immediately.
We suggest using characters that are great against Powerful Foes like Link, Mipha, King Rhoam, and Sidon.
Use your Fourth Character as the Roamer

You may choose to use your fourth character to roam and pick-off enemies around the map in case they decide to attack the Allied Stronghold all at once. You may also use the fourth character to clear enemy Outposts around the map for extra loot.
Astor and Harbinger Ganon has Two Phases

Astor and Harbinger Ganon are locked behind a gated arena. To open the gate, you have to defeat a Powerful Foe.
Halfway through the fight with Astor or Harbinger Ganon, they will flee to another nearby location which is, once again, locked behind a gate. You have to defeat Powerful Foes near the gate to open the gate and finally defeat them.
Do Not Forget to Issue Orders from the Map

Order is an important technique you have to use in this challenge. Always try to make it a point that all your units are constantly moving around the map.
Add Mipha to Your Team

Considering the non-existence of healing items on the battlefield, Mipha's special-attack is extremely useful because it heals allies caught in the waves. Reserve using her Special-Attacks when fighting Calamity Ganon at the final phase of the challenge!
Mipha Usage Guide, Builds, Combos, and How to Unlock
Stock Up on Rods and Apples

We recommend that you stock up on elemental rods and apples before this challenge. The enemies here hit hard and they will chip away your health fast!
Also, some enemies in this challenge are elementals (Fire, Ice, and Electric) so you can use elemental rods to your advantage. Use them sparingly though as the Rods are extremely useful against Calamity Ganon at the end.
Use Cooking

Since this challenge do not drop healing items, we suggest cooking recipes that promote survivability and increases movement speed:
| Survivability | Damage from Enemies -% Recover Health Every 10 Seconds |
|---|---|
| Movement Speed | Movement Speed +% |
Cooking Guide and List of Recipes
Set the Difficulty to Easy

If you are really stuck and at the end of your wits, we suggest setting the difficulty mode to Easy. Enemies are easier to defeat and they do not hit that hard in this difficulty so the problem with the time constraint and survivability may be solved.
Of course, you can always change the difficulty back afterward!
Difference Between Difficulty Modes: Which Difficulty Should You Choose?
Related Links

Author

The Siege of Fort Hateno Challenge Walkthrough
Rankings
- We could not find the message board you were looking for.
Gaming News
![Neverness to Everness (NTE) Review [Beta Co-Ex Test] | Rolling the Dice on Something Special](https://img.game8.co/4414628/dd3192c8f1f074ea788451a11eb862a7.jpeg/show)


Popular Games

Genshin Impact Walkthrough & Guides Wiki
Honkai: Star Rail Walkthrough & Guides Wiki
Arknights: Endfield Walkthrough & Guides Wiki
Umamusume: Pretty Derby Walkthrough & Guides Wiki
Wuthering Waves Walkthrough & Guides Wiki
Pokemon TCG Pocket (PTCGP) Strategies & Guides Wiki
Abyss Walkthrough & Guides Wiki
Zenless Zone Zero Walkthrough & Guides Wiki
Digimon Story: Time Stranger Walkthrough & Guides Wiki
Clair Obscur: Expedition 33 Walkthrough & Guides Wiki


Recommended Games
Fire Emblem Heroes (FEH) Walkthrough & Guides Wiki
Pokemon Brilliant Diamond and Shining Pearl (BDSP) Walkthrough & Guides Wiki
Diablo 4: Vessel of Hatred Walkthrough & Guides Wiki
Super Smash Bros. Ultimate Walkthrough & Guides Wiki
Yu-Gi-Oh! Master Duel Walkthrough & Guides Wiki
Elden Ring Shadow of the Erdtree Walkthrough & Guides Wiki
Monster Hunter World Walkthrough & Guides Wiki
The Legend of Zelda: Tears of the Kingdom Walkthrough & Guides Wiki
Persona 3 Reload Walkthrough & Guides Wiki
Cyberpunk 2077: Ultimate Edition Walkthrough & Guides Wiki


All rights reserved
© Nintendo © KOEI TECMO GAMES All rights reserved. Licensed by Nintendo.
The copyrights of videos of games used in our content and other intellectual property rights belong to the provider of the game.
The contents we provide on this site were created personally by members of the Game8 editorial department.
We refuse the right to reuse or repost content taken without our permission such as data or images to other sites.