This is a page for Speedrunning Key Cavern in The Legend of Zelda: Link's Awakening (Remake) for the Nintendo Switch. Read on for a speedrun walkthrough on finishing this dungeon on 100%!
List of Contents
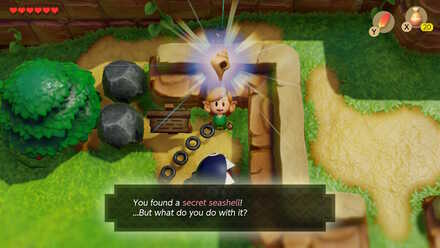
Outside Bottle Grotto, go right until you see a signpost. Lift the rock on its right and get the Secret Seashell #5 beneath.

Continue going right until you see a rock covering something glowing underneath. Lift that rock to activate a warp point.

Go down and speak with Dampe.
Head south through the grass and enter the purple house to the left.
Talk to Tracy and have her apply her Secret Medicine on you for some rupees.

Go back outside and proceed south until you reach a ladder which leads to Ukuku Prairie. After you climb down the ladder, enter through the opening on the left.
Break the tile southwest of the chest by stepping on it and getting off before it falls down. Make your way around the room and get the Piece of Heart #5.

Now, open the chest for 50 rupees and go back outside. Head west to the village and enter the Town Tool Shop again. Choose "Retry" again after being killed.
Buy bombs thrice for a total of 30 bombs and arrows once for a total of 10 arrows then head outside.
Walk southwest and enter Madam MeowMeow's House, the one which was being guarded by BowWow, and talk to Madam MeowMeow to return BowWow to her.
Equip the bombs on either X or Y and the Roc's Feather to the other. There should be a fox by the rooster statue. Lure it by slashing it with your sword then dodging by jumping. You must do this in quick succession to prevent the fox from escaping.
Go back to Ukuku Prairie, while still luring the fox, and head south until you reach Pothole Field.
Behind the cave to the east is a stone block where you should perform Villa Skip using Tracy's Boost. You must have exactly one and a half heart to do this. You can take hits from the fox to decrease your health by half a heart.
Once on top of the stone block, jump onto the stone block southeast of you. Cut the bush below you with a jump attack but do not move down yet as underneath that bush is a hole that warps you to the other side of the stone block if you fall into it. After cutting the bush below you, use another jump attack to cut the bush south of the hole and land on its tile. Cut your way through the nearby entrance.
Upon entering, go up the stairs and down on the staircase on your right. Go down then left through the narrow path, push away the rock, and open the chest for the Secret Seashell #6. Reload your autosave and head outside.

Cut your way to the northeastern part of the field while also jumping over the hidden holes until you get to the Piece of Heart #6.

Go back to the area with an owl statue. Cut the bush in front of that statue and dig its spot to obtain the Slime Key.

Throw the boulder blocking the path northwest and jump over the hole. Walk a little north and use the Slime Key on the statue with a keyhole to unlock the entrance to Key Cavern.

Go around the field by travelling south, east, north, then east at the end. Head north past the ladder, travel a little to the east, turn south, east again, then north again to a small patch of soil surrounded with flowers. Use your shovel to reveal another warp point.

Cut the bushes on your right to find the Secret Seashell #7.

Jump off the nearby ledge then travel north through the narrow path until you find Kiki the Monkey. Give him the bananas and his friends will build you a bridge and leave you a Stick.

Travel west then southwest until you get back to the intersection a while ago. This time head west, get to the other side by jumping on the platforms, then enter the nearby entrance to Key Cavern.
Immediately after you enter the dungeon, a door will shut. Break the door by throwing a pot at it and proceed north. Defeat all the enemies inside this room, which can be done easily by hitting the bombites and let it explode on the other enemies, to make a chest appear containing a small key.
Proceed north and defeat all the zols here to unlock the doors and make another chest appear. Ignore the chest and continue moving north. Ignore the stalfoses in the next room and in the last room, climb down the staircase surrounded by more zols.
Unlock the door on the right and proceed. Walk around this area to reach the stairs while slashing the pairodd and keeses out of your way.
Walk around the floor above to make the zols appear. Defeat all 5 of them and pick up the small key that will fall down. Go to the next room.
Walk west and defeat all the red zols to unlock the two doors. Enter the one on the north.
Defeat the two dodongo snakes in this room by feeding them three bombs each.

You must place the bomb in front of them right before they open their mouth and move forward or they will avoid it. They will leave fairies behind and open a portal upon defeat. Enter the room on the right.
Walk through the path until you reach the end. Push the block on your left then push the other block upwards and open the chest containing the Pegasus Boots.

Press L or ZL button to dash and break the crystal-like objects blocking the path at the bottom of your screen. Push the block away and exit south.
Blow up the wall on the right between the two candlesticks and proceed. Jump over the huge gap by dashing and using Roc's Feather near the edge. Climb the stairs at the top right and proceed north. Dash and jump again over this gap to reach the chest containing the Nightmare Key.

Jump off to the left and proceed north. Defeat all the enemies here to open the door on the left before entering it. Blow up the wall near the shrouded stalfos to reveal a secret room.

Defeat all the bombites inside and pick up the small key that will fall down. Reload your autosave slot.
Back at the entrance, move north and travel through the narrow path on the left. Continue until you reach the northernmost room. Ignore the chest here, push away the block, then enter the room south.
Defeat the enemies here and loot the chest for 300 rupees. Reload your autosave slot again.
This time, enter the room on the right. Use a dash attack to destroy the vacuum mouth and get another small key from the chest. Go back to the entrance and use the blue portal.
Enter through the door on the bottom of your screen then through the door left of the next room. Defeat the enemies here for a small key. You can defeat the pairodds with dash attacks.
Go back to the previous room and use a small key on the locked block nearest to you. Proceed to the newly opened path while unlocking more locked blocks until you reach a staircase and descend.
Below, dash attack the large red thwomp to make it go down. Continue moving to the right, use a dash jump over the spikes, then climb down the ladder.
Defeat all the pairodds to unlock the door on the left, then proceed. Move through the conveyor belts and enter the Nightmare Lair where you will face Slime Eye.

Upon entering the room, dash to a wall to make Slime Eye appear. This battle can be won very easily and quickly. Immediately slash its eye so that it will try to split in two. Slash it three more times then dash through its center to separate them. Focus on taking down one of them before moving on to the other.
After the battle, pick up the Heart Container that will appear. Continue to the next room and get the Sea Lily's Bell to complete the dungeon.


| Speedrun Guides | |
|---|---|
| Speedrun Guide (Any%) | Speedrun Guide (100%) |
| Movement Information and Tips | Speedrunning Techniques and Glitches |
| Shortcuts and Skips | - |
The Legend of Zelda: Link's Awakening Walkthrough & Guides Wiki
Part 3 - Key Cavern Speedrun (100%)

Honkai: Star Rail Walkthrough & Guides Wiki

Genshin Impact Walkthrough & Guides Wiki

FF7 Rebirth Walkthrough & Guides Wiki

Pokemon Scarlet and Violet (SV) Walkthrough & Guides Wiki

Palworld Walkthrough & Guides Wiki

Dragon's Dogma 2 (DD2) Walkthrough & Guides Wiki

Persona 3 Reload Walkthrough & Guides Wiki

Monster Hunter Rise: Sunbreak Walkthrough & Guides Wiki

Pokemon UNITE Walkthrough & Guides Wiki

Fire Emblem Heroes (FEH) Walkthrough & Guides Wiki

Elden Ring Walkthrough & Guides Wiki

Hyrule Warriors: Age of Calamity Walkthrough & Guides Wiki

New Pokemon Snap Walkthrough & Guides Wiki

Pokemon Legends: Arceus Walkthrough & Guides Wiki

Super Smash Bros. Ultimate Walkthrough & Guides Wiki

FF7 Remake Walkthrough & Guides Wiki

The Legend of Zelda: Breath of the Wild Walkthrough & Guides Wiki
© 1993-2019 Nintendo
The copyrights of videos of games used in our content and other intellectual property rights belong to the provider of the game.
The contents we provide on this site were created personally by members of the Game8 editorial department.
We refuse the right to reuse or repost content taken without our permission such as data or images to other sites.